There’s something about the scent of simmering apples with cinnamon that instantly feels like home. Whether you’re baking a holiday pie, crafting cozy fall desserts, or just want a warm topping for oatmeal, nothing beats homemade apple pie filling. Forget the overly sweet canned versions—this easy, freezer-friendly recipe is made from real ingredients and packed with apple flavor. In this guide, we’ll cover everything from the best apples to use to storing tips and creative ways to serve it.
Looking for inspiration? Try our apple crisp mini cheesecakes—they’re the perfect match for this filling.
JUMP TO
Table of Contents
Why Homemade Apple Pie Filling Is Worth It
Making your own apple pie filling from scratch isn’t just about flavor—it’s about control, freshness, and that unbeatable homemade quality. If you’ve only ever used the store-bought kind, you’re in for a treat.
The Downside of Store-Bought Pie Filling
Canned apple pie filling may seem convenient, but it’s often overly sweet, overly processed, and lacking that real fruit texture. Many brands rely heavily on syrups, preservatives, and artificial thickeners. The result? A gloopy mess that barely resembles fresh apples.
Benefits of Making It Yourself
Homemade gives you full control over:
- Sweetness – You decide how much sugar to use.
- Texture – Slice apples thick or thin, soft or slightly crisp.
- Flavor – Adjust cinnamon, add nutmeg, or include a splash of vanilla or bourbon.
- Freshness – No preservatives, no mystery ingredients.
Beyond just taste, it’s a healthier and more budget-friendly option, especially during apple season.
Common Uses Beyond Pie
Sure, it’s made for pie, but this versatile apple filling can do so much more:
- Spoon it over waffles or pancakes
- Use as a warm topping for vanilla ice cream
- Stir it into yogurt or oatmeal
- Fill puff pastry, galettes, or hand pies
Check out our apple crumb cake recipe for another delicious way to enjoy it.
Choosing the Right Apples for Pie Perfection
Your apple choice can make or break the texture and flavor of your filling. Not all apples behave the same when cooked, and knowing the difference matters.
Best Apple Varieties for Filling (Firm vs. Soft)
For a firm, never-mushy result, opt for apples that hold their shape. Here are the top picks:
- Granny Smith – Tart, firm, and perfect for balancing sweetness
- Honeycrisp – Crisp texture with a juicy, sweet bite
- Fuji – Naturally sweet and firm
- Pink Lady – A balanced mix of sweet and tart, holds up well
Avoid soft varieties like:
- McIntosh
- Golden Delicious
- Gala
- Cortland
These tend to break down too quickly, especially if you plan to bake the filling later.
Flavor Pairings: Tart vs. Sweet Apples
Mixing tart and sweet apples brings depth to the filling. For example:
- Combine Granny Smith + Honeycrisp
- Or try Pink Lady + Fuji
This balance keeps the flavor from being one-note and enhances the complexity.
Discover great ideas like our salted caramel apple pie bars where that flavor balance shines.
Mistakes to Avoid When Selecting Apples
- Using all soft apples: Leads to a mushy filling
- Not peeling the apples: Peels turn chewy and rubbery
- Uneven slicing: Thinner slices cook faster, creating inconsistency
To keep the texture just right, slice apples evenly—about ¼ inch thick—and always peel them.
Don’t miss our apple butter latte recipe for a warm, spiced drink to enjoy alongside your pie.
Ingredients That Make All the Difference
Every element in this homemade apple pie filling recipe plays a role in building rich flavor and the perfect texture. Let’s break down what you’ll need and why it matters.
The Role of Brown Sugar and Cinnamon
Brown sugar isn’t just about sweetness—it adds a deep, caramel-like richness that elevates the entire filling. A mix of granulated sugar and light or dark brown sugar strikes the ideal balance. Meanwhile, ground cinnamon ties it all together with warmth and spice that feels like fall in every bite.
Want to switch things up? Add a pinch of nutmeg, allspice, or even cardamom for a more complex spice profile.
Butter vs. Oil for Richness
Unsalted butter is the secret to that silky, luscious texture. When the apples simmer in butter, they absorb richness and develop a buttery glaze that oil simply can’t replicate.
Plus, butter helps blend the sugars and spices smoothly into the apple juices as they cook down.
How Lemon Juice Balances the Sweetness
A touch of fresh lemon juice brightens the flavor and prevents the apples from browning too quickly. More importantly, it helps balance the sugars, keeping the filling from becoming overly sweet.
Bottled lemon juice works in a pinch, but freshly squeezed is always better for flavor and aroma.
Cornstarch vs. Other Thickeners
Thickening the filling is key to avoiding a runny mess in your pie crust. The best option?
A cornstarch slurry—made by whisking water and cornstarch together before adding it to the apple mixture.
Why cornstarch?
- It creates a glossy finish
- It thickens quickly (within 1–2 minutes)
- It doesn’t affect the flavor
Alternatives:
- All-purpose flour – Less glossy, more cloudy
- Tapioca starch – Works well, but can be trickier to measure
Looking for inspiration? Try this unique twist: apple oreo balls recipe—a playful dessert using cooked apples.
Step-by-Step Guide to Making Apple Pie Filling
Now that you’ve got your ingredients lined up, here’s exactly how to bring them together for a perfect apple pie filling that works for pies, crisps, and more.
Prepping the Apples Properly
- Peel and core your apples first—apple skins become chewy when cooked.
- Slice into uniform ¼-inch pieces or dice into ½-inch cubes for hand pies.
- Toss slices with lemon juice immediately to prevent browning.
Simmering Tips for Perfect Texture
- Toss the apple slices with both sugars and cinnamon in a large bowl.
- In a large skillet or pot, melt the butter over medium-high heat.
- Add the apple mixture and cook, stirring often, until juices start to release—about 2 minutes.
- Cover and reduce the heat. Let them cook for 7–8 minutes, until tender but not mushy.
Pro tip: Use a mix of tart and sweet apples to keep the flavor dynamic and prevent sogginess.
When and How to Add the Cornstarch Slurry
- In a small bowl, whisk 6 tablespoons cornstarch with ½ cup water until smooth.
- Once apples are softened, pour in the slurry and stir gently.
- Simmer for just 1–2 minutes, until the mixture thickens and becomes glossy.
- Remove from heat and let cool fully before storing or using.
Check out our easy and comforting applesauce cake with cinnamon cream cheese frosting to use up any leftover apples.
Troubleshooting Mushy or Runny Filling
Common mistake #1: Overcooking the apples
Solution: Remove from heat as soon as they’re tender, and let the residual heat finish the cooking.
Common mistake #2: Using soft apple varieties
Solution: Stick with firm apples like Honeycrisp, Fuji, or Granny Smith to hold shape during cooking.
Common mistake #3: Adding thickener too early
Solution: Only add the cornstarch slurry after apples are mostly cooked to avoid burning or clumping.
How to Store and Freeze Apple Pie Filling
Once your filling is made, storing it correctly ensures that you keep the texture and flavor intact for days (or even months) to come.
Best Practices for Refrigeration
If you’re planning to use the filling within a few days, store it in the fridge:
- Let the filling cool completely to room temperature before storing.
- Use an airtight container to prevent it from absorbing odors.
- It will stay fresh for up to 4 days in the refrigerator.
Pro tip: If you’re baking a pie, using cooled filling prevents a soggy bottom crust.
Freezer Tips: Containers, Thawing & Duration
Want to prep ahead for the holidays? Freeze your filling! Here’s how:
- Cool it completely before freezing.
- Store in freezer-safe zip-top bags or containers.
- Label with the date and freeze flat for easier stacking.
It will last up to 3 months in the freezer. When ready to use, thaw overnight in the fridge.
Reheating Without Losing Texture
To reheat:
- Gently warm in a saucepan over medium-low heat.
- Stir frequently to prevent scorching.
- Add a splash of water or apple juice if it’s too thick after thawing.
Creative Ways to Use Apple Pie Filling (Beyond Pie)
Homemade apple pie filling is more than just for pies—it’s the ultimate fall-flavored multitasker.
Breakfast Recipes Using Apple Filling
- Apple oatmeal bowls – Stir into warm oats or overnight oats
- Apple waffles or pancakes – Use as a warm topping with maple syrup
- Stuffed French toast – Fill thick slices of bread for a cozy brunch
Looking for more apple-themed delights? Check out this delicious apple cinnamon blondies with maple cream.
Desserts You Didn’t Know You Could Make
- Apple turnovers or hand pies
- Mini cheesecakes with apple topping
- Apple crumble or cobbler with streusel
- Ice cream topping with caramel drizzle
Savory Twists and Holiday-Inspired Dishes
- Serve alongside pork chops or roasted chicken
- Use in a stuffed acorn squash for a festive side
- Add to a holiday charcuterie board for a sweet touch

FAQ About Apple Pie Filling
Can you freeze apple pie filling?
Yes! Let it cool completely and store in a freezer-safe container. It lasts up to 3 months. Thaw overnight in the fridge before using.
What apples should I avoid?
Avoid soft apples like McIntosh, Gala, or Golden Delicious. These tend to break down and create a mushy texture.
Will the filling thicken more when baked?
Absolutely. If you’re using it in a pie or pastry, the additional baking time helps thicken the filling even more.
How long does it last in the fridge?
Stored in an airtight container, your homemade apple pie filling will keep for up to 4 days in the refrigerator.
What’s the best way to sweeten it naturally?
You can reduce or replace sugar with maple syrup, honey, or apple juice. Just adjust the liquid content accordingly.
Conclusion: Master the Art of Homemade Apple Pie Filling
From flavor to texture, homemade apple pie filling far outshines the canned version in every way. With just a handful of pantry staples, fresh apples, and 20 minutes of your time, you can craft a filling that elevates every dessert or breakfast dish you pair it with. Remember to use firm apples, don’t rush the cooking process, and always cool before storing or baking.
Don’t miss our apple pie moonshine recipe if you’re ready to take your apple obsession to a whole new level.
PrintApple Pie Filling
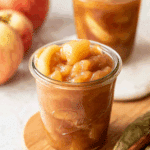
This homemade apple pie filling is rich, flavorful, and easy to make with fresh apples, cinnamon, butter, and brown sugar. Perfect for pies, desserts, or as a topping, it’s freezer-friendly and much better than the canned version.
- Prep Time: 10 minutes
- Cook Time: 10 minutes
- Total Time: 20 minutes
- Yield: 6 cups 1x
- Category: Dessert
- Method: Stovetop
- Cuisine: American
- Diet: Vegetarian
Ingredients
- 8 medium apples, peeled, cored, and sliced (3 pounds / 1.35kg)
- 1/3 cup lemon juice (80mL)
- 2/3 cup granulated sugar (133g)
- 2/3 cup brown sugar, light or dark (140g)
- 1/2 cup unsalted butter (113g)
- 2 teaspoons ground cinnamon
- 6 tablespoons cornstarch
- 1/2 cup water (120mL)
Instructions
- In a large mixing bowl, toss the apple slices with lemon juice.
- Add the granulated sugar, brown sugar, and cinnamon, then toss to combine.
- In a large skillet, melt the butter over medium-high heat.
- Add the apples and cook, stirring, until the sugar dissolves and the mixture begins to simmer (about 2 minutes).
- Cover, reduce the heat to medium-low, and cook until the apples soften and release most of their juices (about 7 minutes).
- In a medium bowl, whisk together the cornstarch and water to make a slurry.
- Add the cornstarch slurry to the apples and cook for 1 to 2 minutes, stirring frequently, until the mixture thickens.
- Remove from heat and let cool completely before storing or using.
Notes
- Use a mix of tart and sweet apples for the best flavor.
- Always cool filling before adding to pie crust to avoid soggy bottoms.
- Freeze in flat, freezer-safe bags for up to 3 months.
- Reheat gently over medium-low heat with a splash of water if needed.
- Try adding vanilla or warm spices like nutmeg for variation.
Nutrition
- Serving Size: 1 cup
- Calories: 475
- Sugar: 71g
- Sodium: 13mg
- Fat: 16g
- Saturated Fat: 10g
- Unsaturated Fat: 5g
- Trans Fat: 1g
- Carbohydrates: 88g
- Fiber: 6g
- Protein: 1g
- Cholesterol: 41mg