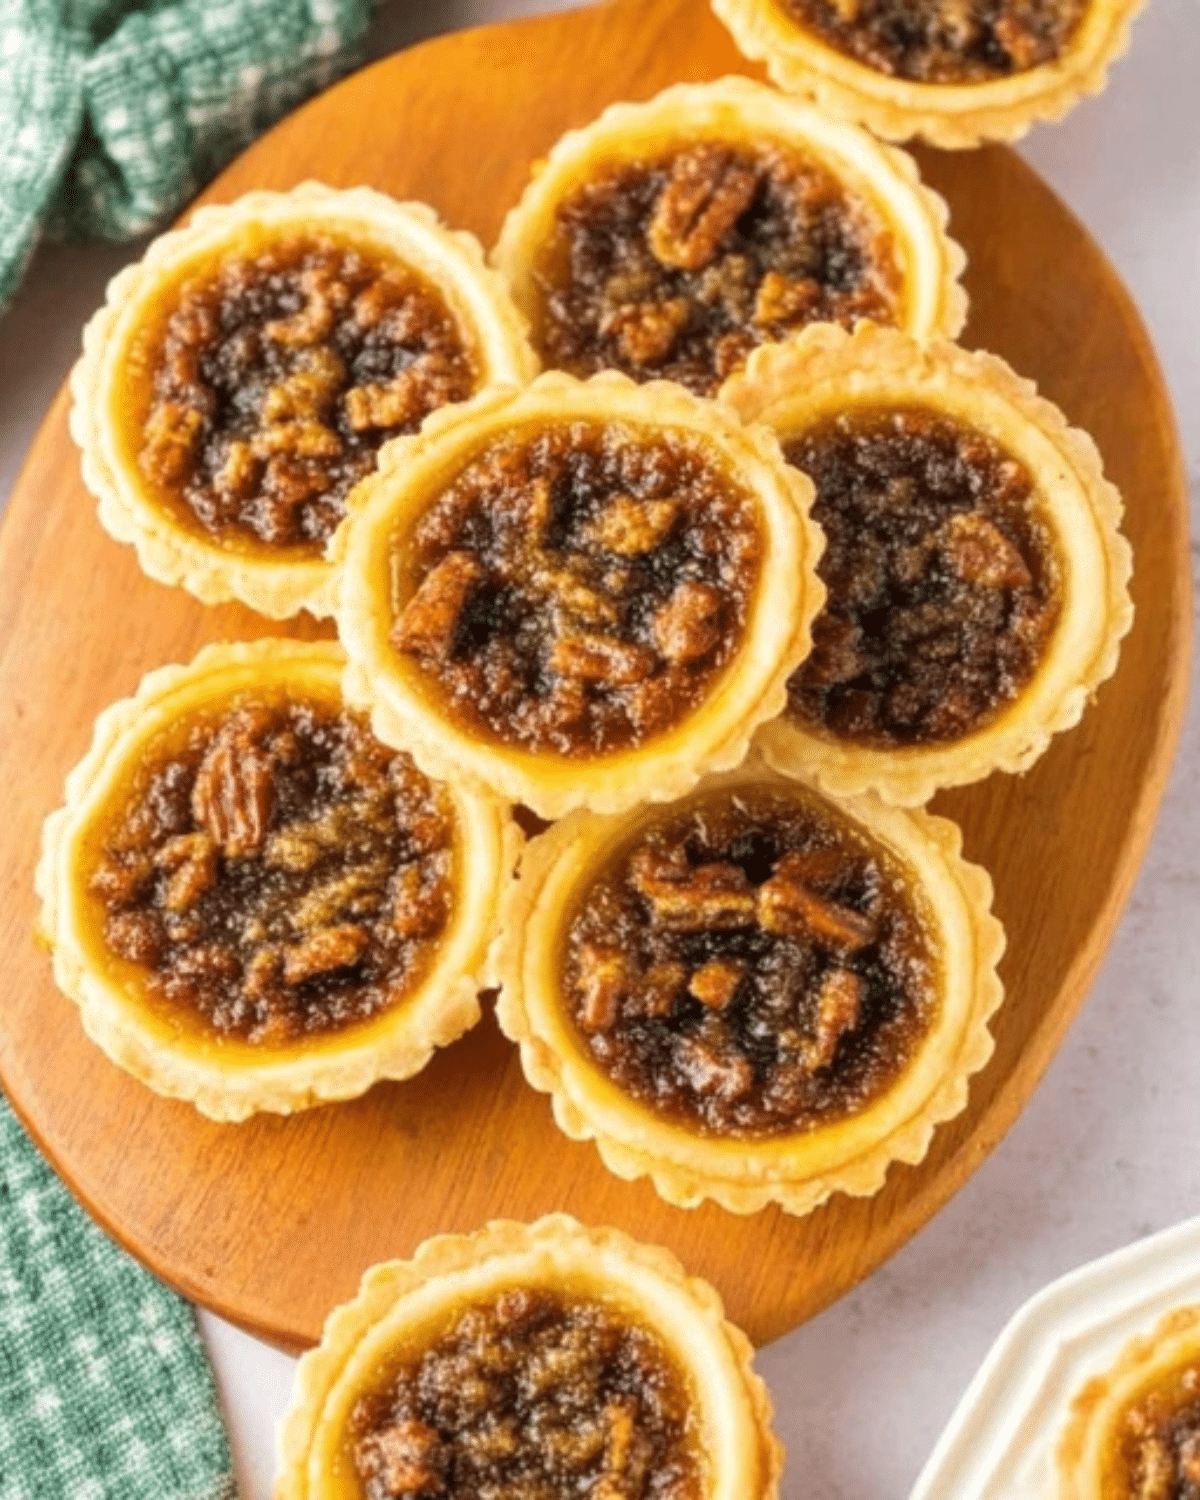
Few desserts capture the heart of Canadian baking traditions like butter tarts. These golden, flaky pastries with a gooey, caramel-like filling are pure comfort in every bite. With a crisp, buttery shell and sweet, syrupy center, they’ve been a staple in Canadian kitchens for over a century — and for good reason.
Butter tarts are beloved for their perfect balance of textures: crisp on the outside and soft, sweet, and slightly sticky on the inside. Some prefer their filling runny and rich, while others like it set and chewy. Either way, this classic dessert delivers pure homemade nostalgia with every bite.
Whether you’re a lifelong fan or trying them for the first time, making butter tarts from scratch is easier than you might think. With a handful of simple ingredients — butter, brown sugar, eggs, and syrup — you can whip up a batch that tastes like it came straight from a cozy bakery.
JUMP TO
Table of Contents
What Are Butter Tarts?
The Origins of Butter Tarts
Butter tarts are one of Canada’s most iconic desserts, believed to have originated in Ontario in the early 1900s. The earliest known recipe appeared in a women’s cookbook in Barrie, Ontario, and since then, they’ve become a treasured part of Canadian heritage.
These tarts are often passed down through generations, each family having their own secret twist — some add raisins or nuts, others prefer the filling smooth and simple. No matter the variation, the combination of buttery pastry and caramel-like filling remains the soul of the dessert.
Over the years, butter tarts have grown beyond Canada’s borders, gaining fans worldwide for their simplicity and decadent flavor. Many compare them to pecan pies or treacle tarts, but true butter tarts have their own unique charm: sweet but not cloying, rich yet light enough to enjoy anytime.
What Makes Them So Special
What makes butter tarts irresistible is the contrast in every bite. The shell is buttery, flaky, and crisp, while the center is soft, gooey, and just a little sticky. Depending on your preference, you can make the filling slightly runny or firm and chewy by adjusting the baking time and syrup ratio.
Traditional recipes use corn syrup for the filling, but maple syrup adds a deeper, more authentic Canadian flavor. Add-ins like raisins, pecans, or walnuts can create your own signature twist while staying true to the classic dessert’s roots.
Butter tarts aren’t just another pastry — they’re a slice of history and tradition, connecting generations through a shared love of baking. Whether enjoyed during holidays, bake sales, or afternoon tea, they never fail to bring smiles and sweet memories to the table.
Ingredients You’ll Need for Homemade Butter Tarts

Making traditional butter tarts from scratch is surprisingly simple. With just a few pantry staples and the right balance of sweetness and texture, you can create this Canadian classic right in your kitchen.
For the Pastry Crust
The secret to perfect butter tarts starts with a light, flaky pastry shell. Here’s what you’ll need:
| Ingredient | Quantity | Notes |
|---|---|---|
| All-purpose flour | 2 cups | Gives structure and crispness |
| Unsalted butter | ¾ cup, cold and cubed | Creates flaky layers |
| Salt | ¼ teaspoon | Enhances flavor |
| Ice water | 4–5 tablespoons | Brings dough together |
Pro Tip: Keep your butter cold for maximum flakiness. A few visible butter pieces in your dough are a good sign — they’ll melt during baking, forming perfect pastry layers.
For the Filling
The filling is what makes butter tarts truly addictive — smooth, buttery, and just the right amount of sweet.
| Ingredient | Quantity | Notes |
|---|---|---|
| Brown sugar | 1 cup, packed | Adds caramel flavor |
| Unsalted butter | ½ cup, melted | Provides richness |
| Eggs | 2 large | Creates structure and stability |
| Vanilla extract | 1 teaspoon | Adds depth of flavor |
| Corn syrup or maple syrup | ½ cup | For sweetness and smooth texture |
| Salt | ¼ teaspoon | Balances sweetness |
Optional Add-Ins
You can keep your butter tarts plain for a classic flavor or mix in some extras for added texture and flavor:
- Raisins or currants – for a traditional touch
- Chopped pecans or walnuts – for crunch and nutty flavor
- Chocolate chips – for a modern twist
Mix-ins can be stirred into the filling or placed directly in the tart shells before adding the filling.
Step-by-Step Guide: How to Make Perfect Butter Tarts
Step 1 – Prepare the Pastry
- In a large bowl, mix flour and salt.
- Cut in the cold butter using a pastry cutter or your fingertips until the mixture resembles coarse crumbs.
- Gradually add ice water, 1 tablespoon at a time, mixing until the dough holds together.
- Form the dough into a ball, wrap it in plastic wrap, and refrigerate for at least 30 minutes.
- On a lightly floured surface, roll out the chilled dough to about ⅛ inch thick. Cut into circles using a round cutter (about 4 inches in diameter).
- Press each circle gently into a muffin tin or tart shell mold.
Step 2 – Make the Filling
- Preheat your oven to 375°F (190°C).
- In a mixing bowl, whisk together melted butter, brown sugar, corn syrup (or maple syrup), eggs, vanilla, and salt until smooth and glossy.
- If using raisins or nuts, place a few in the bottom of each tart shell.
- Spoon the filling into each shell, filling only two-thirds full to prevent overflow during baking.
Step 3 – Bake the Butter Tarts
- Bake for 18–22 minutes, or until the filling bubbles and the edges of the pastry are golden.
- For a runnier filling, remove from the oven sooner (around 18 minutes).
- For a firmer filling, bake a few minutes longer.
- Allow to cool in the pan for 10 minutes before transferring to a wire rack.
Step 4 – Cool and Serve
Let your butter tarts cool completely before serving. The filling will thicken slightly as it cools, giving you that perfect balance of gooey and chewy.
Serve them warm or at room temperature with a cup of tea, coffee, or even a scoop of vanilla ice cream for an indulgent treat.
Expert Tips for the Best Butter Tarts
Baking perfect butter tarts takes a little patience, but with these tried-and-true tips, you’ll master them every time.
Choosing the Right Syrup
Both corn syrup and maple syrup work beautifully, but each gives a different texture. Corn syrup makes the filling thicker and chewier, while maple syrup creates a slightly runnier filling with a richer flavor. For the most authentic Canadian version, maple syrup is the winner.
Preventing Overflow
Butter tart filling can bubble up while baking, especially if you overfill the shells. To prevent overflow:
- Fill only two-thirds full.
- Bake on a lined baking sheet to catch any spills.
- Chill the filled tart shells in the fridge for 10 minutes before baking — it helps the filling set more evenly.
Texture Control
Prefer a gooier center? Bake for about 18 minutes. Want a firmer, more caramelized texture? Extend baking by 3–5 minutes. The difference in texture comes from how long the sugar and syrup have to thicken in the oven, so it’s easy to tweak.
Butter Tart Variations You’ll Love
The beauty of butter tarts is that they’re endlessly customizable. Once you’ve mastered the base recipe, try one of these flavorful variations.
Classic Raisin Butter Tarts
The most traditional version — sweet, sticky, and dotted with plump raisins that caramelize beautifully in the oven. So simple yet timeless.
Maple Pecan Butter Tarts
Swap raisins for chopped pecans and use maple syrup instead of corn syrup for a nutty, rich filling that’s perfect for autumn or holiday baking.
Chocolate Chip Butter Tarts
Add a handful of mini chocolate chips to the filling for a fun modern twist. The chocolate melts into the syrupy filling, creating a dessert that’s both gooey and indulgent.
Coconut Butter Tarts
Stir in shredded coconut for a tropical flavor boost and extra chewiness. Ideal if you love texture in your desserts.
How to Serve and Store Butter Tarts
Serving Suggestions
Butter tarts taste best slightly warm, allowing the filling to reach its perfect gooey consistency. Serve them on their own, or dress them up with a scoop of vanilla ice cream or a drizzle of caramel sauce for an extra-decadent treat.
They also make a great addition to dessert tables, afternoon tea spreads, or holiday gatherings — small enough to enjoy without feeling too heavy.
Storage and Freezing
Store cooled butter tarts in an airtight container at room temperature for up to 3 days or in the refrigerator for up to a week.
To freeze, place cooled tarts in a single layer on a tray, freeze until solid, then transfer to a freezer bag or airtight container. They’ll keep for up to 3 months. Thaw at room temperature or reheat in a 300°F oven for 5–10 minutes before serving.
FAQ About Butter Tarts
Can I make butter tarts ahead of time?
Yes! You can make both the pastry dough and filling in advance. Store the dough in the fridge for up to 3 days or freeze it for up to 3 months. The baked tarts also keep well, making them perfect for prepping before holidays or events.
Why did my filling overflow?
Overflow usually happens if the tarts are overfilled or baked at too high a temperature. Always fill the shells two-thirds full and bake at 375°F for best results.
Can I freeze butter tarts?
Absolutely! Butter tarts freeze very well. Just cool them completely before freezing, and they’ll taste just as fresh once thawed and lightly reheated.
How do I make gluten-free butter tarts?
Simply use a 1:1 gluten-free flour blend for the crust. The filling is already gluten-free, so no other adjustments are needed.
Conclusion – Why Butter Tarts Deserve a Spot in Every Kitchen
Few desserts are as simple yet satisfying as homemade butter tarts. With their buttery pastry crust, sweet caramelized filling, and just-right gooeyness, they embody everything we love about home baking — warmth, nostalgia, and pure indulgence.
They’re easy to customize, freeze beautifully, and always impress, whether you’re baking for family, friends, or special occasions. So grab your mixing bowl and rolling pin — once you’ve tried these classic butter tarts, they’ll become a permanent part of your dessert rotation.
PrintButter Tarts: The Best Easy Homemade Recipe

Classic Canadian butter tarts made with a flaky homemade pastry crust and a rich, gooey caramel-like filling. These sweet treats are a perfect balance of buttery, crisp pastry and a soft, syrupy center — a timeless dessert everyone will love.
- Prep Time: 25 minutes
- Cook Time: 22 minutes
- Total Time: 47 minutes
- Yield: 12 butter tarts
- Category: Dessert
- Method: Baking
- Cuisine: Canadian
- Diet: Vegetarian
Ingredients
- 2 cups all-purpose flour
- 3/4 cup unsalted butter, cold and cubed
- 1/4 teaspoon salt
- 4–5 tablespoons ice water
- 1 cup packed brown sugar
- 1/2 cup unsalted butter, melted
- 2 large eggs
- 1 teaspoon vanilla extract
- 1/2 cup corn syrup or maple syrup
- 1/4 teaspoon salt
- 1/2 cup raisins, pecans, or walnuts (optional)
Instructions
- In a large bowl, combine flour and salt. Cut in the cold butter until the mixture resembles coarse crumbs. Gradually add ice water until dough comes together.
- Shape dough into a ball, wrap in plastic wrap, and refrigerate for 30 minutes.
- On a lightly floured surface, roll out dough to 1/8-inch thickness. Cut circles about 4 inches in diameter and press into muffin tins or tart shells.
- Preheat oven to 375°F (190°C).
- In a medium bowl, whisk together melted butter, brown sugar, syrup, eggs, vanilla, and salt until smooth.
- If using raisins or nuts, place a few in the bottom of each shell. Fill tart shells two-thirds full with filling.
- Bake for 18–22 minutes, until the pastry is golden and filling is bubbling. For a runnier center, bake closer to 18 minutes; for a firmer filling, bake up to 22 minutes.
- Cool in pan for 10 minutes, then transfer to a wire rack. Serve warm or at room temperature.
Notes
- Use maple syrup for an authentic Canadian flavor and a slightly runnier texture.
- To prevent overflow, fill only two-thirds full and bake on a lined baking sheet.
- For gluten-free butter tarts, substitute a 1:1 gluten-free flour blend.
- To freeze, cool completely and store in an airtight container for up to 3 months.
- Reheat in a 300°F oven for 5–10 minutes for a just-baked taste.