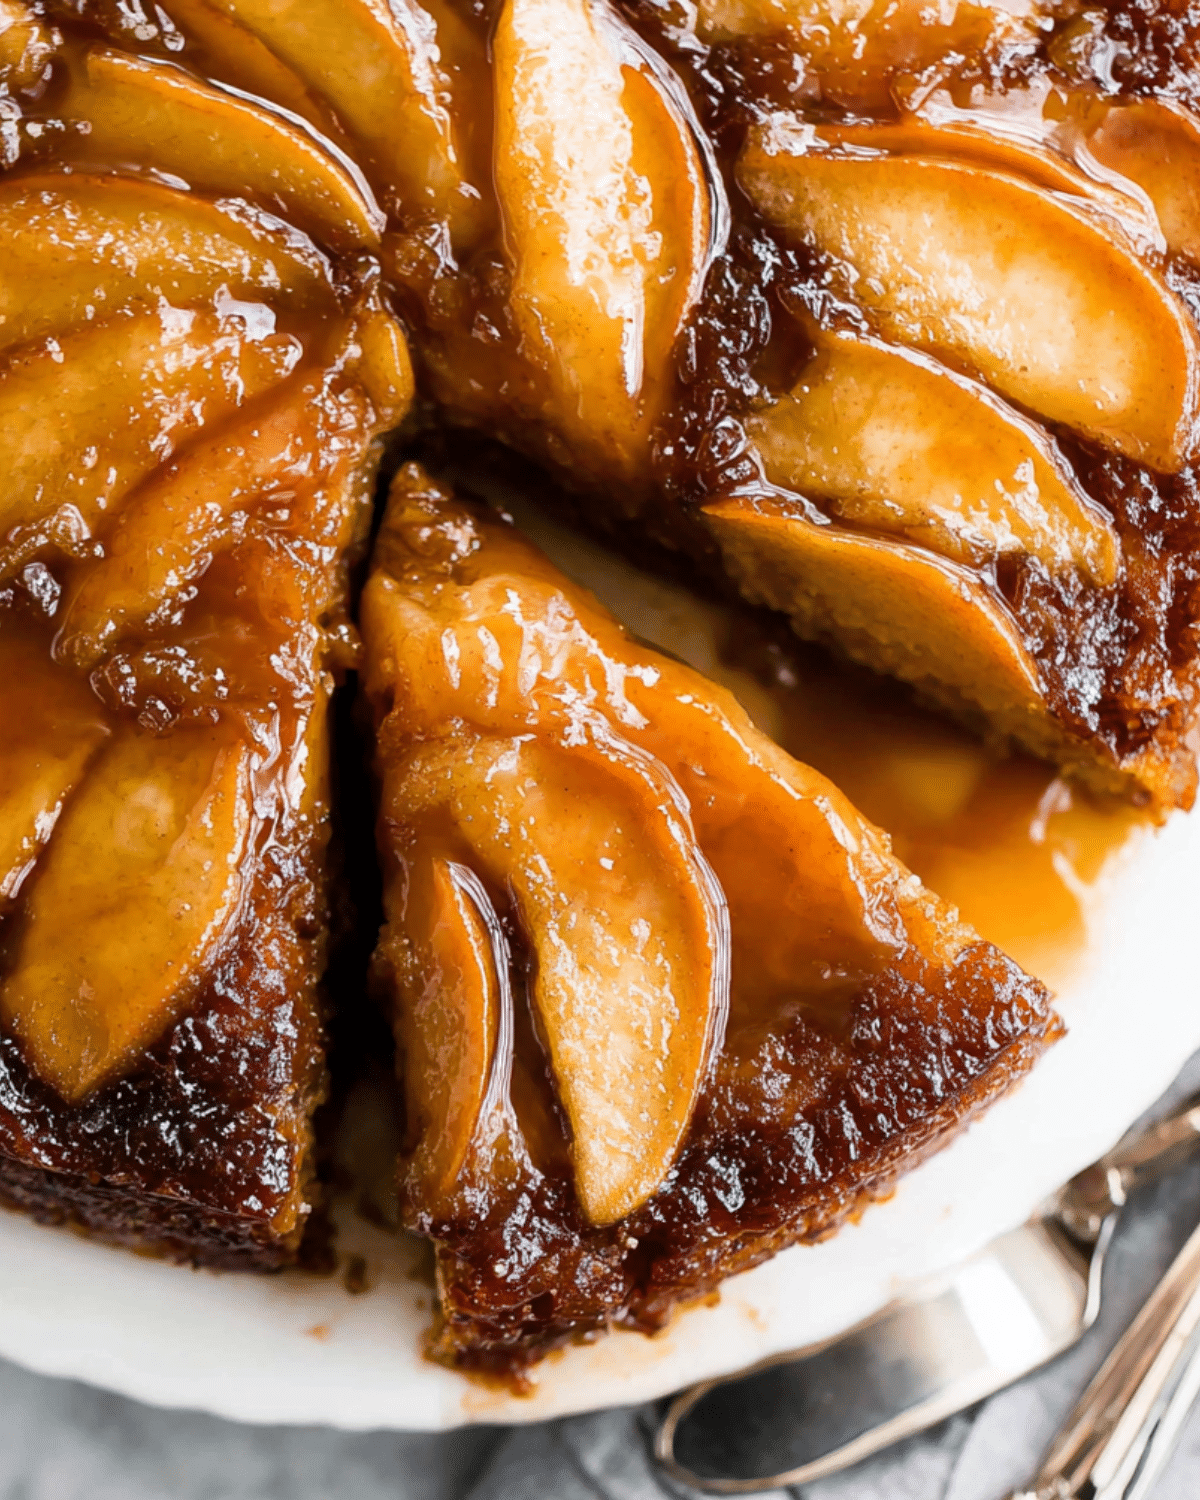
Fall brings crisp air, colorful leaves, and the irresistible aroma of spiced apple desserts drifting from the kitchen. If you’re looking for a dessert that combines seasonal flavor with old-fashioned comfort, Caramel Apple Upside-Down Cake is your must-bake treat. This deliciously moist, cinnamon-spiced cake flips tradition (and itself) by featuring buttery caramelized apples on top after baking. No frosting needed—the beauty is baked right in. This article dives into everything you need to know, from choosing the best apples and caramel techniques to baking tips and irresistible variations. Don’t miss our Apple Crumb Cake for another fall favorite worth trying.
JUMP TO
Table of Contents
Why This Caramel Apple Upside-Down Cake Deserves a Spot on Your Table
The magic of upside-down cakes
Upside-down cakes have a retro charm that never goes out of style. With their rich, sticky topping baked at the bottom and flipped post-bake, they’re as eye-catching as they are flavorful. Unlike standard frosted cakes, the upside-down method ensures moisture seeps into every bite, especially with juicy apples and warm caramel.
How caramel enhances apple desserts
Caramel and apples are a match made in dessert heaven. The brown sugar and butter melt together to form a sweet sauce that coats the apples during baking. When the cake is flipped, this golden topping becomes the star. The caramel also soaks slightly into the cake, infusing it with deep, buttery notes that elevate this simple treat to something special.
What makes this version stand out from traditional apple cakes
Unlike standard apple cakes that mix fruit into the batter, this version places thinly sliced apples right at the top—well, technically, the bottom while baking. The result? A dessert that’s part cobbler, part cake, and entirely unforgettable. Its tender crumb holds up to the weight of the fruit without getting soggy, and the presentation looks gourmet without any extra decorating.
Reader-loved and season-approved
This cake isn’t just beautiful—it’s been loved by home bakers for years. It uses simple pantry ingredients, doesn’t require any advanced baking skills, and is perfect for everything from casual dinners to Thanksgiving dessert tables. Discover great ideas like our Salted Caramel Apple Pie Bars if you’re craving even more cozy flavor combinations.
Choosing the Right Ingredients for the Best Texture and Flavor
Best apple varieties for upside-down cake
Choosing the right apples makes all the difference. Go for firm, slightly tart varieties like Granny Smith, Honeycrisp, or Fuji. These hold their shape during baking and balance the sweetness of the caramel. Avoid softer apples like Red Delicious, which can break down and turn mushy.
| Apple Type | Flavor Profile | Best For Upside-Down Cake |
|---|---|---|
| Granny Smith | Tart, crisp | ✅ Excellent choice |
| Honeycrisp | Sweet-tart, juicy | ✅ Great texture & flavor |
| Fuji | Very sweet, crisp | ✅ Holds shape well |
| Red Delicious | Mild, soft | ❌ Too mushy when baked |
Check out our Cinnamon Apple Bread to explore other ways to bake with your favorite apple varieties.
Brown sugar vs. white sugar: which gives better caramelization?
When it comes to caramel, brown sugar wins every time. The molasses in brown sugar deepens the flavor and color of the caramel topping. While some recipes mix in granulated sugar, this one sticks to brown for its rich, toffee-like notes that pair beautifully with apples.
Choosing between butter and oil in the cake base
This recipe sticks with butter for richness and flavor, especially since it’s already in the topping. Butter helps the crumb stay tender and adds a slight nutty depth. Oil would create a lighter texture but lacks the rich taste needed to balance the bold topping.
Enhancing flavor with cinnamon, nutmeg, and vanilla
Spices are key to making this cake smell and taste like fall. A blend of cinnamon and nutmeg gives the cake a cozy warmth, while vanilla extract adds balance. Don’t overdo the spices though—too much cinnamon can overpower the delicate apple notes.
If you’re looking for more unique takes, don’t miss our Apple Crisp Mini Cheesecakes that blend creamy and crunchy textures.
The Secret to Perfect Caramelized Apples on Top
Cooked caramel vs. dump-and-bake: what works best?
Some upside-down cakes just toss butter and sugar into the pan, but this method cooks the caramel on the stovetop first. Why? It intensifies the flavor, thickens the texture slightly, and creates that rich, glossy coating that makes the apples shine. The extra minute is well worth it.
Layering the apples: aesthetics vs. function
Arrange the apple slices in a tight, overlapping spiral or rows. Not only does it look beautiful when flipped, but it also ensures the apples cook evenly. The tighter the layering, the more apples you can fit—no one complains about extra caramelized fruit.
Why slice thickness matters in bake time and texture
Aim for ¼-inch thick slices. Thinner slices melt into the caramel too quickly, while thicker ones stay crunchy and undercooked. Uniform slices help ensure even baking and that the fruit becomes perfectly tender without falling apart.
Looking for inspiration? Try our Apple Oreo Balls for another twist on apple-based desserts.
Step-by-Step: How to Make Caramel Apple Upside-Down Cake Like a Pro
Prep and Set the Topping for Maximum Caramel Flavor
Making stovetop caramel the right way
To create that sticky, buttery layer that defines upside-down cake, start by melting unsalted butter and brown sugar together in a small saucepan. Stir constantly until the sugar dissolves and the mixture bubbles gently—about one minute is all it takes. Remove it from the heat, add vanilla and a pinch of cinnamon, and immediately pour it into your cake pan. This quick stovetop caramel deepens the flavor and sets a rich base for the apples.
Best pan shapes and materials for even caramelization
Use a 9×2 inch round cake pan or deep pie dish—just make sure it’s at least 2 inches deep to prevent overflow. Glass or ceramic dishes conduct heat evenly and allow the sugars to caramelize slowly without burning. Place the pan in the fridge for 10–15 minutes while you prep the batter. This helps the apple layout stay in place during baking.
Arranging the apples without gaps or overlaps
After pouring the caramel into the pan, layer your thinly sliced apples in a circular or spiral pattern, slightly overlapping each piece. The goal is maximum coverage, ensuring every slice is blanketed in caramel during baking. Try to pack them in tightly, especially if using juicy apples like Honeycrisp. Discover great ideas like our Bourbon Peach Upside-Down Cake for similar layering inspiration.
Mixing the Batter for Soft, Moist Cake
Why room temperature ingredients matter
Room temperature eggs, butter, and milk make all the difference. They mix more evenly, trap air more efficiently when whipped, and ensure a smooth batter. Cold ingredients can cause curdling or lumpy textures, leading to uneven baking.
Properly creaming butter and sugars
Using a hand or stand mixer, cream the softened butter with granulated and brown sugar until the mixture is fluffy and pale. This should take about 1–2 minutes on high speed. This step creates the foundation for a light yet sturdy crumb that can support the heavy apple topping without becoming dense.
How to avoid overmixing and dense cake
After incorporating the eggs and vanilla, gently mix in the dry ingredients (a blend of all-purpose flour, baking powder, cinnamon, nutmeg, and salt). Alternate with whole milk and stir just until the batter is combined. Do not overmix—this can overdevelop gluten, making the cake chewy instead of tender.
Baking Tips and Cooling Tricks for a Clean Invert
How to prevent burning the top layer
Since the top (which bakes on the bottom) has sugar and butter, it’s prone to browning too fast. About halfway through the bake—20 to 25 minutes in—tent foil loosely over the pan. This shields the top from direct heat while allowing the center to finish baking thoroughly.
Using foil tenting at the right time
Don’t add foil too early or it may collapse onto the batter. Wait until the cake is mostly set and the edges are puffed and golden. A properly timed tent avoids scorching without steaming the batter.
Flipping the cake without sticking or collapsing
After removing the cake from the oven, cool it for 15 minutes in the pan. Run a thin knife around the edges to loosen it, place a serving plate on top, and invert quickly but steadily. The cake should release easily, and the caramel-soaked apples will now glisten on top. Let it cool completely for cleaner slices. Don’t miss our Apple Crumb Cake for another moist apple-forward dessert perfect for slicing and serving.
Serving, Storing & Pairing Ideas to Make It Unforgettable
Serving Suggestions: Elevate the Experience
Best ways to serve: warm, chilled, with ice cream?
This cake is best served slightly warm, when the caramel is still soft and the apples tender. If you love contrast, pair a warm slice with a scoop of vanilla ice cream or a dollop of whipped cream. Chilling the cake firms up the texture and enhances the flavors too, so it’s excellent both ways.
Drizzle toppings: salted caramel, whipped cream, or maple glaze?
Add an extra drizzle of homemade salted caramel for a deeper flavor. You could also whip up a quick maple glaze or top with whipped cream flavored with cinnamon. Each option complements the cake’s spice-forward profile beautifully.
Great pairings: drinks and side ideas
This cake pairs perfectly with hot apple cider, spiced chai, or even a glass of cold milk. For brunch or holiday gatherings, serve it alongside a fruit salad or savory egg dish to balance the sweetness.
Looking for inspiration? Try our Apple Crisp Mini Cheesecakes for another party-friendly apple dessert.
Variations to Try If You Love This Recipe
Add-ins: pecans, raisins, or cranberries
Want a more textured twist? Stir in chopped toasted pecans, plump golden raisins, or even sweet dried cranberries into the batter. These mix-ins bring extra dimension and a holiday flair to your cake without overwhelming the apple flavor.
Spice it up: chai spice or gingerbread twist
If you’re ready to switch up the flavor profile, try substituting the standard cinnamon-nutmeg combo with chai spice or a touch of ground ginger and cloves. These seasonal spices create a deeper, more complex aroma that’s perfect for cooler months.
Gluten-free or dairy-free substitutions
Swap the all-purpose flour for a gluten-free baking mix and use plant-based butter and almond milk to make this cake dairy-free. While the texture may shift slightly, the flavors remain just as cozy and crave-worthy.
Don’t miss our Cinnamon Apple Bread if you’re looking for a quick loaf-style dessert with similar fall flavors.

Frequently Asked Questions (FAQs)
What apples are best for upside-down cakes?
Firm, tart-sweet apples like Granny Smith, Honeycrisp, and Fuji are ideal. They hold their shape and balance the rich caramel topping.
Can I use store-bought caramel instead of making it?
You can, but it won’t develop the same deep, buttery flavor as stovetop caramel. Making your own takes just minutes and makes a big difference in taste.
Why is my cake too dense or dry?
Overmixing the batter or overbaking the cake are common culprits. Stick to the baking time, test with a toothpick, and always use room-temperature ingredients for best results.
How do I keep the apples from sticking to the pan?
The cooked caramel acts as a natural release layer. Be sure to cool the cake slightly (about 15 minutes) and run a knife along the edge before inverting to prevent sticking.
Can I make this ahead of time?
Yes, but presentation may suffer slightly. You can bake it the day before and store it tightly covered at room temperature. Avoid refrigerating as it can make the cake overly dense.
Conclusion: A Fall Classic That Never Fails
The Caramel Apple Upside-Down Cake is more than just a seasonal recipe—it’s a comforting, nostalgic dessert that brings together the warm spices of fall with the rich sweetness of homemade caramel. Whether served at a cozy dinner or your next holiday gathering, this cake delivers both flavor and flair.
Check out our Salted Caramel Apple Pie Bars and Apple Oreo Balls for even more irresistible apple treats that are just as crowd-pleasing.
PrintCaramel Apple Upside-Down Cake

This Caramel Apple Upside-Down Cake is a moist, cinnamon-spiced dessert with a buttery caramelized apple topping. It’s the perfect cozy treat for fall gatherings, made with simple pantry ingredients and no frosting required.
- Prep Time: 25 minutes
- Cook Time: 45 minutes
- Total Time: 1 hour 10 minutes
- Yield: 8 servings
- Category: Dessert
- Method: Baking
- Cuisine: American
- Diet: Vegetarian
Ingredients
- 6 tablespoons (85g) unsalted butter
- 1/2 cup (100g) packed light or dark brown sugar
- 1/4 teaspoon ground cinnamon
- 1/4 teaspoon pure vanilla extract
- 2 medium apples, peeled and sliced into 1/4-inch slices (1.5–2 cups or 188–250g)
- 1 1/2 cups (188g) all-purpose flour
- 1 1/2 teaspoons baking powder
- 1 1/2 teaspoons ground cinnamon
- 1/4 teaspoon ground nutmeg
- 1/2 teaspoon salt
- 1/2 cup (113g) unsalted butter, softened
- 1/2 cup (100g) granulated sugar
- 1/2 cup (100g) packed light or dark brown sugar
- 2 large eggs, at room temperature
- 1 teaspoon pure vanilla extract
- 6 tablespoons (90ml) whole milk, at room temperature
Instructions
- Preheat oven to 350°F (177°C).
- In a small saucepan over medium heat, melt 6 tbsp butter and 1/2 cup brown sugar. Cook for 1 minute while whisking. Remove from heat and stir in cinnamon and vanilla. Pour mixture into an ungreased 9×2 inch pie dish or cake pan.
- Arrange apple slices over the caramel layer in a tight, overlapping pattern. Refrigerate pan while preparing the cake batter.
- In a medium bowl, whisk together flour, baking powder, cinnamon, nutmeg, and salt.
- In a large bowl, beat softened butter until smooth. Add both sugars and beat until creamed. Add eggs and vanilla, and beat until combined.
- Gradually mix in dry ingredients, alternating with milk. Mix until just combined without overmixing.
- Remove pan from refrigerator. Spread cake batter evenly over the apples and caramel layer.
- Bake for 40–46 minutes, tenting with foil halfway through to prevent overbrowning. Cake is done when a toothpick comes out mostly clean.
- Cool in the pan for 15 minutes, then invert onto a serving plate. Allow to cool fully before slicing.
Notes
- Use firm apples like Granny Smith or Honeycrisp for best results.
- Refrigerating the topping briefly helps keep the apple arrangement intact.
- Do not overmix the batter to avoid a dense cake.
- Allow cake to cool fully before slicing for cleaner cuts.
- Store leftovers covered at room temperature for up to 3 days or freeze individual slices for up to 3 months.