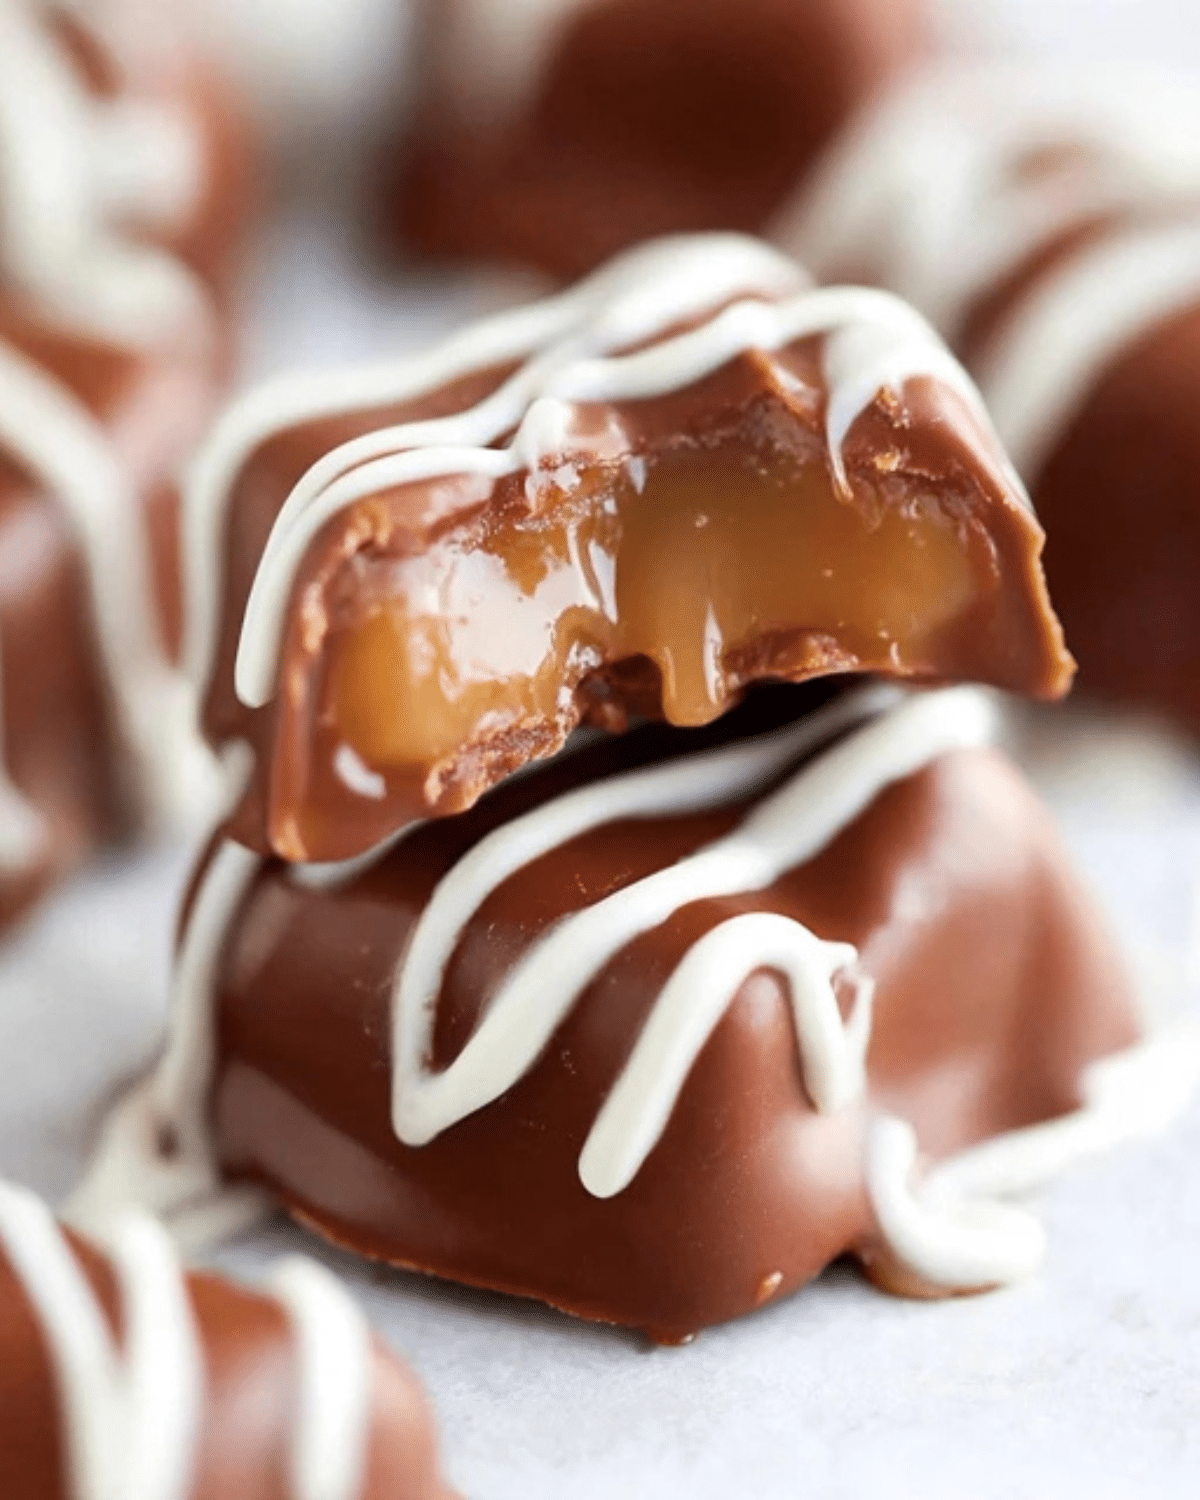
Chocolate Covered Caramels are a classic candy that never goes out of style. With a soft, buttery caramel center wrapped in smooth chocolate, they strike the perfect balance between rich, sweet, and indulgent. Whether you’re making them for holiday gifts, special occasions, or simple treats at home, Chocolate Covered Caramels are surprisingly easy to prepare with just a few ingredients. This guide walks you through everything you need to know, from choosing the right caramels and chocolate to expert dipping tips that help you achieve a professional finish every time.
JUMP TO
Table of Contents
What Are Chocolate Covered Caramels?
Chocolate Covered Caramels are bite-sized candies made by coating soft caramel centers in melted chocolate. Once the chocolate sets, it forms a smooth shell that contrasts beautifully with the chewy caramel inside. This combination has made Chocolate Covered Caramels a favorite in candy shops, gift boxes, and holiday dessert trays for generations.
Why Chocolate and Caramel Are a Perfect Match
Chocolate and caramel work so well together because they balance each other naturally. The deep, slightly bitter notes of chocolate cut through the sweetness of caramel, while the creamy caramel softens the intensity of the chocolate. This contrast creates a layered flavor experience that feels rich without being overwhelming, especially when the caramel stays soft and chewy.
Homemade vs Store-Bought Chocolate Covered Caramels
While store-bought Chocolate Covered Caramels are convenient, homemade versions offer better flavor and texture. When you make them yourself, you control the quality of the chocolate, the softness of the caramel, and any added toppings. Homemade Chocolate Covered Caramels also avoid preservatives, making them taste fresher and more indulgent.
Why You’ll Love These Chocolate Covered Caramels
There are many reasons this recipe stands out, especially if you enjoy making candy at home without complicated techniques.
Perfect for Gifts, Holidays, and Special Occasions
Chocolate Covered Caramels are ideal for gifting because they store well and look elegant with minimal effort. Wrapped individually or placed in decorative boxes, they make thoughtful homemade gifts for holidays, birthdays, and celebrations.
Simple Ingredients with Professional Results
This recipe uses easy-to-find ingredients, yet the finished candies look polished and bakery-worthy. With proper melting and dipping techniques, your Chocolate Covered Caramels will have a smooth, glossy coating and a soft center that rivals professional candy shops.
Beginner-Friendly Candy Recipe
Even if you’ve never made candy before, Chocolate Covered Caramels are a great place to start. There’s no baking involved, and the process is forgiving, making it easy to achieve consistent results with minimal equipment.
Ingredients Needed for Chocolate Covered Caramels

Making Chocolate Covered Caramels at home doesn’t require a long ingredient list, but the quality of each ingredient directly affects the final texture and flavor. Choosing the right caramels and chocolate ensures a smooth coating and a soft, chewy center.
Best Type of Caramels to Use
Soft, chewy caramels work best for Chocolate Covered Caramels. Individually wrapped store-bought caramels are convenient and consistent, making them ideal for beginners. Look for caramels labeled as “soft” rather than firm or hard, since softer caramels stay pleasant to bite into after being coated in chocolate.
If you prefer homemade caramel, make sure it is fully set but still pliable. Caramels that are too soft may lose their shape during dipping, while overly firm ones can be difficult to bite through.
Choosing the Right Chocolate for Dipping
High-quality chocolate melts smoothly and sets with a clean snap, which is essential for Chocolate Covered Caramels. Chocolate melting wafers or couverture chocolate are excellent choices because they don’t require tempering. If using chocolate chips or baking chocolate, melting slowly and evenly helps avoid scorching.
Milk chocolate offers a classic, sweet flavor, while dark chocolate provides a richer contrast to the caramel. Semi-sweet chocolate strikes a balance between the two and is a popular choice for homemade candy.
Optional Toppings and Flavor Additions
Toppings add texture and visual appeal to Chocolate Covered Caramels. Sea salt is one of the most popular options, enhancing the sweetness of the caramel while balancing the chocolate. Crushed nuts, toasted coconut, or finely chopped pretzels also work well.
For flavor variations, a small pinch of flaky salt or a drizzle of contrasting chocolate can elevate the finished candies without overpowering the base flavors.
How to Make Chocolate Covered Caramels Step-by-Step
This process is simple and methodical. Working in small batches helps maintain control and ensures each caramel is evenly coated.
Preparing the Caramels for Dipping
Unwrap all caramels and place them on a parchment-lined baking sheet. If the caramels are very soft, chilling them briefly makes dipping easier. However, they should remain pliable, not hard, to maintain the desired chewy texture.
Arrange the caramels with space between them so they don’t stick together once dipped.
Melting Chocolate the Right Way
Melt the chocolate slowly using a microwave or double boiler. If using a microwave, heat in short intervals, stirring between each one to prevent overheating. Smooth, lump-free chocolate is essential for clean dipping.
Let the chocolate cool slightly before dipping. Chocolate that is too hot may slide off the caramel instead of coating it evenly.
Dipping and Coating Like a Pro
Using a fork or dipping tool, lower each caramel into the melted chocolate, turning gently to coat all sides. Lift the caramel out, allowing excess chocolate to drip off before placing it back onto the parchment-lined tray.
If adding toppings like sea salt or nuts, sprinkle them on while the chocolate is still wet so they adhere properly. Repeat until all caramels are coated.
Tips for Perfect Chocolate Covered Caramels
Small adjustments during the process can make a noticeable difference in the final result. These tips help ensure smooth, attractive Chocolate Covered Caramels every time.
Preventing Chocolate Bloom
Chocolate bloom appears as white or gray streaks and is often caused by temperature changes. To avoid this, let Chocolate Covered Caramels set at room temperature in a cool, dry area rather than refrigerating them immediately.
Getting a Smooth, Even Chocolate Shell
Stir the chocolate gently to avoid introducing air bubbles. Tapping the fork lightly against the bowl before placing the caramel down helps remove excess chocolate and creates a thinner, more even shell.
Chocolate Covered Caramel Variations
Chocolate Covered Caramels are incredibly versatile, which makes them easy to customize for different tastes, seasons, and occasions. With a few simple changes, you can create multiple versions from one base recipe.
Dark Chocolate vs Milk Chocolate
Milk chocolate produces a sweeter, creamier candy that closely resembles classic store-bought Chocolate Covered Caramels. Dark chocolate, on the other hand, delivers a richer flavor that contrasts beautifully with the buttery caramel center. Semi-sweet chocolate falls in between and is ideal if you want balance without overpowering sweetness.
Sea Salt Chocolate Covered Caramels
Adding flaky sea salt to the top of Chocolate Covered Caramels enhances both sweetness and depth. The salt cuts through the richness of the chocolate while amplifying the caramel flavor. Sprinkle lightly while the chocolate coating is still wet so the salt adheres properly.
Nut, Pretzel, and Flavor Infusions
Crushed almonds, pecans, or hazelnuts add crunch and nutty flavor. For a sweet-and-salty twist, finely crushed pretzels provide texture and balance. You can also drizzle a contrasting chocolate over the top to create a decorative finish without altering the core flavors.
How to Store Chocolate Covered Caramels
Proper storage ensures that Chocolate Covered Caramels maintain their texture, shine, and flavor for as long as possible.
Room Temperature vs Refrigeration
Chocolate Covered Caramels store best at cool room temperature in an airtight container. Refrigeration is not recommended unless the environment is very warm, as temperature changes can cause condensation and dull the chocolate coating.
Shelf Life and Make-Ahead Tips
When stored correctly, Chocolate Covered Caramels stay fresh for up to two weeks. This makes them ideal for make-ahead treats, gift boxes, and holiday dessert trays. Always separate layers with parchment paper to prevent sticking.
FAQs About Chocolate Covered Caramels
How long do chocolate covered caramels last?
Chocolate Covered Caramels typically last up to two weeks when stored in an airtight container at cool room temperature.
Do homemade caramels need refrigeration?
No, refrigeration is not required and may cause the chocolate to lose its shine. Room temperature storage works best.
Can you freeze chocolate covered caramels?
Freezing is not recommended because thawing can cause condensation, which affects the chocolate coating and texture.
What chocolate melts best for candy making?
Melting wafers or couverture chocolate melt smoothly and set well, making them ideal for Chocolate Covered Caramels.
Final Thoughts on Homemade Chocolate Covered Caramels
Chocolate Covered Caramels are a timeless candy that combines rich chocolate with soft, buttery caramel in every bite. They’re simple to make, easy to customize, and perfect for gifting or enjoying at home. With the right chocolate, careful dipping, and proper storage, homemade Chocolate Covered Caramels can rival any confectionery treat.
PrintChocolate Covered Caramels Recipe – Easy Homemade Candy

Chocolate Covered Caramels are classic homemade candies made with soft, chewy caramel centers coated in smooth melted chocolate, perfect for gifting, holidays, or simple sweet treats.
- Prep Time: 20 minutes
- Cook Time: 0 minutes
- Total Time: 40 minutes
- Yield: 30 candies
- Category: Dessert
- Method: No-Bake
- Cuisine: American
- Diet: Vegetarian
Ingredients
- 30 soft chewy caramels, unwrapped
- 12 oz milk chocolate, dark chocolate, or semi-sweet chocolate (melting wafers or chopped)
- 1 tsp flaky sea salt (optional, for topping)
- 1/4 cup chopped nuts or crushed pretzels (optional)
Instructions
- Line a baking sheet with parchment paper and set aside.
- Unwrap the caramels and arrange them on the prepared baking sheet. Chill briefly if very soft.
- Melt the chocolate slowly using a microwave in short intervals or a double boiler, stirring until smooth.
- Let the melted chocolate cool slightly so it thickens just enough for dipping.
- Using a fork or dipping tool, dip each caramel into the chocolate, turning to coat completely.
- Lift the caramel out, tap gently to remove excess chocolate, and place it back on the parchment paper.
- Sprinkle with sea salt or toppings while the chocolate is still wet, if desired.
- Allow the chocolate to set at room temperature until firm before serving or storing.
Notes
- Use high-quality chocolate for the smoothest coating and best flavor.
- Avoid refrigerating while the chocolate sets to prevent bloom or dull streaks.
- Work in small batches to keep chocolate from thickening too quickly.
- Store candies in a cool, dry place for best texture.