If you’re dreaming of a sweet and festive treat to light up your holiday dessert table, look no further than Christmas Mints. These soft, melt-in-your-mouth candies are incredibly easy to make, no baking required, and perfect for adding a pop of color and flavor to your seasonal spread. Whether you’re creating edible gifts, planning a party, or just craving a nostalgic peppermint bite, homemade Christmas mints will bring holiday magic to your kitchen. Don’t miss our ultimate Christmas gooey butter cookies recipe for another sweet seasonal idea.
JUMP TO
Table of Contents
What Are Christmas Mints and Why Everyone Loves Them
The origin of butter mints and their Christmas twist
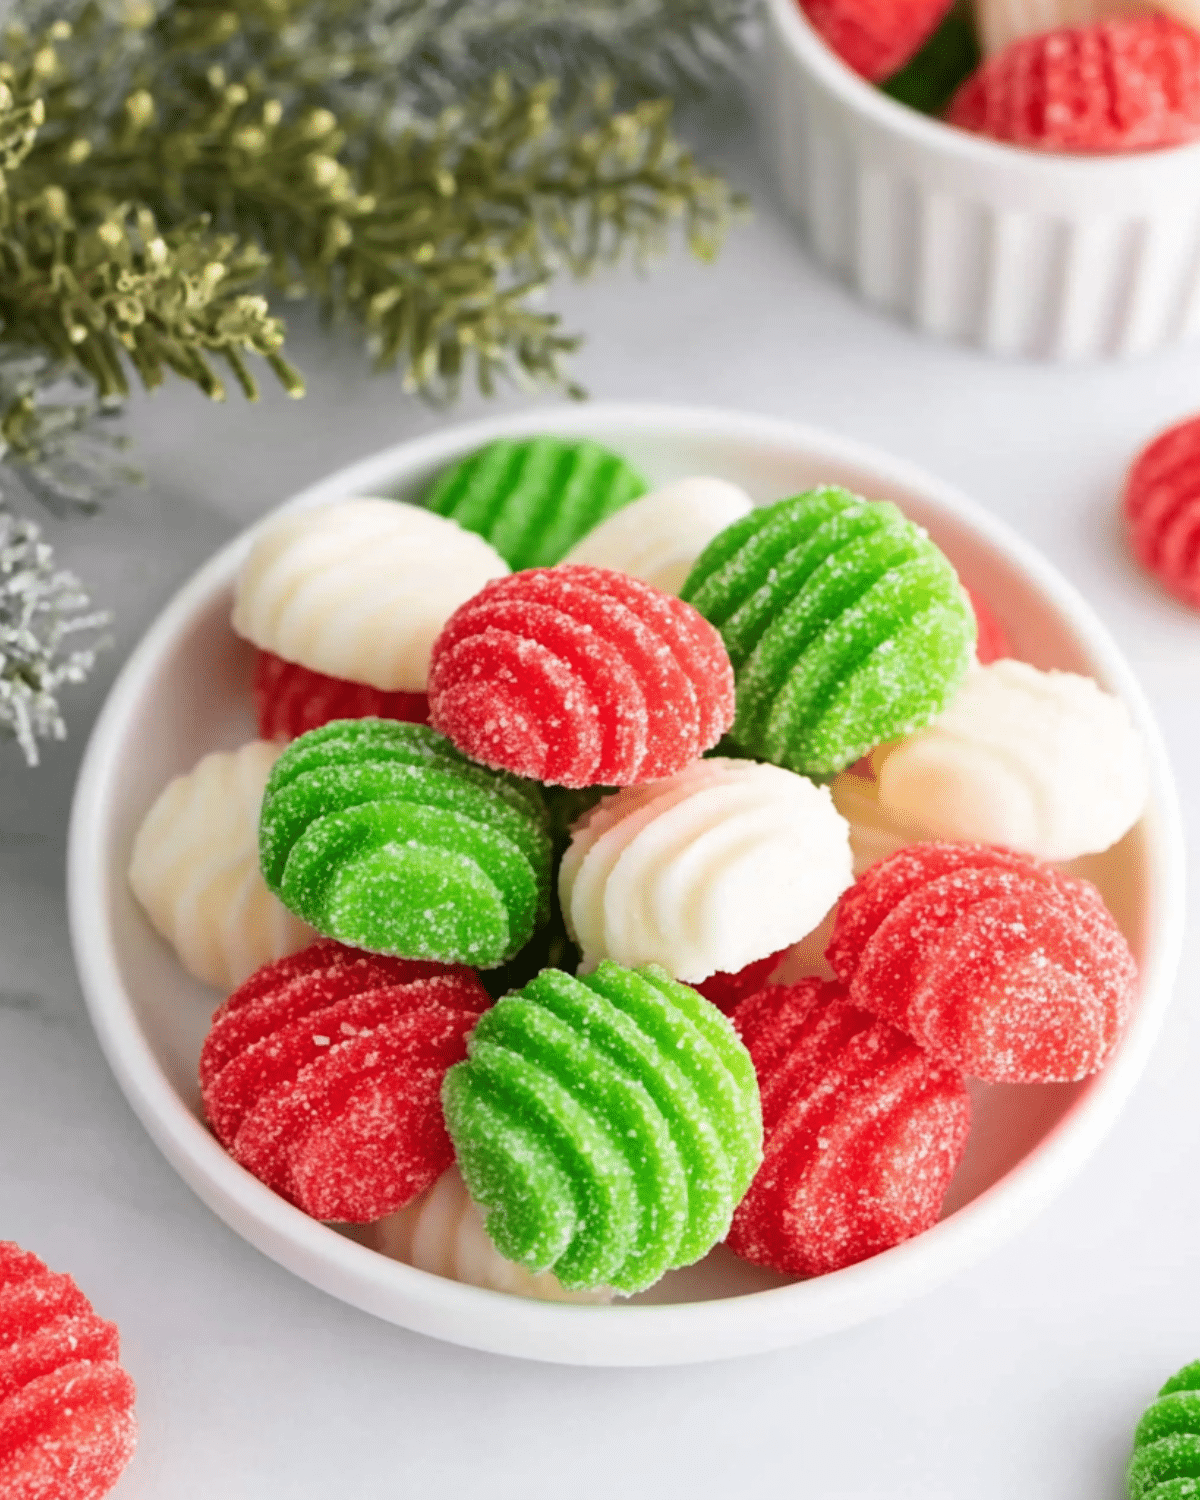
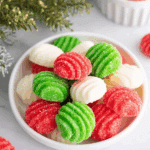
Christmas mints trace their roots back to classic butter mints—those soft, pastel candies served at weddings and baby showers. What makes them “Christmas” is the festive touch: vibrant red, green, and white colors, often flavored with peppermint or wintergreen, and shaped into adorable holiday designs. This seasonal variation takes the traditional recipe and turns it into a cheery, craveable tradition that looks just as good as it tastes.
Popular holiday uses and gift ideas
These creamy, colorful bites are more than just candy—they’re a seasonal staple. Use them as edible décor on cookie trays, scatter them on dessert tables, or drop them in gift tins for neighbors and coworkers. They’re also a hit at cookie exchanges, Christmas brunches, and stocking stuffers. Discover great ideas like Christmas dessert trays with peppermint fudge to pair them with.
Why they’re better homemade than store-bought
Store-bought butter mints often lack that rich, creamy texture and vibrant freshness that only homemade versions can offer. Making your own lets you customize flavors, colors, and shapes—and the hands-on process is half the fun. Plus, there are no preservatives, no artificial waxy aftertaste, and you get to control the sweetness. Looking for inspiration? Try our easy 3-ingredient pencil cookies recipe for another fun and customizable treat.
Ingredients You’ll Need for Easy Christmas Mints
Simple pantry ingredients list
You only need a handful of basic ingredients to make these no-bake mints. Here’s what you’ll gather:
| Ingredient | Amount |
|---|---|
| Cream Cheese (softened) | 8 oz (1 block) |
| Butter (softened) | 2 tablespoons |
| Powdered Sugar | 6 cups (approx.) |
| Peppermint Extract | 1 teaspoon |
| Food Coloring | Red & Green |
| Sprinkles (optional) | For decoration |
These ingredients combine into a smooth, rollable dough that’s easy to shape and perfect for festive designs.
Substitutions and flavor variations
Not a fan of peppermint? No problem! You can substitute it with vanilla, almond, or even lemon extract for a unique twist. For a creamier texture, swap half the cream cheese for mascarpone. And if you want to dial down the sweetness, gradually reduce the powdered sugar—just enough to keep the dough manageable.
Choosing food coloring and decorative sprinkles
Use gel food coloring for vibrant results without making the dough sticky. Stick with red, green, and white for a traditional Christmas palette, or go playful with pastel pink and icy blue for a winter wonderland vibe. Don’t forget festive sprinkles, sanding sugar, or even edible glitter for that eye-catching sparkle. Check out our apple Oreo balls recipe for more candy-decorating inspiration.
How to Make Christmas Mints Step by Step
Mixing the dough base
Start by beating the softened cream cheese and butter until smooth. Gradually add powdered sugar, one cup at a time, until a thick, dough-like consistency forms. Stir in peppermint extract and mix until well combined.
Coloring and flavoring
Divide the dough into portions and knead in gel food coloring. Add a drop at a time until you get your desired shades of red and green. If you’re using different flavorings (like lemon or vanilla), mix them into separate dough batches at this stage.
Shaping, drying, and storing tips
Roll dough into small balls, flatten with a fork or press into silicone molds for festive shapes. Lay them on parchment paper and let air-dry for 24 hours to set. Store finished mints in an airtight container at room temperature for up to 2 weeks—or freeze them for up to 2 months.
Expert Tips for Perfect No-Bake Mints
How to get the best texture every time
To make your Christmas mints light, airy, and creamy, always start with room-temperature cream cheese and butter. Sift the powdered sugar before mixing—it helps create that signature melt-in-your-mouth feel. Knead just enough to bring the dough together, but avoid overmixing, which can make the mints too dense.
Troubleshooting sticky or crumbly dough
If your dough turns out sticky, gradually add more powdered sugar, one tablespoon at a time, until it firms up. Too crumbly? Add a touch of milk or extra cream cheese and knead again. Humidity can affect consistency, so adjust ingredients accordingly if your kitchen is damp or dry.
How to make mints ahead and freeze them
Planning ahead for the holidays? You’re in luck. Christmas mints freeze beautifully. Once dried, place them in a single layer on a baking sheet, freeze until solid, then store in airtight containers with parchment between layers. They’ll stay fresh for up to 2 months.
Don’t miss our pumpkin cheesecake truffles for another great make-ahead holiday dessert.
Creative Ways to Present and Serve Christmas Mints
Holiday parties, cookie trays, and centerpieces
Christmas mints are more than treats—they’re table décor with flavor. Arrange them on tiered trays, nestle them among cookies, or display them in glass jars as edible centerpieces. Their color pop adds visual interest to any dessert spread.
Packaging ideas for edible gifts
Fill festive tins, mason jars, or mini gift bags with assorted mints and tie with ribbon or twine. Add a printed tag that says “Made with love” for a personal touch. This is a perfect DIY holiday gift for teachers, coworkers, or neighbors.
Kid-friendly shapes and decorating fun
Let the little ones help! Use small cookie cutters to shape stars, trees, or snowflakes. Let kids sprinkle their favorite toppings or add edible glitter. It’s a sweet bonding activity that ends in a tasty reward.
Check out our ruler Rice Krispies recipe for another fun, kid-friendly dessert idea!

Frequently Asked Questions About Christmas Mints
How long do homemade Christmas mints last?
Stored in an airtight container at room temp, they last up to 2 weeks. In the freezer, they stay good for 2 months.
Can I freeze Christmas mints?
Absolutely. Freeze after they’re fully dried. Use parchment to layer them and avoid sticking.
Can I make these without cream cheese?
Yes, you can try substituting with buttercream or mascarpone, but the texture may differ. Cream cheese is ideal for that classic soft consistency.
What flavoring works best for holiday mints?
Peppermint is the traditional choice, but wintergreen, vanilla, or almond are great alternatives.
Do these mints harden or stay soft?
They dry on the outside but stay soft and creamy inside—just the way holiday mints should be.
Conclusion: A Sweet Tradition Worth Making Every Year
Homemade Christmas mints are more than just candy—they’re a nostalgic holiday tradition wrapped in color, flavor, and festive charm. With a few basic ingredients and endless ways to customize, they make the perfect addition to any Christmas celebration. Whether you’re whipping up a batch for gifting, decorating your dessert table, or sharing them with loved ones, these melt-in-your-mouth mints are sure to become a family favorite.
Looking for more festive bites? Don’t miss our salted caramel apple pie bars—another holiday hit you’ll want to bookmark.
PrintChristmas Mints
Christmas Mints are a no-bake, melt-in-your-mouth holiday candy made with cream cheese, butter, powdered sugar, and peppermint extract. They’re perfect for festive trays, edible gifts, or party treats and can be customized with colors and flavors.
- Prep Time: 20 minutes
- Cook Time: 0 minutes
- Total Time: 24 hours (includes drying time)
- Yield: About 100 small mints
- Category: Dessert, Candy
- Method: No-Bake
- Cuisine: American
- Diet: Vegetarian
Ingredients
- 8 oz cream cheese (softened)
- 2 tablespoons butter (softened)
- 6 cups powdered sugar (approx.)
- 1 teaspoon peppermint extract
- Red and green gel food coloring
- Sprinkles (optional, for decoration)
Instructions
- In a large mixing bowl, beat the softened cream cheese and butter until smooth and creamy.
- Gradually add powdered sugar, one cup at a time, until a dough-like consistency forms.
- Stir in peppermint extract and mix until well combined.
- Divide the dough into portions and knead in desired gel food coloring.
- Roll into small balls or press into silicone molds or shape with cookie cutters.
- Place shaped mints on a parchment-lined baking sheet and allow to air dry for 24 hours.
- Store in an airtight container at room temperature or freeze for longer storage.
Notes
- Use gel food coloring to prevent sticky dough.
- If the dough is sticky, add more powdered sugar; if crumbly, add a bit of milk or cream cheese.
- Mints can be stored for 2 weeks or frozen for up to 2 months.
- Customize with different extracts like vanilla or almond for variety.