Few cookies capture nostalgia and elegance quite like Danish Butter Cookies. With their melt-in-your-mouth texture, golden hue, and rich buttery aroma, these traditional treats have earned a special place on holiday tables across the world. Originally crafted in Denmark, these cookies symbolize simplicity, comfort, and European baking finesse. Whether you remember them from the blue tins your grandmother used to keep or want to bake them fresh at home, this recipe guide will walk you through everything — from ingredients and shaping to storage and serving.
Unlike other buttery desserts, Danish Butter Cookies strike a perfect balance between crisp edges and tender centers. In this guide, we’ll uncover what makes them truly authentic, explore the science behind their texture, and share time-tested baking tips to guarantee flawless results every time.
For those who love European-style desserts, you might also enjoy our easy shortbread cookies recipe — another melt-in-your-mouth treat that pairs perfectly with tea or coffee.
JUMP TO
Table of Contents
What Makes Authentic Danish Butter Cookies So Special
Every bite of a Danish Butter Cookie tells a story — one rooted in Denmark’s long-standing baking traditions. But what exactly makes these cookies so irresistible? Let’s dive into the origins, ingredients, and iconic designs that define this beloved treat.
A Short History of Danish Butter Cookies
The story begins in Denmark, where bakers mastered the art of using simple, high-quality ingredients to create pastries with rich, buttery depth. Traditionally known as småkager, meaning “small cakes,” these cookies became a symbol of Danish hospitality. Over time, they spread across Europe and eventually to the United States, often gifted in decorative tins that now evoke fond childhood memories.
Modern Danish Butter Cookies still honor that legacy — using only butter, sugar, and flour to achieve perfection. While recipes vary slightly from baker to baker, the essence remains: pure butter flavor and a delicate crunch.
Butter Quality and Flavor
Butter isn’t just an ingredient here — it’s the heart and soul of the cookie. Authentic Danish Butter Cookies rely on European-style butter, known for its higher fat content (82–85%), which delivers unmatched flavor and tenderness. Using real butter ensures a rich, caramelized edge that margarine can never replicate.
For a flawless texture, always use unsalted, room-temperature butter. Creaming it with sugar creates tiny air pockets that give the cookies their light, crumbly structure. If you’ve ever wondered why store-bought versions taste different, it’s usually because of cheaper butter substitutes or shortening.
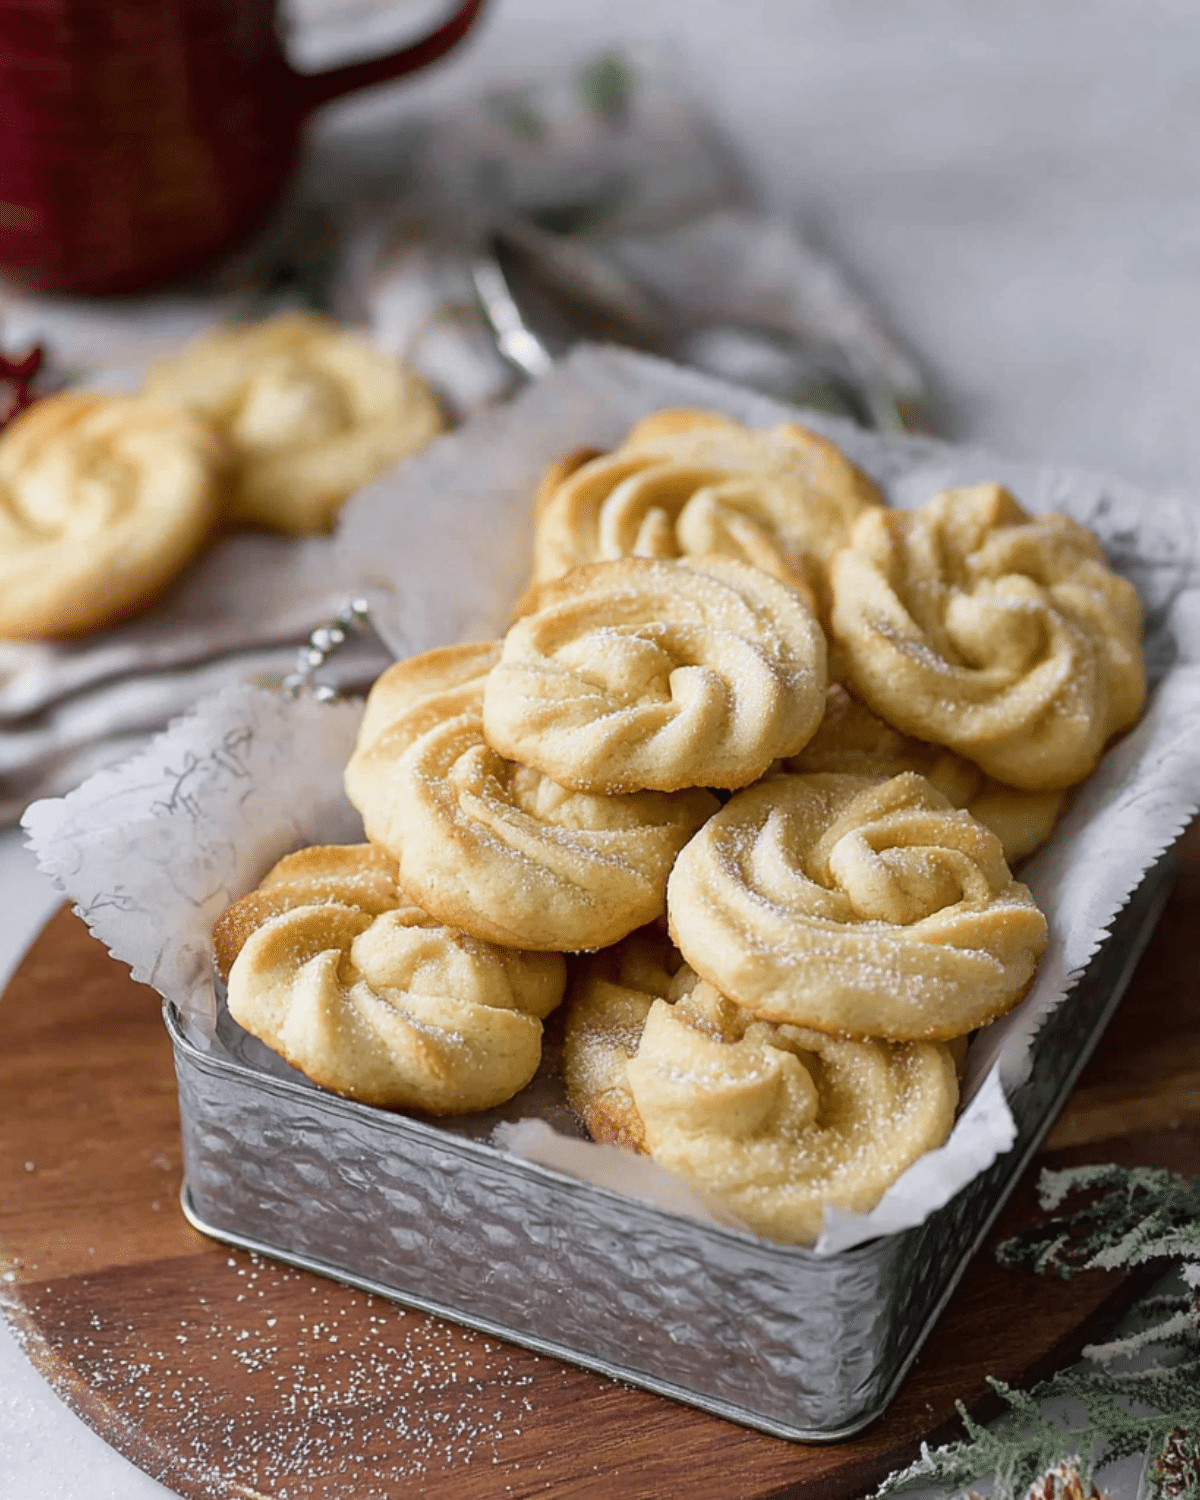
Traditional Danish Shapes and Designs
When you open a classic blue tin, you’ll find a delightful mix of shapes — swirls, pretzel twists, rings, and rectangles, each offering a slightly different bite. These shapes aren’t just decorative; they reflect Danish artistry and tradition.
Swirled cookies, piped using a star nozzle, showcase the baker’s skill. Pretzel shapes symbolize luck and celebration, while rings offer the perfect crispness around the edges. You can easily recreate these at home using a piping bag or cookie press.
If you’d like to explore more European baking traditions, visit our homemade biscotti recipe for another crisp, buttery classic from Italy.
Key Ingredients for Perfect Danish Butter Cookies
Before you even turn on the oven, it’s essential to understand how each ingredient contributes to the taste and texture of authentic Danish Butter Cookies. These cookies depend on precision and balance — too much sugar, and they spread; too little butter, and they lose their rich, crumbly texture.

Choosing the Right Butter
Butter is the foundation of this recipe, and the quality makes a world of difference. Traditional Danish bakers use European-style butter, which contains more butterfat (around 82%) than standard varieties. This higher fat content yields a richer flavor and a tender, melt-in-your-mouth bite. Always use unsalted butter, so you can control the salt levels precisely.
If you want to deepen the flavor, you can even try browning the butter slightly before creaming it with sugar — just remember to let it cool first. The nutty aroma will take your cookies to another level.
Sugar, Flour, and Vanilla – Getting Ratios Right
Granulated sugar is most common, but some bakers use powdered sugar for a softer, lighter texture. The ideal ratio keeps the dough firm enough to hold its piped shape yet delicate enough to stay crisp after baking.
Vanilla extract is another key player. It enhances the buttery flavor and rounds out the cookie’s sweetness. Use pure vanilla extract rather than imitation for best results.
Here’s a simple overview of the base ingredients:
| Ingredient | Amount | Purpose |
|---|---|---|
| Unsalted Butter | 1 cup (226 g) | Richness, texture |
| Sugar | 2/3 cup (135 g) | Sweetness, structure |
| Egg | 1 large | Binds dough |
| Vanilla Extract | 1 tsp | Flavor |
| All-Purpose Flour | 2 ¼ cups (280 g) | Structure |
| Salt | ¼ tsp | Enhances flavor |
Optional Add-ins for Flavor Variations
While the traditional version keeps things simple, feel free to experiment. Add a touch of almond extract for a nutty twist, or dip half of each cooled cookie in melted chocolate for an indulgent upgrade. You can also sprinkle coarse sugar or crushed nuts on top before baking for a bit of crunch.
For more ideas on flavor variations, check out our easy sugar cookies recipe — it’s a versatile base for countless cookie creations.
Step-by-Step Recipe for Homemade Danish Butter Cookies
Ready to bake your first batch of crisp, buttery goodness? Follow these steps carefully, and you’ll achieve bakery-quality results at home.
Step 1 – Creaming Butter and Sugar Properly
Start with room-temperature butter. In a large bowl, beat the butter and sugar together using a hand or stand mixer for about 3–5 minutes until the mixture turns pale and fluffy. This process traps air in the dough, giving your cookies that signature light texture.
Avoid overmixing once the flour is added, as this can make the cookies tough instead of tender.
Step 2 – Adding Eggs and Flavoring
Beat in the egg and vanilla extract just until combined. The dough should be smooth but not overly sticky. If it’s too firm to pipe, add a teaspoon of milk; if it’s too soft, chill it for 10–15 minutes before shaping.
Step 3 – Shaping the Cookies
Transfer the dough into a piping bag fitted with a large star tip (Wilton 1M works perfectly). Pipe swirls, rings, or pretzel shapes onto a baking sheet lined with parchment paper. Each cookie should be about 2 inches wide, with at least 1 inch of space between them to allow for slight spreading.
If you don’t have a piping bag, use a cookie press — it’s an easy, traditional tool for shaping Danish Butter Cookies.
For a guide on shaping and decorating, read our cookie press baking tips for beginner-friendly advice.
Step 4 – Baking and Cooling
Bake the cookies in a preheated oven at 350°F (175°C) for 10–12 minutes, or until the edges turn light golden. Watch them closely; overbaking can make them dry.
Let the cookies cool on the tray for a few minutes before transferring them to a wire rack. As they cool, they’ll firm up while keeping that irresistible buttery crispness.
If you’re planning to make multiple batches or store them for the holidays, check out our cookie storage and freshness guide to keep your treats tasting fresh for weeks.
Storage, Serving, and Gifting Ideas
Danish Butter Cookies aren’t just for eating — they’re a perfect homemade gift and a holiday staple. When baked correctly and stored well, they stay fresh and crisp for weeks, making them ideal for sharing.
How to Store Danish Butter Cookies to Keep Them Fresh
Once your cookies have cooled completely, transfer them to an airtight container lined with parchment paper. Keep the layers separated with more parchment to prevent sticking. Store them at room temperature for up to 2 weeks or in the freezer for up to 3 months.
When freezing, place cookies in a freezer-safe bag and remove as much air as possible. To serve, let them thaw at room temperature for 20–30 minutes.
For long-term freshness and professional storage tips, see our baked goods preservation guide.
Creative Gift Packaging Ideas
These cookies are known for their iconic blue tins, but you can give them a personal twist. Arrange them in decorative glass jars, festive boxes, or ribbon-tied pouches. Add handwritten tags or labels for an extra homemade touch.
Gifting tip: Pair them with homemade cocoa or tea blends for a charming Danish-inspired present.
Serving Suggestions
Serve your Danish Butter Cookies with tea, coffee, or hot chocolate. They also pair beautifully with ice cream or can be crushed into a cheesecake crust.
For more pairing inspiration, try our homemade hot chocolate mix, a cozy companion to buttery cookies.
Common Mistakes to Avoid When Baking Danish Butter Cookies
Even seasoned bakers can run into issues. Avoid these pitfalls for flawless cookies every time.
Overmixing or Using Cold Butter
Butter must be softened, not melted or cold. Overmixing after adding flour can develop too much gluten, resulting in tough cookies. Always mix just until combined.
Wrong Piping Techniques
If your dough is too stiff, it won’t pipe properly, and your cookies may crack. Add a splash of milk to loosen the texture if needed. Also, make sure all cookies are similar in size for even baking.
Oven Temperature Errors
Always preheat your oven fully before baking. If cookies brown too quickly, reduce the temperature slightly. Line trays with parchment or silicone mats for even heat distribution.
For more precision tips, check out the baking temperature guide to prevent underbaked or overbrowned desserts.
Frequently Asked Questions About Danish Butter Cookies
What’s the difference between Danish Butter Cookies and shortbread?
The main difference lies in texture and ingredients. Shortbread uses a higher butter-to-sugar ratio and no eggs, giving it a crumbly texture. Danish Butter Cookies include an egg, which adds structure and a slightly lighter bite.
Can I use margarine instead of butter?
You can, but it won’t taste the same. Margarine contains more water and less fat, resulting in cookies that spread more and lose their signature buttery flavor. For authenticity, always stick with real butter.
Why are my cookies spreading too much?
Overmixing, warm dough, or excess sugar can cause spreading. Chill the dough for 15–20 minutes before baking if your kitchen is warm.
How long can homemade Danish Butter Cookies last?
Stored in airtight containers, they last up to 2 weeks at room temperature or 3 months in the freezer. Keep them away from moisture to maintain crispness.
Conclusion – Bring a Taste of Denmark to Your Kitchen
With their delicate crunch and rich buttery taste, Danish Butter Cookies are more than a holiday treat — they’re a timeless recipe that brings warmth and joy year-round. Whether you’re baking them as gifts, serving them with coffee, or reliving childhood memories of the famous blue tin, this recipe delivers tradition, simplicity, and flavor in every bite.
Ready to keep the baking fun going? Try our Peach Brioche next — they share the same buttery magic with a crumbly twist.
PrintDanish Butter Cookies

Classic Danish Butter Cookies with a rich, buttery flavor and crisp, melt-in-your-mouth texture. Perfect for holidays, gifting, or enjoying with coffee or tea.
- Prep Time: 20 minutes
- Cook Time: 12 minutes
- Total Time: 32 minutes
- Yield: 30 cookies
- Category: Dessert
- Method: Baking
- Cuisine: Danish
- Diet: Vegetarian
Ingredients
- 1 cup (226 g) unsalted butter, softened
- 2/3 cup (135 g) granulated sugar
- 1 large egg
- 1 teaspoon pure vanilla extract
- 2 1/4 cups (280 g) all-purpose flour
- 1/4 teaspoon salt
- Optional: 1/2 teaspoon almond extract
- Optional: Melted chocolate or coarse sugar for decoration
Instructions
- Preheat your oven to 350°F (175°C) and line baking sheets with parchment paper.
- In a large bowl, cream the butter and sugar together using a mixer for about 3–5 minutes until pale and fluffy.
- Add the egg and vanilla extract (and almond extract, if using), then mix until just combined.
- Gradually add flour and salt, mixing until a smooth dough forms. Do not overmix.
- Transfer dough into a piping bag fitted with a large star tip and pipe swirls or rings onto the baking sheet.
- Bake for 10–12 minutes, or until the edges turn light golden brown.
- Allow cookies to cool on the tray for 2 minutes, then transfer to a wire rack to cool completely.
- Store in an airtight container at room temperature for up to 2 weeks.
Notes
- For best flavor, use high-quality European-style unsalted butter.
- If dough is too stiff to pipe, add 1 teaspoon of milk at a time until pliable.
- Chill dough for 15 minutes if your kitchen is warm to prevent spreading.
- Cookies can be frozen for up to 3 months.
- Dip half of each cookie in melted chocolate for a festive touch.