Few desserts are as comforting, classic, and crowd-pleasing as a Homemade Cherry Pie. Whether you’re working with fresh tart cherries during peak season or opening a can from your pantry, this recipe delivers a flaky crust filled with rich, juicy cherry filling that’s perfectly sweet and just a little tangy. In this article, you’ll learn everything you need—from picking the right cherries to baking a golden lattice crust and even freezing leftovers for later. This is your go-to guide for the perfect cherry pie.
Check out our Sour Cherry Pie recipe if you’re craving more tart variations.
JUMP TO
Table of Contents
Why Homemade Cherry Pie is a Timeless Favorite
The nostalgic charm of cherry desserts
Cherry pie has been baked into American tradition for decades. It’s a staple at summer BBQs, Thanksgiving dinners, and holiday feasts alike. There’s something incredibly nostalgic about that glossy, ruby-red filling paired with a buttery crust—like a bite of home.
Cherry pie vs. other fruit pies: what makes it stand out
While apple and peach pies have their fans, cherry pie holds its ground with a more vibrant and tangy flavor. It balances sweet and tart better than most, and its bold red color makes it a showstopper on any table.
When is cherry pie in season (and why it matters)
Cherries are in season from late spring through mid-summer, with sour cherries having a shorter window. Fresh cherries are ideal for homemade pie, but don’t worry—canned or frozen cherries can produce equally impressive results with just a few tweaks to your technique.
Essential Ingredients for the Best Homemade Cherry Pie
Choosing between sweet cherries and tart cherries

For a truly classic homemade cherry pie, go for sour or tart cherries. These are often labeled as “pie cherries” and offer a tang that’s beautifully balanced by sugar. If you’re using sweet cherries, reduce the sugar in your filling by about ⅓ cup to avoid an overly sugary result.
Fresh vs. canned cherries: pros and cons
Fresh cherries yield a firmer, more textured filling, and they shine when in season. But canned cherries are incredibly convenient—they’re pitted, softened, and available year-round. Just make sure to drain them properly and reduce any added sugar if they’re already packed in syrup.
Looking for inspiration? Try our Strawberry Pie recipe for another fruity, crowd-favorite dessert.
The role of cornstarch, lemon juice, and sugar
These three are essential for your filling. Cornstarch thickens the mixture without clouding it. Lemon juice adds brightness and balances out the sugar. Speaking of sugar, it’s the glue that brings the flavor together and keeps the texture smooth once the pie cools.
Optional ingredients: butter, almond extract, cinnamon
A small amount of butter added before baking gives the filling a richer taste. A few drops of almond extract can elevate the cherry flavor with a subtle nutty undertone. Cinnamon, while not traditional, adds warmth that complements cherries beautifully—especially during colder months.
Making the Cherry Pie Filling from Scratch
Fresh cherry filling: step-by-step process
- Pit and halve 1.5 lbs of fresh, tart cherries.
- Toss them with sugar and lemon juice in a saucepan.
- Cook over medium heat until juices release.
- In a separate bowl, stir cornstarch into a bit of the cherry liquid until smooth.
- Add back to the pot and cook until thickened.
- Fold the thickened sauce back into the cherries and cool.
Using canned cherries: adjustments and tips
- Drain cherries but save ⅓ cup of the juice.
- Mix that juice with cornstarch and set aside.
- Heat remaining juice and sugar to a boil.
- Stir in the dissolved cornstarch and cook until thick.
- Add butter, lemon juice, and cherries.
- Cool before filling your crust.
Don’t miss our Sour Cherry Crumble Bars recipe for another cherry-packed option that’s perfect for potlucks.
How to prevent a runny filling
The key is cooling the filling completely before baking. This gives the starch time to gel and set. Also, avoid overloading the pie with liquid; drain your cherries well and don’t rush the thickening process on the stove.
How to Make a Homemade Pie Crust That Doesn’t Sog
Basic dough ingredients and techniques
All you need is flour, salt, butter, and ice water. Mix just until crumbly, then form into discs and chill. The butter should remain in chunks—that’s how you get those flaky layers.
Chill time and why it matters
Refrigerating your dough for at least 2 hours (or overnight) prevents shrinkage in the oven and makes it easier to roll. Cold dough also creates a flakier crust as the butter melts during baking.
Rolling and fitting the crust in the pan
Roll your bottom crust to about 12 inches in diameter for a 9-inch pie dish. Gently lay it in the pan without stretching—it should settle naturally to avoid bubbling or tearing.
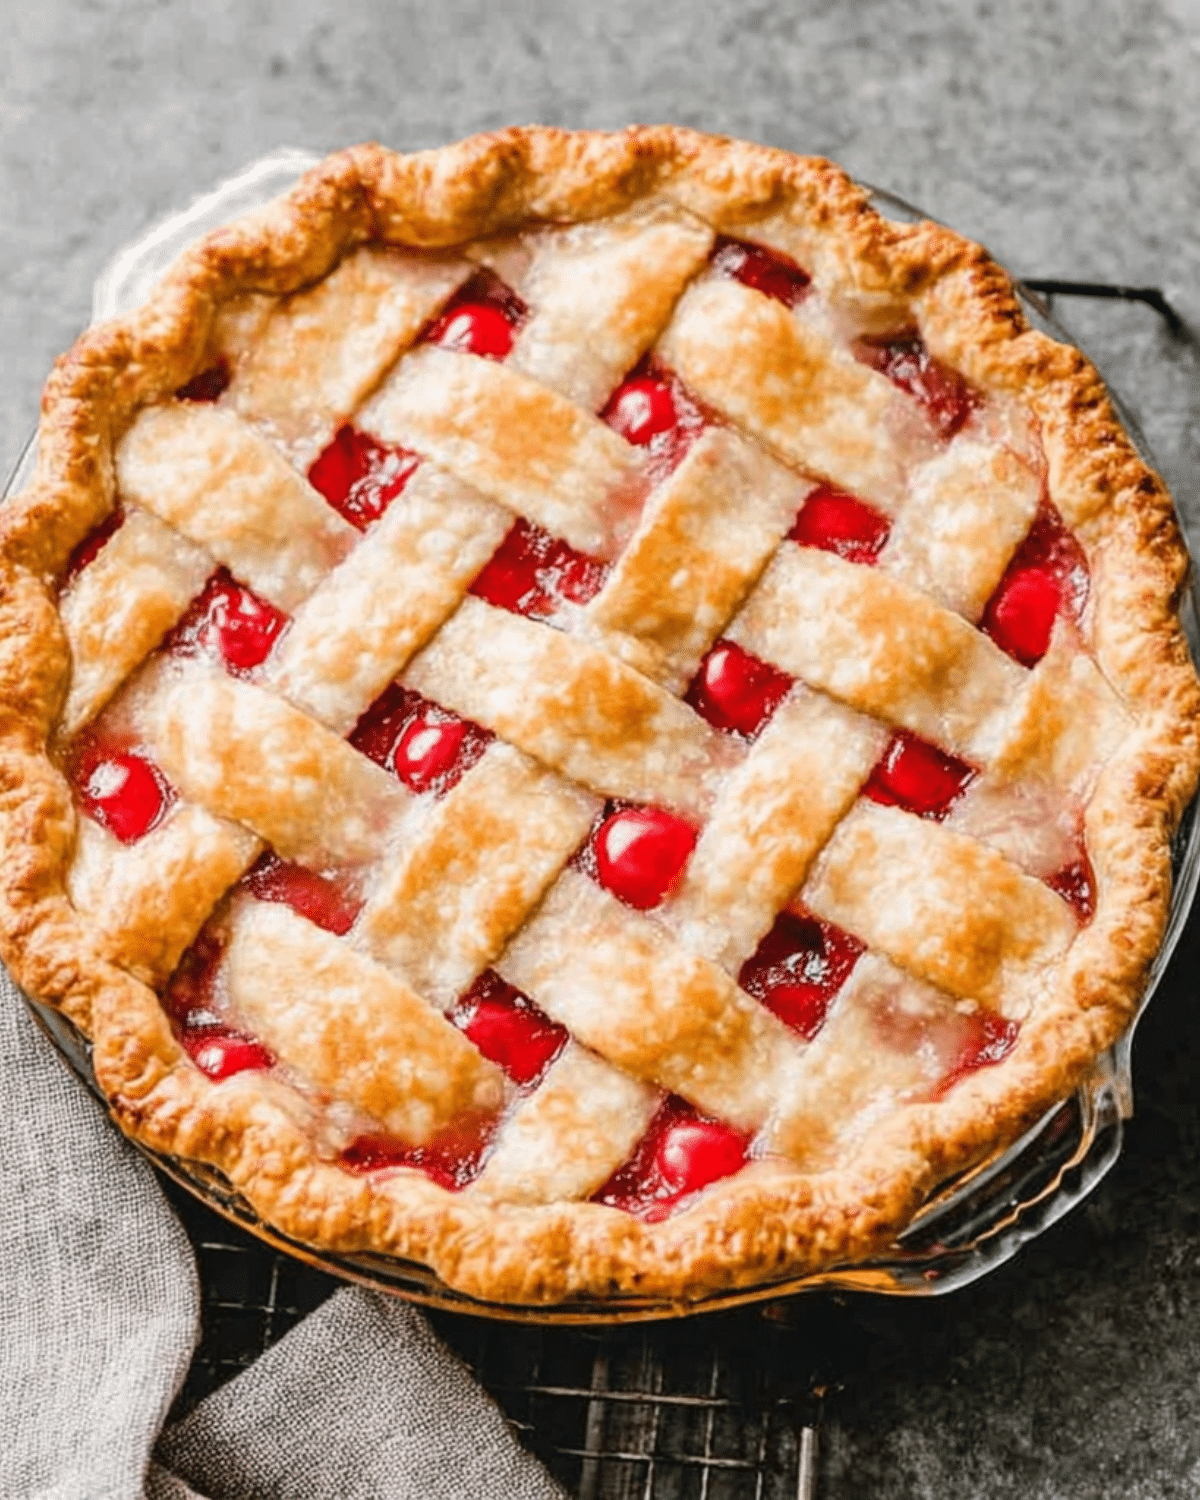
Lattice top vs. solid top crust
A lattice crust isn’t just for looks—it allows steam to escape and helps the filling set properly. A full top crust works too, just remember to cut slits so the pie can vent.
Check out this Nectarine Hand Pies recipe for more flaky crust tips in a portable format.
Baking and Cooling the Perfect Cherry Pie
Pre-bake tips: egg wash and sugar topping
Before your pie goes into the oven, give the top crust a light egg white wash to help it brown evenly and create a light shine. A sprinkle of granulated sugar adds a satisfying crunch and a bakery-style finish. For added appeal, consider using coarse sugar like turbinado.
Ideal baking time and temperature
Preheat your oven to 400°F (200°C). Bake the pie for 40–45 minutes on the middle rack. About halfway through, check the crust—if it’s browning too quickly, gently cover it with foil. Bake until the filling is bubbling and the crust is golden brown.
Cooling and slicing for clean servings
Let the cherry pie cool for at least 3–4 hours on a wire rack. This resting time helps the filling set, so you’ll get clean slices that don’t ooze across the plate. Rushing this part is one of the most common pie-baking mistakes!
Don’t miss our Apple Cinnamon Sheet Cake recipe for another cozy, baked-from-scratch treat.
Storage, Make-Ahead, and Freezing Instructions
How long cherry pie lasts in the fridge
Once baked and cooled, your homemade cherry pie will keep in the refrigerator for up to 5 days. Cover it with plastic wrap or store it in an airtight pie container to maintain freshness.
Best methods for freezing pie and filling
Cherry pie freezes beautifully. You can freeze it before or after baking.
- Before baking: Wrap the unbaked pie tightly in plastic wrap and foil. Freeze for up to 3 months. Bake from frozen, adding about 15 extra minutes to the bake time.
- After baking: Let the pie cool completely, then wrap and freeze. Thaw overnight in the fridge and reheat in the oven at 350°F for 15–20 minutes to crisp the crust.
The cherry filling and pie crust can also be frozen separately for more flexibility.
Reheating tips for preserving flavor and texture
To refresh a slice, place it in a preheated 300°F oven for 10–12 minutes. This keeps the crust flaky while warming the filling evenly. Microwaving is quicker but will soften the crust.
Check out our Pumpkin Crisp recipe for another make-ahead dessert with freezer potential.
Expert Tips for Success with Homemade Cherry Pie
Avoiding soggy bottoms and burnt edges
Use a metal or ceramic pie pan and place it on a preheated baking sheet. This encourages the bottom crust to cook evenly and avoid sogginess. Shield the crust edges with foil if they brown too quickly.
Flavor boosters to try: almond, vanilla, spices
Try adding ¼ teaspoon of almond extract or vanilla extract to your filling for extra depth. A dash of ground cinnamon or nutmeg can add cozy flavor, especially during fall and winter months.
How to fix common pie-baking mistakes
- Watery filling? You may not have used enough cornstarch or let the filling cool long enough.
- Shrunken crust? That usually happens if you didn’t chill the dough properly.
- Cracked top? Your top crust may have been too dry or rolled too thin. Use a bit of water when rolling to prevent cracking.
Looking for inspiration? Try our Cinnamon Apple Bread recipe for more baking confidence.
Frequently Asked Questions (FAQs)
Can I use frozen cherries for cherry pie?
Absolutely. Frozen cherries work well—just thaw and drain them first. You may need to add an extra tablespoon of cornstarch to account for the extra moisture.
Do you need to blind-bake the crust?
Not for this recipe. Since the pie bakes for 40–45 minutes, the bottom crust cooks through without blind baking. But placing the pie on a hot baking sheet helps ensure crisp results.
Should cherry pie be refrigerated?
Yes, after it cools completely. Store it in the fridge for up to 5 days. If you plan to eat it within 1 day, room temperature is fine—but only if your kitchen isn’t too warm.
What thickens cherry pie filling?
Cornstarch is the most common thickener. You can also use arrowroot or tapioca starch as substitutes. Don’t skip this step—it’s what turns cherry juice into a sliceable filling.
Can you use store-bought crust?
You can, but the results won’t be as flaky or sturdy as homemade. Store-bought crusts often lack the fat content needed for a strong structure during baking.
Conclusion: Bake a Homemade Cherry Pie That Steals the Show
There’s no need to buy a store-bought dessert when you can bake a rich, flavorful, and visually stunning Homemade Cherry Pie in your own kitchen. Whether you prefer the juicy burst of fresh cherries or the convenience of canned ones, this pie never fails to impress. With a flaky crust, thick cherry filling, and simple prep, it’s a perfect treat for holidays, birthdays, or just because.
From prepping the perfect filling to nailing that golden-brown lattice top, you’ve now got all the tools and tips to make your cherry pie a standout. So tie on that apron and get baking—because nothing says “home” like a slice of warm cherry pie.
Discover great ideas like our Sour Cherry Pie and Strawberry Pie for more fruit-filled inspiration.
PrintHomemade Cherry Pie

This Homemade Cherry Pie recipe delivers a flaky crust filled with sweet-tart cherry filling made from fresh or canned cherries. Perfect for any season and easy enough for beginners.
- Prep Time: 20 minutes
- Cook Time: 45 minutes
- Total Time: 1 hour 5 minutes
- Yield: 1 9-inch pie (8 servings)
- Category: Dessert
- Method: Baking
- Cuisine: American
- Diet: Vegetarian
Ingredients
- 1.5 lbs fresh, sour cherries or three (14.5 oz) cans sour cherries
- 3/4 cup granulated sugar
- 2 tablespoons lemon juice
- 1/3 cup cornstarch
- 2 tablespoons butter
- 1/2 teaspoon ground cinnamon
- Homemade pie crust (makes 2 crusts: one for the bottom and one for the top)
- 1 large egg white, beaten with a fork
- Granulated sugar, for sprinkling on top
Instructions
- If using fresh cherries: Pit and halve the cherries. Combine them with sugar and lemon juice in a saucepan. Cook over medium heat until juices release.
- Use a slotted spoon to remove cherries. Stir cornstarch into a portion of the sauce until dissolved, then return to pot and cook until thickened. Pour over cherries and cool.
- If using canned cherries: Drain cherries, reserving 1/3 cup juice. Stir cornstarch into the reserved juice. Heat remaining juice and sugar to a boil, add cornstarch mixture, cook until thickened. Add butter, lemon juice, and cherries. Cool completely.
- Preheat oven to 400°F (200°C). Roll out one pie crust and place into a 9” pie dish.
- Spoon the cherry filling into the crust and sprinkle with cinnamon. Dot with butter if using fresh cherries.
- Roll out second crust and cut into strips for lattice or use whole. Assemble top crust. Crimp edges and brush with egg white. Sprinkle with sugar.
- Bake for 40–45 minutes, checking at 25 minutes to tent with foil if browning too quickly.
- Cool for at least 3–4 hours before slicing and serving.
Notes
- Use tart cherries for classic flavor; reduce sugar if using sweet cherries.
- Cool filling completely before baking to avoid soggy crust.
- Freeze unbaked or baked pie for up to 3 months.
- Use almond or vanilla extract for extra flavor depth.
- Preheat a baking sheet under the pie to prevent soggy bottoms.