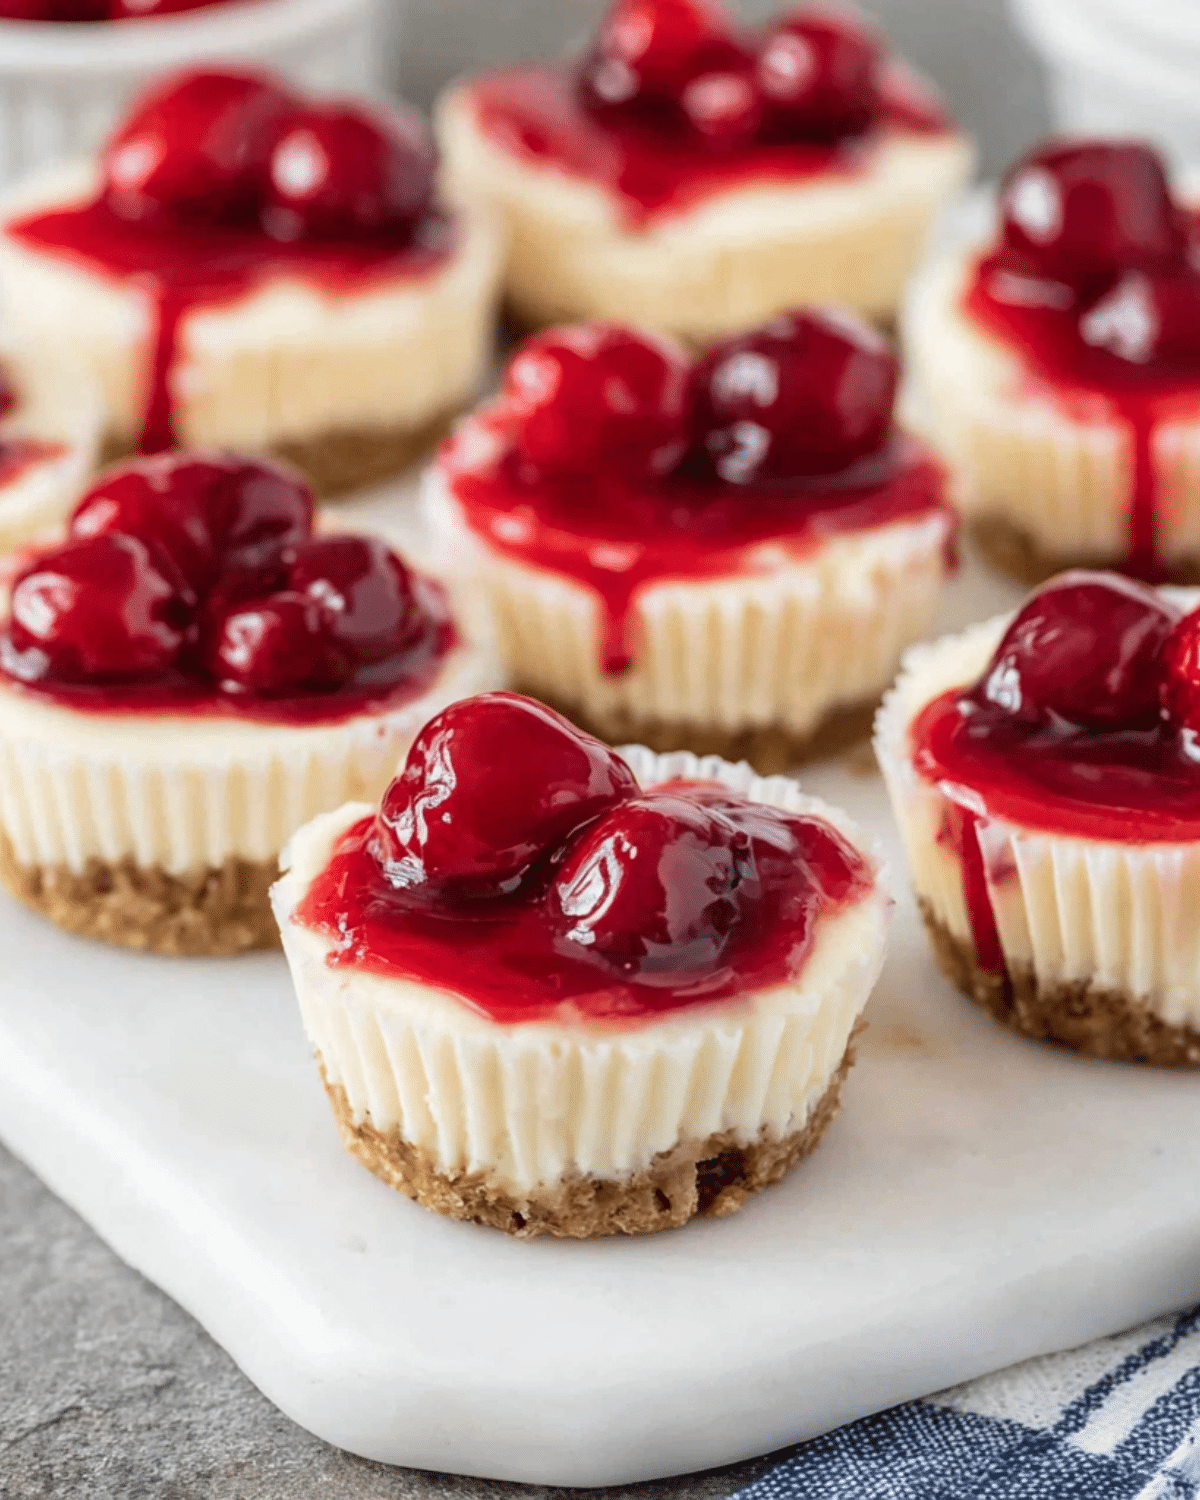
Mini Cherry Cheesecakes are a classic treat that combines rich, creamy cheesecake with a buttery crust and sweet cherry topping—all in a perfectly portioned bite. Whether you’re planning a holiday party, bridal shower, potluck, or weeknight dessert, these mini cheesecakes check every box. They’re simple to make, versatile in flavor, and impossible to stop at just one.
They also make a stunning addition to dessert tables, and since they’re served individually, they’re easy to transport and serve. In this article, you’ll discover how to make perfect Mini Cherry Cheesecakes step-by-step, tips to customize them, storage hacks, and answers to common questions—plus some mouthwatering variations you’ll want to try immediately.
Looking for inspiration? Try our Vanilla Bean Brown Butter Cheesecake for another creamy crowd-pleaser.
JUMP TO
Table of Contents
Why Mini Cherry Cheesecakes Are the Perfect Party Dessert
Mini desserts have become a staple for modern entertaining, and it’s easy to see why. These small treats offer convenience, customization, and aesthetic appeal without sacrificing flavor.
Bite-sized convenience for events and gatherings
Hosting a big crowd? Mini Cherry Cheesecakes save the hassle of slicing and serving a traditional cake. Simply pop them out of the mini muffin tin, top with cherry filling, and you’ve got dozens of ready-to-eat sweets. No plates, no mess.
Versatility in flavor and presentation
The beauty of this recipe lies in its flexibility. While cherry is a nostalgic favorite, you can top these mini cheesecakes with any fruit pie filling—blueberry, raspberry, or even lemon curd for a tangy twist. You can also change the crust to Oreo or gingersnap for a flavor makeover.
Check out our Sour Cherry Crumble Bars for another great cherry dessert variation.
Crowd-pleasing appeal for all ages
There’s just something about mini desserts that excites guests. Maybe it’s the cuteness, maybe it’s the portion control, but Mini Cherry Cheesecakes are always the first to disappear. They’re creamy, sweet, and just the right size to make guests come back for seconds (or thirds!).
Don’t miss our Apple Crisp Mini Cheesecakes for a seasonal spin on this format.
Ingredients You Need to Make Mini Cherry Cheesecakes
Making Mini Cherry Cheesecakes at home doesn’t require any complicated ingredients. In fact, most of what you need is likely already in your pantry or fridge. To get the best texture and flavor, using quality ingredients is key.
For the crust: classic and creative options
The base of these mini delights is a crumbly crust that adds a sweet and buttery contrast to the creamy filling.
| Ingredient | Notes |
|---|---|
| Graham cracker crumbs | About 9 full crackers, crushed finely |
| Unsalted butter | Melted to bind the crumbs |
| Granulated sugar | Enhances the sweetness of the base |
While graham crackers are a classic, you can get creative! Nilla wafers, gingersnaps, or even Oreo cookies make excellent alternatives.
Check out our Salted Caramel Apple Pie Bars if you love buttery crust desserts with fruit.
Creamy cheesecake filling essentials
The heart of any cheesecake lies in its creamy, tangy filling. For best results, always use full-fat, brick-style cream cheese—not the spreadable kind.
| Ingredient | Notes |
|---|---|
| Cream cheese | Two 8 oz blocks, softened |
| Granulated sugar | Sweetens the base |
| Eggs | Two large eggs bind and fluff the batter |
| Vanilla extract | Adds aroma and warmth |
Beating the cream cheese until smooth and fluffy (around 3-5 minutes) makes a huge difference in texture.
Toppings that take it over the top
This is where you add the signature cherry goodness. While store-bought pie filling is super convenient, you can always use homemade cherry topping or even swap it with fresh berries and whipped cream.
| Topping | Options |
|---|---|
| Cherry pie filling | Use a generous tablespoon per cheesecake |
| Whipped cream | Optional but delicious with fresh berries |
| Fresh cherries | For a rustic summer feel |
Don’t miss our Strawberry Cheesecake Truffles for another fruity and creamy bite-sized dessert.
Tools and supplies that make prep easier
You don’t need fancy equipment, but the right tools help speed things up:
- Mini muffin pan with liners
- Hand or stand mixer
- Food processor or blender (for crust)
- Tart shaper or spoon to press crust
Step-by-Step Recipe for Mini Cherry Cheesecakes
Let’s walk through the recipe in detail. It’s broken into three easy layers: crust, filling, and topping.
Making the graham cracker or cookie crust
Start by crushing your graham crackers into fine crumbs using a food processor. In a bowl, combine crumbs with sugar and melted butter. Stir until evenly moistened.
Add 1 to 2 teaspoons of the crumb mixture into each lined mini muffin tin. Press down firmly with a tart shaper or spoon to form the base.
Bake at 350°F (175°C) for 5 minutes if you like a firmer crust, or move directly to the filling if you prefer it softer.
Whipping the creamy cheesecake filling
In a large bowl, beat the softened cream cheese for about 3 minutes until smooth. Add sugar, eggs, and vanilla. Beat again until light and fluffy.
Spoon the filling into each muffin tin until about 2/3 full. The batter will rise slightly during baking.
Assembling and baking to perfection
Bake in a preheated 350°F oven for 17–20 minutes or until the centers are slightly set and not jiggly. Remove and let them cool in the pan for 10 minutes, then transfer to a wire rack.
Refrigerate for at least 2 hours before topping.
Chilling, topping, and serving
Once cooled and firm, spoon a generous tablespoon of cherry pie filling on top of each cheesecake. Try to include at least one whole cherry per piece. Refrigerate until ready to serve.
For a fancy finish, top with whipped cream or a sprinkle of crushed graham cracker crumbs.
Discover great ideas like our Pumpkin Cheesecake Truffles for fun ways to reinvent cheesecake into new forms.
Expert Tips for the Best Mini Cherry Cheesecakes
A few smart baking tricks can take your Mini Cherry Cheesecakes from good to unforgettable. Here’s how to make sure every batch comes out perfect.
How to avoid sunken centers
Mini cheesecakes often sink in the center when they’re overbaked or cooled too quickly. To prevent this:
- Do not overmix the batter—too much air causes collapse.
- Avoid opening the oven door during baking.
- Let them cool gradually before refrigerating.
The importance of full-fat cream cheese
Using full-fat block cream cheese ensures a rich, velvety texture. Low-fat versions or tub-style spreads can lead to a runny or grainy result.
Looking for inspiration? Try our rich and fluffy Pumpkin Cheesecake Cookies for another creamy dessert made right.
Perfect crust-to-filling ratio
Stick with 1–2 teaspoons of crust per cup, and fill each liner just two-thirds full with cheesecake batter. This keeps the proportions ideal and prevents overflow during baking.
Freezing and make-ahead advice
These cheesecakes are freezer-friendly—just skip the topping. Wrap them in plastic wrap and place in a sealed container for up to 3 months. Add the cherry pie filling just before serving for the freshest flavor.
Don’t miss our No-Bake Pumpkin Cheesecake Balls for another freezer-friendly dessert idea.
Variations on the Classic Mini Cheesecake
Mini Cherry Cheesecakes are endlessly customizable. Switch up the crust, filling, or toppings to create your own signature version.
Swap the cherry topping with other fruit fillings
Try canned or homemade blueberry, raspberry, or even lemon pie fillings. You can also use a spoonful of jam or compote if you’re short on pie filling.
Use Oreos, Nilla Wafers, or gingersnaps for crust
Replace graham crackers with chocolate sandwich cookies or spicy gingersnaps for a flavor boost. Just crush and mix with melted butter.
Make them no-bake for quick prep
Skip the oven by using a no-bake cheesecake mixture and chilling in the fridge for 2–3 hours. Perfect for hot days when you want dessert without turning on the heat.
Mini cheesecakes in jars for gifting
Serve these cheesecakes in mini mason jars for a sweet gift or party favor. Layer crust, filling, and cherry topping, then seal and chill.
Check out our Pumpkin Pie Overnight Oats if you love creative mason jar recipes.
How to Store and Freeze Mini Cherry Cheesecakes
Keeping these cheesecakes fresh is easy if you follow a few simple tips.
Refrigerator storage tips
Store cheesecakes in an airtight container in the fridge for up to 5 days. Keep them cold until ready to serve to maintain their firm texture.
Freezing without toppings
To freeze, wrap each plain mini cheesecake tightly in plastic wrap and place them in a freezer-safe bag or container. They’ll last up to 3 months.
Thawing and topping before serving
Thaw overnight in the refrigerator. Add your cherry pie filling or other toppings just before serving for best flavor and presentation.
FAQs About Mini Cherry Cheesecakes
Can you make mini cheesecakes without a crust?
Yes! You can bake the cheesecake filling directly in lined tins. They’ll be softer at the base but still delicious.
Why do mini cheesecakes sink in the middle?
This usually happens from overbaking or rapid cooling. Bake just until set and let them cool slowly.
Can I use homemade cherry topping instead of canned?
Absolutely. Homemade cherry compote or pie filling gives a fresher taste and allows you to control sweetness.
How long can you store mini cheesecakes in the fridge?
Properly stored in an airtight container, they’ll stay fresh in the fridge for up to 5 days.
Conclusion – The Magic of Mini Cherry Cheesecakes
Mini Cherry Cheesecakes are the perfect dessert for any celebration, from birthdays to holidays and everything in between. They’re simple, crowd-pleasing, and easy to customize with your favorite flavors.
Whether you stick with classic cherry or try a new variation, these bite-sized treats are sure to impress. So gather your ingredients, preheat your oven, and enjoy a dessert that delivers big flavor in a mini package.
Don’t miss our Easy Lemon Butter Garlic Pasta for a savory recipe to pair with this sweet finish.
PrintMini Cherry Cheesecakes
Mini Cherry Cheesecakes are creamy, bite-sized desserts made with a graham cracker crust, rich cream cheese filling, and a sweet cherry topping. They’re perfect for parties, holidays, and make-ahead treats.
- Prep Time: 15 minutes
- Cook Time: 20 minutes
- Total Time: 35 minutes
- Yield: 48 mini cheesecakes
- Category: Dessert
- Method: Baking
- Cuisine: American
- Diet: Vegetarian
Ingredients
- 1 1/4 cup graham cracker crumbs (about 9 full crackers)
- 1/2 cup unsalted butter, melted
- 1/4 cup granulated sugar (for crust)
- 2 packages (8 oz each) cream cheese, softened
- 1 cup granulated sugar (for filling)
- 2 large eggs
- 1 teaspoon vanilla extract
- 1 can (21 oz) cherry pie filling
Instructions
- Preheat the oven to 350°F (175°C) and line a mini muffin pan with paper liners.
- Crush graham crackers into fine crumbs using a food processor or blender.
- In a bowl, mix crumbs with melted butter and 1/4 cup sugar until combined.
- Spoon 1–2 teaspoons of crust mixture into each liner and press down firmly.
- In a separate bowl, beat softened cream cheese for about 3 minutes until smooth.
- Add 1 cup sugar, eggs, and vanilla extract. Beat until light and fluffy.
- Fill each muffin liner about 2/3 full with the cheesecake mixture.
- Bake for 17–20 minutes or until centers are set.
- Cool in pan for 10 minutes, then transfer to a wire rack to cool completely.
- Refrigerate for at least 2 hours before topping.
- Top each mini cheesecake with a spoonful of cherry pie filling before serving.
Notes
- Use full-fat brick-style cream cheese for the best texture.
- Allow cheesecakes to cool gradually to prevent sinking.
- Cheesecakes can be frozen (without topping) for up to 3 months.
- Top with other fruit fillings, whipped cream, or fresh berries for variety.

