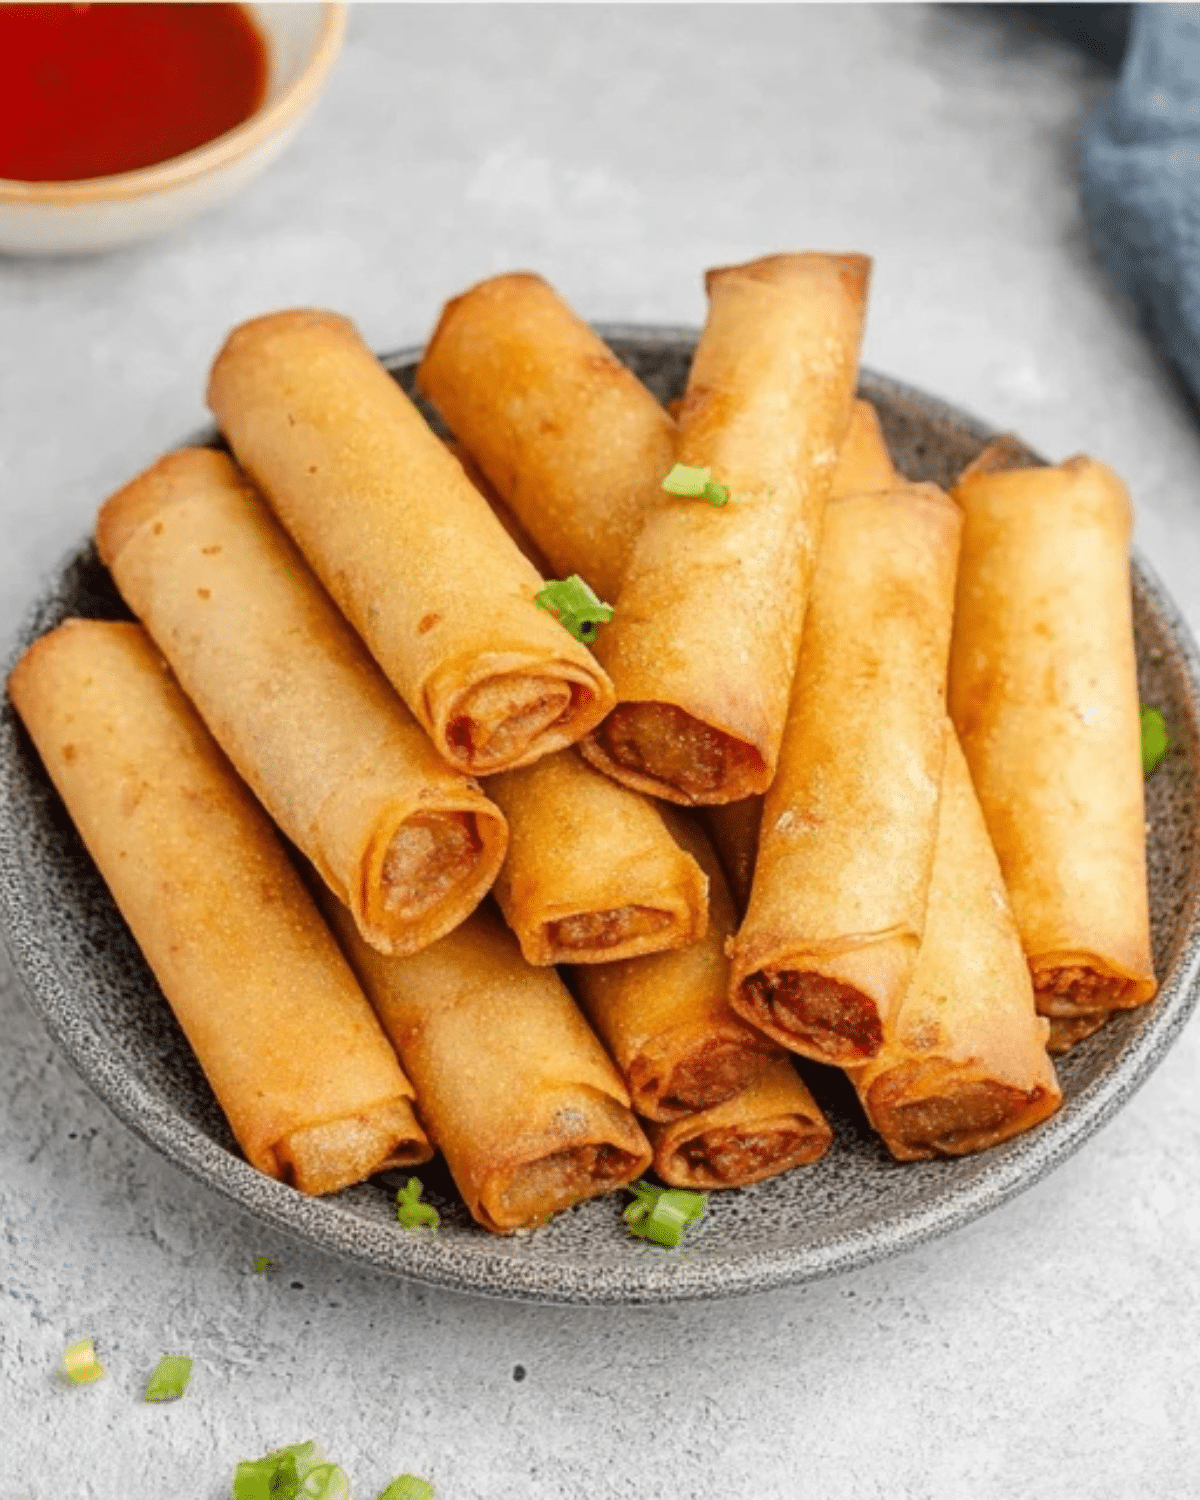
Golden, crispy, and packed with savory flavor, Vegan Lumpiang Shanghai is a plant-based take on one of the most loved Filipino appetizers. These bite-sized spring rolls feature a perfectly seasoned vegetable filling wrapped in thin lumpia wrappers and fried until irresistibly crunchy.
Traditionally made with ground meat, Lumpiang Shanghai gets a delicious vegan upgrade in this recipe without losing any of its classic taste or texture. Thanks to finely chopped vegetables, mushrooms, and bold seasonings, every bite delivers that familiar Filipino comfort food flavor — completely meat-free.
Whether you’re serving them at a party, making a festive appetizer, or preparing snacks ahead of time, vegan lumpiang shanghai is always a crowd-pleaser. They’re crispy on the outside, savory on the inside, and impossible to eat just one.
JUMP TO
Table of Contents
Why You’ll Love This Vegan Lumpiang Shanghai
Crispy and Flavor-Packed
These vegan spring rolls fry up beautifully golden and crunchy, while the inside stays juicy and well-seasoned. The balance of textures is exactly what makes vegan lumpiang shanghai so addictive.
100% Plant-Based Comfort Food
This recipe delivers the authentic flavors of Filipino lumpia using simple, plant-based ingredients. It’s proof that you don’t need meat to enjoy classic comfort food.
Perfect for Parties and Meal Prep
Lumpia are ideal for gatherings because they can be rolled ahead of time and cooked just before serving. They’re also freezer-friendly, making vegan lumpiang shanghai great for meal prep and last-minute entertaining.
Ingredients You’ll Need for Vegan Lumpiang Shanghai
For the Lumpia Filling
| Ingredient | Quantity | Purpose |
|---|---|---|
| Neutral oil | 1 tbsp | For sautéing |
| Onion, finely chopped | 1 small | Adds savory depth |
| Garlic, minced | 3 cloves | Aromatic base |
| Carrots, finely minced | 1 cup | Adds sweetness and texture |
| Mushrooms, finely chopped | 1 cup | Adds umami flavor |
| Plant-based ground (optional) | 1 cup | Adds hearty texture |
| Green onions, chopped | ¼ cup | Fresh flavor |
| Soy sauce or tamari | 2 tbsp | Salty umami |
| Black pepper | ½ tsp | Mild heat |
| Salt | To taste | Enhances flavor |
Lumpia Wrappers
- Spring roll wrappers or lumpia wrappers (about 25–30 sheets)
- Keep wrappers covered with a damp towel to prevent drying out
For Cooking
- Neutral oil (vegetable, canola, or avocado oil) for frying
- Optional: cooking spray if baking or air-frying
Optional Dipping Sauces
- Sweet chili sauce
- Banana ketchup
- Garlic vinegar dipping sauce
- Spicy soy dipping sauce
Pro Tip:
Chop the vegetables very finely so the filling cooks evenly and stays compact inside the wrapper. This helps create the tight, crispy texture that makes vegan lumpiang shanghai so satisfying.
How to Make Vegan Lumpiang Shanghai Step by Step
Prepare the Lumpia Filling
Heat 1 tablespoon neutral oil in a large skillet over medium heat. Add the finely chopped onion and sauté for 2–3 minutes until soft and translucent.
Next, add the minced garlic and cook for 30 seconds, just until fragrant. Stir in the carrots, mushrooms, and plant-based ground (if using). Cook for 5–7 minutes, stirring often, until the vegetables soften and any moisture evaporates.
Season the mixture with soy sauce, black pepper, and salt to taste. Stir in the chopped green onions, then remove the pan from heat and allow the filling to cool completely.
Cooling the filling is essential — warm filling can soften the wrappers and make rolling difficult.

Set Up Your Rolling Station
Lay out a clean work surface and place one lumpia wrapper in front of you in a diamond shape. Keep the remaining wrappers covered with a damp towel to prevent drying out.
Prepare a small bowl of water to seal the wrappers.
Assemble the Vegan Lumpiang Shanghai
Spoon 1–2 tablespoons of the cooled filling across the lower third of the wrapper. Spread it into a thin line, leaving space on both sides.
Fold the bottom corner over the filling, then fold in the left and right sides tightly. Roll upward into a snug cylinder. Dip your finger in water and lightly seal the edge.
Repeat with the remaining wrappers and filling.
Pro Tip:
Avoid overfilling. Tightly rolled lumpia fry evenly and stay crisp longer.
Fry Until Golden and Crispy
Heat 2–3 inches of neutral oil in a deep skillet or pot to 350°F (175°C).
Carefully add the lumpia in batches, making sure not to overcrowd the pan. Fry for 3–4 minutes, turning occasionally, until evenly golden brown and crispy.
Transfer the cooked lumpia to a wire rack or paper towel-lined plate to drain excess oil.
Alternative Cooking Methods
Air Fryer Method:
Brush or spray the lumpia lightly with oil. Air fry at 375°F (190°C) for 10–12 minutes, flipping halfway, until crisp and golden.
Baking Method:
Preheat oven to 400°F (205°C). Arrange lumpia on a lined baking sheet, brush with oil, and bake for 18–22 minutes, flipping halfway.
While frying gives the crispiest result, these methods work well for a lighter version of vegan lumpiang shanghai.
Tips for the Best Vegan Lumpiang Shanghai
Don’t Overfill
Too much filling can cause wrappers to burst and absorb excess oil.
Seal the Wrappers Properly
Use just enough water to seal — too much can make wrappers soggy.
Maintain Oil Temperature
Keep oil between 350–365°F for even cooking and maximum crispiness.
Cook in Small Batches
Overcrowding lowers oil temperature and results in greasy lumpia.
Serve Hot
Vegan lumpiang shanghai tastes best fresh and hot, straight from the fryer.
Chef’s Tip:
If making ahead, freeze uncooked lumpia in a single layer, then transfer to a freezer bag. Fry straight from frozen — no thawing needed.
Tasty Variations of Vegan Lumpiang Shanghai
Mushroom-Loaded Vegan Lumpia
Increase the mushrooms to 2 cups and skip the plant-based ground for a deeply savory, umami-rich filling. Finely chopped mushrooms create a juicy texture that closely mimics the classic version.
Tofu Vegetable Lumpiang Shanghai
Add ½ cup finely crumbled extra-firm tofu to the filling for extra protein. Be sure to press the tofu well to remove excess moisture before mixing it in.
Spicy Vegan Lumpiang Shanghai
Mix 1–2 teaspoons chili garlic sauce or sambal oelek into the filling for a spicy kick. Serve with sweet chili sauce to balance the heat.
Gluten-Free Vegan Lumpia
Use gluten-free spring roll wrappers and replace soy sauce with tamari. The rest of the ingredients are naturally gluten-free, making this version easy to adapt.
FAQ – Vegan Lumpiang Shanghai
Can I freeze vegan lumpia?
Absolutely. Freeze uncooked lumpia in a single layer, then transfer to a freezer bag. Fry straight from frozen — just add 1–2 extra minutes of cooking time.
Can I make vegan lumpiang shanghai ahead of time?
Yes. You can roll the lumpia up to 24 hours in advance, store them covered in the refrigerator, and fry them just before serving.
What oil is best for frying lumpia?
Neutral oils like canola, vegetable, or avocado oil work best because they have a high smoke point and don’t overpower the flavor.
Can I bake or air-fry lumpiang shanghai?
Yes. While frying gives the crispiest result, baking or air-frying works well for a lighter option. Just be sure to brush or spray the rolls with oil.
Conclusion
Crispy, savory, and completely plant-based, Vegan Lumpiang Shanghai proves that classic Filipino comfort food can be made without meat — and without sacrificing flavor. Each bite delivers that signature crunch, packed with a well-seasoned vegetable filling that’s rich, satisfying, and incredibly addictive.
Whether you’re cooking for a party, meal prepping, or simply craving a nostalgic favorite with a vegan twist, this recipe fits every occasion. With make-ahead options, freezer-friendly prep, and flexible cooking methods, it’s a dish you’ll return to again and again.
Once you master this recipe, vegan lumpiang shanghai will become a staple in your kitchen — crispy, comforting, and always a crowd favorite.
PrintVegan Lumpiang Shanghai – Crispy Filipino Spring Rolls

Vegan Lumpiang Shanghai is a crispy Filipino-style spring roll made completely plant-based. Filled with finely chopped vegetables and savory seasonings, these golden rolls deliver classic lumpia flavor with a crunchy exterior and satisfying vegan filling.
- Prep Time: 30 minutes
- Cook Time: 15 minutes
- Total Time: 45 minutes
- Yield: 25–30 lumpia 1x
- Category: Appetizer
- Method: Frying
- Cuisine: Filipino
- Diet: Vegan
Ingredients
- 1 tbsp neutral oil (for sautéing)
- 1 small onion, finely chopped
- 3 cloves garlic, minced
- 1 cup carrots, finely minced
- 1 cup mushrooms, finely chopped
- 1 cup plant-based ground (optional)
- 1/4 cup green onions, chopped
- 2 tbsp soy sauce or tamari
- 1/2 tsp black pepper
- Salt, to taste
- 25–30 lumpia or spring roll wrappers
- Water, for sealing wrappers
- Neutral oil, for frying
Instructions
- Heat 1 tablespoon oil in a skillet over medium heat. Add onion and sauté until translucent.
- Add garlic and cook for 30 seconds until fragrant.
- Stir in carrots, mushrooms, and plant-based ground (if using). Cook 5–7 minutes until softened and moisture evaporates.
- Season with soy sauce, black pepper, and salt. Stir in green onions, then remove from heat and let filling cool completely.
- Lay one wrapper in a diamond shape. Place 1–2 tablespoons of filling near the bottom edge.
- Fold bottom corner over filling, fold in sides, and roll tightly. Seal edge with water.
- Repeat with remaining wrappers and filling.
- Heat oil to 350°F (175°C). Fry lumpia in batches for 3–4 minutes until golden and crispy.
- Drain on paper towels or a wire rack and serve hot with dipping sauce.
Notes
- Do not overfill wrappers to prevent bursting during frying.
- Ensure filling is fully cooled before rolling to keep wrappers intact.
- Maintain oil temperature for even browning and crispiness.
- Lumpia can be frozen uncooked and fried directly from frozen.
- Serve immediately for best texture.
Nutrition
- Serving Size: 3 lumpia
- Calories: 220
- Sugar: 4g
- Sodium: 480mg
- Fat: 12g
- Saturated Fat: 2g
- Unsaturated Fat: 9g
- Trans Fat: 0g
- Carbohydrates: 22g
- Fiber: 3g
- Protein: 6g
- Cholesterol: 0mg