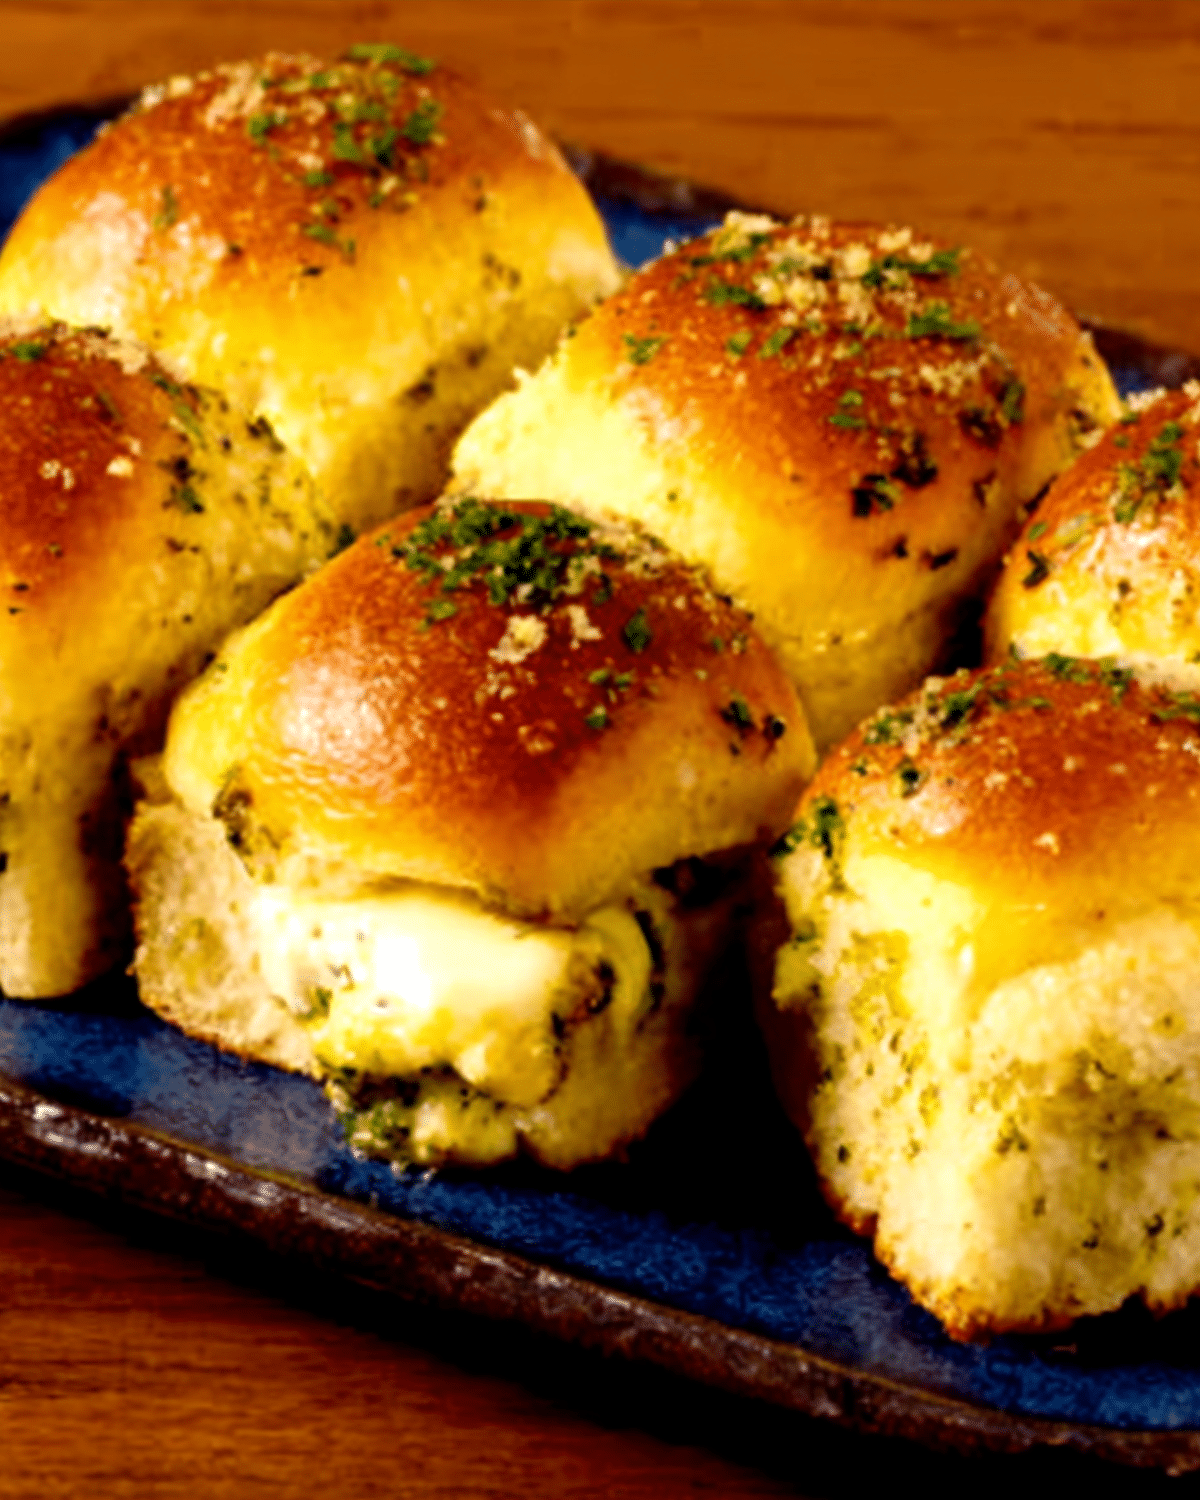
Craving something quick, cheesy, and bursting with garlic flavor? These cheesy garlic bombs hit all the right notes—fluffy biscuit dough stuffed with gooey melted cheese and brushed with buttery garlic sauce that sinks right into every bite. Whether you’re planning game night, a cozy dinner side, or a party platter, this savory snack will disappear fast.
With just a few pantry staples and less than 20 minutes of total cook time, cheesy garlic bombs are a game-changer for home cooks of all skill levels. Plus, they’re endlessly customizable to your taste—spicy, herby, or even sweet and savory. In this article, you’ll find step-by-step instructions, pro tips, and variations to keep this recipe exciting every time you make it.
Looking for more bite-sized ideas? Check out our pizza cupcakes for another easy crowd-pleaser.
JUMP TO
Table of Contents
Why Cheesy Garlic Bombs Are the Ultimate Party Snack
The irresistible combo of garlic, butter, and cheese
There’s just something magical about the trio of garlic, butter, and melted cheese. Each bite of these garlic bombs delivers the same satisfaction as pulling apart a slice of cheesy garlic bread—only better. The buttery glaze seeps into the cracks of the biscuit dough, soaking every crumb in flavor. The result? A crisp-golden outside and molten, cheesy center that stretches when you pull them apart.
Unlike standard rolls or store-bought appetizers, these deliver gourmet taste without the hassle. You can use string cheese or cubed mozzarella, and the garlic butter can be enhanced with parsley, Italian herbs, or even a hint of red chili for extra heat.
Quick prep and minimal ingredients
One of the biggest advantages of this recipe is how little it takes to whip up. With only five ingredients—store-bought biscuits, mozzarella, butter, garlic powder, and parsley—you can have these in the oven in under 10 minutes. That makes them a top-tier solution for busy weeknights, unexpected guests, or even lazy Sundays when you want comfort food without a huge grocery haul.
No yeast, no dough-making, no rising. Just pop open a biscuit can, stuff them with cheese, bake, and brush. It’s that simple. And if you’re in a real rush, you can even prep them ahead of time and refrigerate until ready to bake.
Discover great ideas like these Texas Roadhouse rolls for more easy bread side dishes.
Ideal for game nights, holidays, and potlucks
Cheesy garlic bombs are built for sharing. They’re small, finger-friendly, and ultra-satisfying—just the kind of thing guests keep reaching for. Serve them on a platter with toothpicks and a side of warm marinara, ranch, or garlic aioli, and watch them vanish.
They’re also incredibly kid-friendly, especially when made with mild cheese and no added spice. And if you’re hosting for a mixed crowd, try offering a variety of fillings in one batch—like cheddar, jalapeño jack, or herbed cream cheese—to keep things exciting.
Don’t miss our French onion dip recipe for a perfect pairing with these savory bites.
Ingredients Needed for Cheesy Garlic Bombs
Making cheesy garlic bombs doesn’t require fancy ingredients or complicated prep. In fact, one of the biggest perks of this recipe is how accessible it is—even for beginners. All you need is a few staples, but choosing the right ones can take these from good to unforgettable.
Choosing the right biscuit dough
Let’s start with the base. The secret to a soft yet golden exterior lies in your biscuit choice. Pre-packaged refrigerated biscuit dough is the go-to here, especially buttermilk biscuits in jumbo size (8-count tubes work best). Pillsbury Grands is a popular option, but any similar brand will work.
Avoid flaky-layered biscuits—they tend to break apart when stuffed. Instead, go for solid-style biscuits that can be pinched and sealed tightly around the cheese.
You can also experiment with homemade biscuit dough, but keep in mind it’ll require more prep and mess. If you’re looking to keep things fast, canned dough wins every time.
Looking for inspiration? Try our easy black pepper chicken recipe to pair with these bombs for a full meal.
Best cheeses to use (beyond mozzarella)
Mozzarella is the classic choice for cheesy garlic bombs—and for good reason. It melts into that iconic gooey stretch that makes each bite satisfying. Use whole milk mozzarella (block or string cheese) for best results. String cheese works particularly well because it’s pre-portioned and easy to wrap.
But don’t stop there. If you want to mix things up, here are a few great alternatives:
| Cheese Type | Texture When Baked | Flavor Profile |
|---|---|---|
| Mozzarella (whole) | Stringy, melty | Mild and creamy |
| Cheddar (sharp) | Oozes but firm | Tangy and bold |
| Pepper Jack | Creamy with kick | Spicy and buttery |
| Havarti | Ultra creamy | Slightly sweet |
| Gouda (young) | Smooth melt | Nutty and mellow |
You can even blend cheeses for unique flavor combos. Try mozzarella + cheddar or gouda + cream cheese for a richer center.
Don’t miss our cheesy root vegetable gratin if you’re a cheese lover looking for hearty side dishes.
Garlic butter topping: herbs, butter, and flavor hacks
The real magic happens once the garlic bombs come out of the oven. While still piping hot, they’re brushed with a luscious blend of melted butter, garlic powder, and herbs.
Here’s how to perfect it:
- Butter: Use unsalted butter so you can control the saltiness.
- Garlic powder: Add at least 1 tsp per 4 tbsp of butter for rich, aromatic flavor.
- Herbs: Dried parsley is classic, but Italian seasoning, thyme, or oregano also work well.
- Optional kick: A pinch of chili flakes or cayenne adds heat.
- Parmesan: Sprinkle some grated parm for extra savoriness and texture.
Tip: Brush generously while the bombs are hot so the butter soaks into every crevice.
Want a sweet-and-savory twist? Add a drizzle of honey or maple syrup to the butter for honey garlic bombs—perfect for brunch or holiday spreads.
Check out our butter cake recipe for another way to celebrate rich, buttery flavor.
Step-by-Step Instructions to Make Cheesy Garlic Bombs
You’ve got your ingredients lined up—now it’s time to turn them into deliciously gooey, golden-brown garlic bombs. This method is beginner-friendly and takes less than 20 minutes from start to finish. Whether you’re cooking solo or getting the kids involved, it’s fun, fast, and foolproof.
How to stuff and seal the biscuits perfectly
Start by preheating your oven to 400°F (200°C) and lining a baking sheet with parchment paper or a silicone baking mat.
Take each refrigerated biscuit and gently flatten it in your palm or on a clean surface. You want enough space to encase your cheese cube or piece of string cheese completely. Place the cheese in the center, then gather the edges of the dough and pinch to seal tightly.
Be sure there are no gaps or cracks—any openings will allow the cheese to leak out while baking. Once sealed, place each bomb seam-side down on your prepared baking sheet.
Pro tip: Lightly dust your hands with flour to avoid sticky dough.
Learn more about sealing techniques in our homemade fig bars recipe where dough handling is key to perfect texture.
Baking tips for golden, fluffy bombs
Slide your tray into the preheated oven and bake for 10 to 12 minutes, or until the tops are golden brown and firm to the touch. Keep a close eye on them during the last few minutes—overbaking will dry them out and possibly burn the garlic topping if pre-brushed.
Rotate the tray halfway through baking if your oven has hot spots.
When they’re done, they should look slightly puffed and golden, with a soft but cooked-through center. Resist the urge to poke one open—the cheese inside will be molten!
Check out our fig muffins recipe for more tips on achieving a perfect golden bake.
Brushing with garlic butter for maximum flavor
As soon as those cheesy garlic bombs come out of the oven, it’s time to brush them down. Don’t wait—they need to be hot to fully absorb the garlic butter and lock in the flavor.
Here’s how to prepare your garlic butter:
- Melt 4 tablespoons of unsalted butter
- Stir in 1 teaspoon garlic powder, 1 teaspoon dried parsley, and a pinch of salt (if using unsalted butter)
Use a pastry brush to coat the tops (and even sides) of each bomb thoroughly. Want to go the extra mile? Sprinkle freshly grated Parmesan or a touch of smoked paprika right after brushing for a visual and flavor upgrade.
You’ll want to serve them warm while the cheese is still soft and gooey.
Looking for more easy prep-and-serve dishes? Don’t miss our pumpkin crisp recipe – it’s the perfect dessert after a savory snack like this.
Variations and Custom Twists
While the classic cheesy garlic bombs are already irresistible, it doesn’t hurt to shake things up. Whether you like it spicy, herby, or a little sweet, these bombs can be easily tailored to suit any taste or occasion.
Add a spicy kick: jalapeños, chili flakes, or pepper jack
If you’re someone who loves heat, spice up the filling with:
- Chopped jalapeños: Add a few slices with the cheese before sealing the biscuit.
- Crushed red pepper flakes: Mix directly into the garlic butter topping.
- Pepper jack cheese: A perfect melty alternative that brings flavor and fire.
Want extra crunch and spice? Lightly sprinkle the tops with everything bagel seasoning or smoked paprika before baking.
Check out our cajun potato soup recipe for another spicy comfort dish to serve alongside.
Make them sweet and savory: honey garlic bombs
It may sound unusual, but sweet-and-savory garlic bombs are a hit. After baking, brush them with a honey garlic butter glaze (just add a teaspoon of honey or maple syrup to your garlic butter mixture). The combination of rich cheese and sweet garlic makes these perfect for brunches or holiday spreads.
For more variation:
- Add a slice of prosciutto or ham inside with the cheese.
- Use brie or goat cheese for an upscale twist.
Discover great ideas like our bacon pepper jack and jalapeño scones to take your brunch menu to the next level.
Kid-friendly and lunchbox-approved mini bombs
Make mini versions using smaller biscuit cuts and mild cheeses. Mozzarella sticks sliced into thirds are perfect for this. Once baked, pack them into school lunchboxes or serve them as after-school snacks.
You can even involve kids in the prep—just flatten the dough, let them add their cheese, and you handle the oven work.
Looking for more lunchbox ideas? Try our easy fresh peach fritters for a sweet pairing.
Serving Suggestions and Storage Tips
These garlic bombs are best hot out of the oven, but you can absolutely make them ahead and enjoy later.
What to serve with cheesy garlic bombs
Here are some great ways to serve them:
- With marinara sauce or ranch as a dip
- Alongside pasta dishes like spaghetti or lasagna
- As a side for soup, like tomato or creamy potato
- On a brunch board with eggs and fruit
They’re also excellent for game day platters or potlucks.
How to keep them crispy for longer
To avoid soggy bottoms, let them rest on a wire rack instead of a plate after baking. This allows airflow underneath and keeps the crust crisp. You can also reheat in a toaster oven or air fryer at 350°F for 5–7 minutes.
Avoid microwaving for too long—it makes them rubbery.
Freezing and reheating without losing flavor
To freeze:
- Bake and cool completely.
- Wrap individually in foil or store in an airtight container.
- Freeze for up to 2 months.
To reheat: Thaw in the fridge overnight or microwave briefly to soften, then finish in the oven for 5–10 minutes to crisp up again.

Frequently Asked Questions About Cheesy Garlic Bombs
Can I make cheesy garlic bombs ahead of time?
Absolutely. You can assemble the bombs, place them on a baking sheet, and store them covered in the fridge for up to 24 hours before baking. This makes them perfect for parties and holiday prep. Just bake as directed when ready, and brush with garlic butter while hot.
What’s the best cheese to use inside garlic bombs?
Mozzarella is the top choice for its stretch and melt, especially whole milk or string cheese. However, sharp cheddar, pepper jack, havarti, or even a combo of cheeses can elevate the flavor. Just avoid pre-shredded cheese—it doesn’t melt as well due to anti-caking agents.
How do I keep the cheese from leaking out?
The trick is in sealing the biscuit dough tightly. After placing the cheese in the center, press all the edges together firmly and roll it into a smooth ball with no visible seams. Bake seam-side down, and don’t overstuff the cheese.
Can I use puff pastry or pizza dough instead of biscuits?
Yes, but the texture will change. Puff pastry will create a flakier bomb, while pizza dough results in a more elastic, chewy texture. Adjust your baking time accordingly—puff pastry may need less time, and pizza dough might need more.
Do cheesy garlic bombs need to be served warm?
They’re definitely best warm. The cheese is gooey, and the garlic butter is aromatic right out of the oven. However, leftovers can be reheated in the oven or air fryer for a few minutes and will still be delicious.
Conclusion: Why You’ll Want to Keep This Recipe on Repeat
Cheesy garlic bombs aren’t just easy to make—they’re easy to love. With just a handful of ingredients and a short bake time, you get buttery, melty, flavor-packed bites that impress every time. Perfect for parties, weeknights, game days, or lazy Sundays, these bombs are endlessly versatile and crowd-pleasing.
Looking for more recipes that are quick, fun, and full of flavor? Don’t miss our vanilla bean brown butter cheesecake – it’s the perfect sweet finale after these savory bites.
PrintCheesy Garlic Bombs

Cheesy Garlic Bombs are quick, buttery bites filled with gooey mozzarella and brushed with garlic herb butter. A perfect 5-ingredient party snack ready in under 20 minutes.
- Prep Time: 5 minutes
- Cook Time: 10 minutes
- Total Time: 15 minutes
- Yield: 8 cheesy garlic bombs 1x
- Category: Appetizer
- Method: Baking
- Cuisine: American
- Diet: Vegetarian
Ingredients
- 1 can refrigerated buttermilk biscuits (8-count)
- 6 oz mozzarella cheese (block or string cheese)
- 4 tablespoons unsalted butter
- 1 teaspoon garlic powder
- 1 teaspoon dried parsley (or fresh)
- Salt to taste (optional)
Instructions
- Preheat oven to 400°F (200°C) and line a baking sheet with parchment paper or silicone mat.
- Cut mozzarella cheese into 8 equal cubes or pieces.
- Flatten each biscuit and place one piece of cheese in the center.
- Pinch the dough around the cheese to seal and roll into a ball.
- Place seam-side down on the baking sheet.
- Bake for 10–12 minutes until golden brown and puffed.
- While baking, melt the butter and stir in garlic powder, parsley, and salt if needed.
- Brush the garlic butter over the bombs immediately after baking while hot.
- Serve warm with dipping sauces or as a side dish.
Notes
- Use whole milk mozzarella for best meltability.
- Seal the dough tightly to prevent cheese leakage.
- Add chili flakes or pepper jack for a spicy version.
- Store leftovers in the fridge and reheat in the oven or air fryer.
- Freeze after baking and reheat at 350°F for best results.
Nutrition
- Serving Size: 1 bomb
- Calories: 252
- Sugar: 2g
- Sodium: 708mg
- Fat: 11g
- Saturated Fat: 6g
- Unsaturated Fat: 4g
- Trans Fat: 0g
- Carbohydrates: 26g
- Fiber: 1g
- Protein: 7g
- Cholesterol: 25mg