Cherry Breakfast Bars are the perfect balance of sweet, tart, and wholesome. If you’re looking for a simple make-ahead breakfast that feels like dessert but fuels your morning, these cherry breakfast bars deliver big flavor with nourishing ingredients. In this guide, you’ll learn how to make soft, chewy bars packed with juicy cherries, how to get the perfect crumb topping, and how to store them for busy weekdays. If you enjoy fruity baked goods like this Blueberry Breakfast Cake, you’ll absolutely love these homemade bars.
Cherry breakfast bars are ideal for meal prep, school lunches, quick snacks, and even light desserts. Because they combine fruit, oats, and natural sweetness, they feel indulgent while still being balanced. Let’s start with what makes these bars so special and why they deserve a spot in your weekly baking routine.
JUMP TO
Table of Contents
Why Cherry Breakfast Bars Are a Must-Try
Cherry breakfast bars stand out because they combine convenience with real fruit flavor. Unlike store-bought breakfast pastries loaded with preservatives, these bars use simple pantry ingredients and fresh or frozen cherries.
The Perfect Sweet-Tart Flavor Balance
Cherries bring a bold, slightly tart taste that cuts through sweetness. As a result, the bars never taste overly sugary. Instead, every bite offers a bright fruit flavor balanced by a buttery oat crust.
Moreover, cherries naturally contain antioxidants and vitamins, which makes these bars a smarter morning option compared to frosted pastries.
Soft Center with a Crumbly Oat Topping
Texture matters. That’s why cherry breakfast bars use a press-in crust that doubles as the crumble topping. The base stays firm enough to hold its shape, while the center remains soft and jammy.
Because the topping bakes to a golden finish, you get a gentle crunch that contrasts beautifully with the fruit layer.
Great for Meal Prep and Busy Mornings
Another reason cherry breakfast bars are so popular is convenience. You can bake a batch on Sunday and enjoy them all week. Simply slice into squares and store in an airtight container.
Additionally, they travel well. Pack them for school, work, or road trips without worrying about mess.
Ingredients for the Best Cherry Breakfast Bars
The beauty of cherry breakfast bars lies in their simplicity. Most ingredients are pantry staples, and the cherries provide the main burst of flavor.

Key Ingredients Overview
Here’s what you’ll need:
| Ingredient | Purpose | Tips |
|---|---|---|
| Cherries (fresh or frozen) | Main fruit layer | Pit and chop fresh cherries |
| Rolled oats | Structure & texture | Use old-fashioned oats |
| All-purpose flour | Stability | Spoon and level when measuring |
| Brown sugar | Moisture & flavor | Adds slight caramel note |
| Butter or coconut oil | Richness | Melted for easy mixing |
| Lemon juice | Brightens flavor | Enhances cherry taste |
| Cornstarch | Thickens filling | Prevents runny bars |
| Vanilla extract | Flavor depth | Optional but recommended |
| Salt | Balances sweetness | Don’t skip |
Because cherry breakfast bars rely on fruit for flavor, using quality cherries makes a difference.
Fresh vs. Frozen Cherries
Fresh cherries work beautifully when in season. However, frozen cherries are just as effective. Simply thaw and drain them before cooking the filling.
If you enjoy other cherry-based desserts, you might also love these Chocolate Cherry Brownies for a richer twist on fruit baking.
Natural Sweetener Options
While brown sugar provides classic flavor, you can substitute coconut sugar or maple syrup for a more natural option. Keep in mind that liquid sweeteners may slightly soften the crust.
Step-by-Step Guide to Making Cherry Breakfast Bars
Making cherry breakfast bars is straightforward, but following the right order ensures perfect texture.
Step 1: Prepare the Cherry Filling
Start by combining chopped cherries, lemon juice, sugar, and cornstarch in a saucepan over medium heat. Stir continuously until the mixture thickens and resembles jam.
This step is essential. Without thickening, the filling may spread too much and prevent clean slices.
Once thickened, remove from heat and let it cool slightly.
Step 2: Make the Oat Crust and Crumble
In a mixing bowl, combine rolled oats, flour, brown sugar, salt, and melted butter. Stir until crumbly but evenly coated.
Press about two-thirds of the mixture firmly into a parchment-lined baking pan. This creates a sturdy base for your cherry breakfast bars.
Step 3: Add the Cherry Layer
Spread the cooled cherry filling evenly over the crust. Make sure it reaches the edges but doesn’t overflow.
Then sprinkle the remaining oat mixture over the top. Don’t press it down too hard; loose crumbs create better texture.
Step 4: Bake to Golden Perfection
Bake at 350°F for 35–40 minutes until the top is golden brown and the center is set.
Allow the bars to cool completely before slicing. Although it’s tempting to cut them warm, cooling ensures clean squares.
Common Mistakes to Avoid
Even simple cherry breakfast bars can go wrong if a few key details are ignored.
Skipping the Thickening Step
If you don’t cook the cherry mixture long enough, the filling may turn watery. Always allow it to thicken properly before layering.
Overpacking the Crust
Press the base firmly, but don’t compress it too tightly. Otherwise, the bars can become dense instead of tender.
Cutting Too Soon
Patience pays off. Cooling allows the filling to set, which makes slicing easier and cleaner.
Healthy Variations of Cherry Breakfast Bars
Once you master classic cherry breakfast bars, you can easily adjust the recipe to fit different dietary needs. Because the base is flexible, small changes create new flavors without sacrificing texture.
Gluten-Free Cherry Breakfast Bars
To make gluten-free cherry breakfast bars, replace all-purpose flour with a 1:1 gluten-free baking blend. Additionally, ensure your oats are certified gluten-free. The result stays soft and chewy, especially if you don’t overbake.
Vegan Cherry Breakfast Bars
For a dairy-free version, substitute melted coconut oil for butter. You can also use maple syrup instead of refined sugar for a more natural sweetness. Since this recipe doesn’t rely on eggs, adapting it is simple.
Low-Sugar Option
If you prefer a lighter version, reduce the sugar in the cherry filling slightly. Because cherries already contain natural sweetness, the bars will still taste balanced. However, avoid removing sugar completely, as it helps with texture and structure.
Mixed Berry Breakfast Bars
You can combine cherries with raspberries or blueberries for a mixed berry twist. This variation adds complexity while maintaining the signature fruit-forward taste.
Pro Tips for Perfect Cherry Breakfast Bars
Although cherry breakfast bars are beginner-friendly, a few expert tricks can elevate them.
Use Parchment Paper for Easy Removal
Line your pan fully with parchment paper. Once cooled, simply lift the bars out in one piece before slicing. This prevents crumbling and uneven cuts.
Chill Before Slicing
After baking, allow the bars to cool at room temperature. Then refrigerate for at least 1 hour. As a result, the filling firms up and slicing becomes effortless.
Don’t Overbake
Cherry breakfast bars should have a golden top but a slightly soft center. Overbaking dries out the crust and reduces the chewy texture.
Boost Flavor with Citrus Zest
Adding a bit of lemon zest enhances the cherry flavor without overpowering it. In fact, citrus naturally brightens fruit-based desserts.
How to Store Cherry Breakfast Bars
One of the best things about cherry breakfast bars is how well they store. Because they’re sturdy and slice cleanly, they’re ideal for meal prep.
Room Temperature
Store in an airtight container for up to 3 days. Keep parchment between layers to prevent sticking.
Refrigeration
Refrigerate for up to 5–6 days. Since the filling contains fruit, refrigeration helps maintain freshness. Let bars sit at room temperature for 10–15 minutes before serving.
Freezing
Wrap individual bars tightly in plastic wrap and place in a freezer-safe bag. Freeze for up to 3 months. When ready to eat, thaw overnight in the refrigerator or at room temperature.
Serving Ideas for Cherry Breakfast Bars
Cherry breakfast bars are versatile enough for many occasions.
- Serve slightly warm with yogurt
- Add a drizzle of honey on top
- Pair with morning coffee or tea
- Cut into smaller squares for brunch platters
If you love fruit-forward baked goods, you may also enjoy these Mini Cherry Cheesecakes for a creamier cherry dessert option.
Frequently Asked Questions About Cherry Breakfast Bars
Can I use canned cherries?
Yes, but drain them thoroughly and reduce added sugar. Otherwise, the filling may become too loose.
Are cherry breakfast bars healthy?
Cherry breakfast bars can be part of a balanced diet, especially when made with oats and moderate sugar. They contain fruit and whole grains, which makes them more wholesome than processed pastries.
Why are my bars falling apart?
This usually happens if they’re sliced while still warm. Cooling completely allows the filling to set properly.
Can I make cherry breakfast bars ahead of time?
Absolutely. In fact, they taste even better the next day because the flavors meld together.
Can I use cherry jam instead of fresh cherries?
You can, but reduce the sugar and skip the cornstarch. Keep in mind that homemade filling offers fresher flavor.
Conclusion: Why You’ll Love Cherry Breakfast Bars
Cherry breakfast bars are sweet, tart, chewy, and incredibly convenient. Because they combine simple ingredients with bold cherry flavor, they feel comforting yet wholesome. Whether you’re meal-prepping for the week or baking for brunch, these bars deliver consistent results every time.
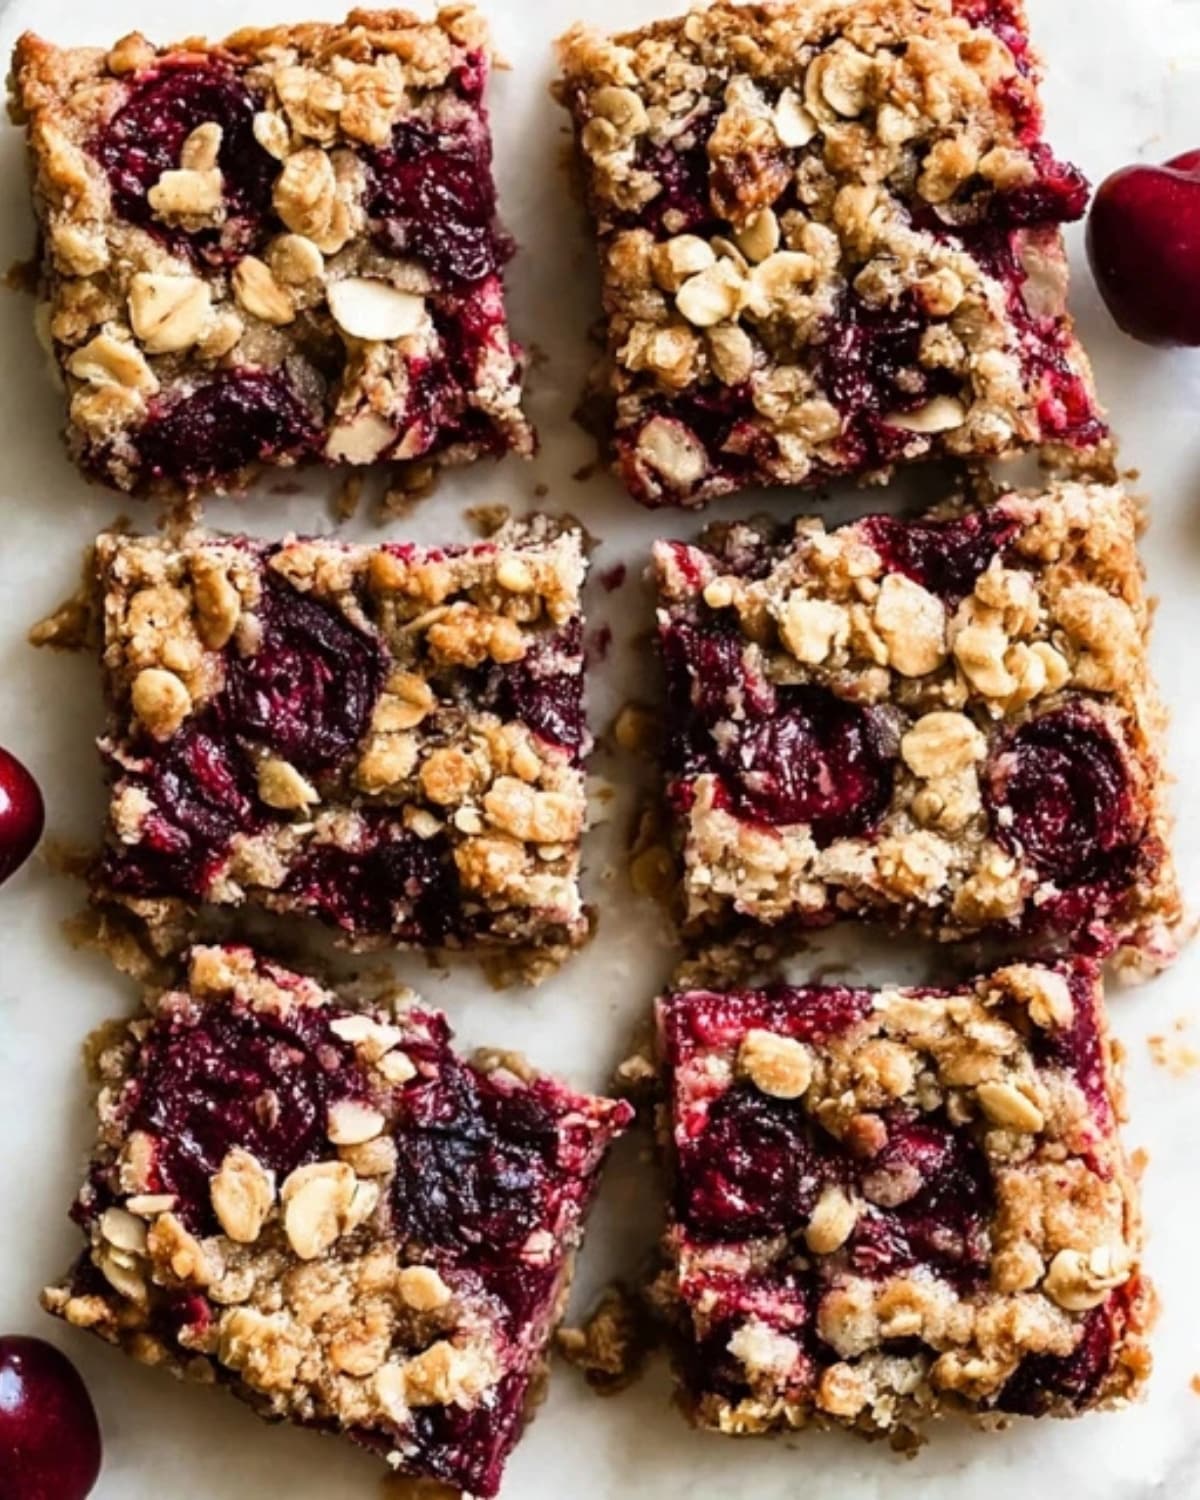
With their crumbly oat topping and jammy fruit center, cherry breakfast bars offer the perfect balance of texture and taste. Once you try them, they’ll likely become a regular part of your baking routine.
PrintCherry Breakfast Bars: Easy and Healthy Homemade Recipe

Cherry Breakfast Bars are soft, chewy oat bars layered with sweet-tart cherry filling and a golden crumble topping, perfect for meal prep or a quick morning treat.
- Prep Time: 20 minutes
- Cook Time: 40 minutes
- Total Time: 1 hour
- Yield: 9 bars 1x
- Category: Breakfast
- Method: Baking
- Cuisine: American
- Diet: Vegetarian
Ingredients
- 2 cups cherries (fresh or frozen), pitted and chopped
- 1 tablespoon lemon juice
- 1/3 cup granulated sugar
- 1 tablespoon cornstarch
- 1 cup rolled oats
- 3/4 cup all-purpose flour
- 1/2 cup brown sugar
- 1/2 cup unsalted butter, melted
- 1 teaspoon vanilla extract
- 1/4 teaspoon salt
Instructions
- Preheat oven to 350°F and line an 8×8-inch baking pan with parchment paper.
- In a saucepan over medium heat, combine chopped cherries, lemon juice, granulated sugar, and cornstarch. Stir until thickened and jam-like. Remove from heat and let cool slightly.
- In a mixing bowl, combine rolled oats, flour, brown sugar, salt, melted butter, and vanilla extract. Mix until crumbly.
- Press two-thirds of the oat mixture firmly into the prepared pan to form the crust.
- Spread the cherry filling evenly over the crust.
- Sprinkle the remaining oat mixture loosely over the top as a crumble.
- Bake for 35–40 minutes until the top is golden brown and the center is set.
- Allow to cool completely, then refrigerate for 1 hour before slicing into bars.
Notes
- If using frozen cherries, thaw and drain thoroughly before cooking.
- Do not skip thickening the cherry filling to avoid runny bars.
- Chilling before slicing ensures clean, neat squares.
- Store in an airtight container for up to 5 days in the refrigerator.
Nutrition
- Serving Size: 1 bar
- Calories: 260 kcal
- Sugar: 18 g
- Sodium: 110 mg
- Fat: 12 g
- Saturated Fat: 7 g
- Unsaturated Fat: 4 g
- Trans Fat: 0 g
- Carbohydrates: 36 g
- Fiber: 3 g
- Protein: 4 g
- Cholesterol: 30 mg