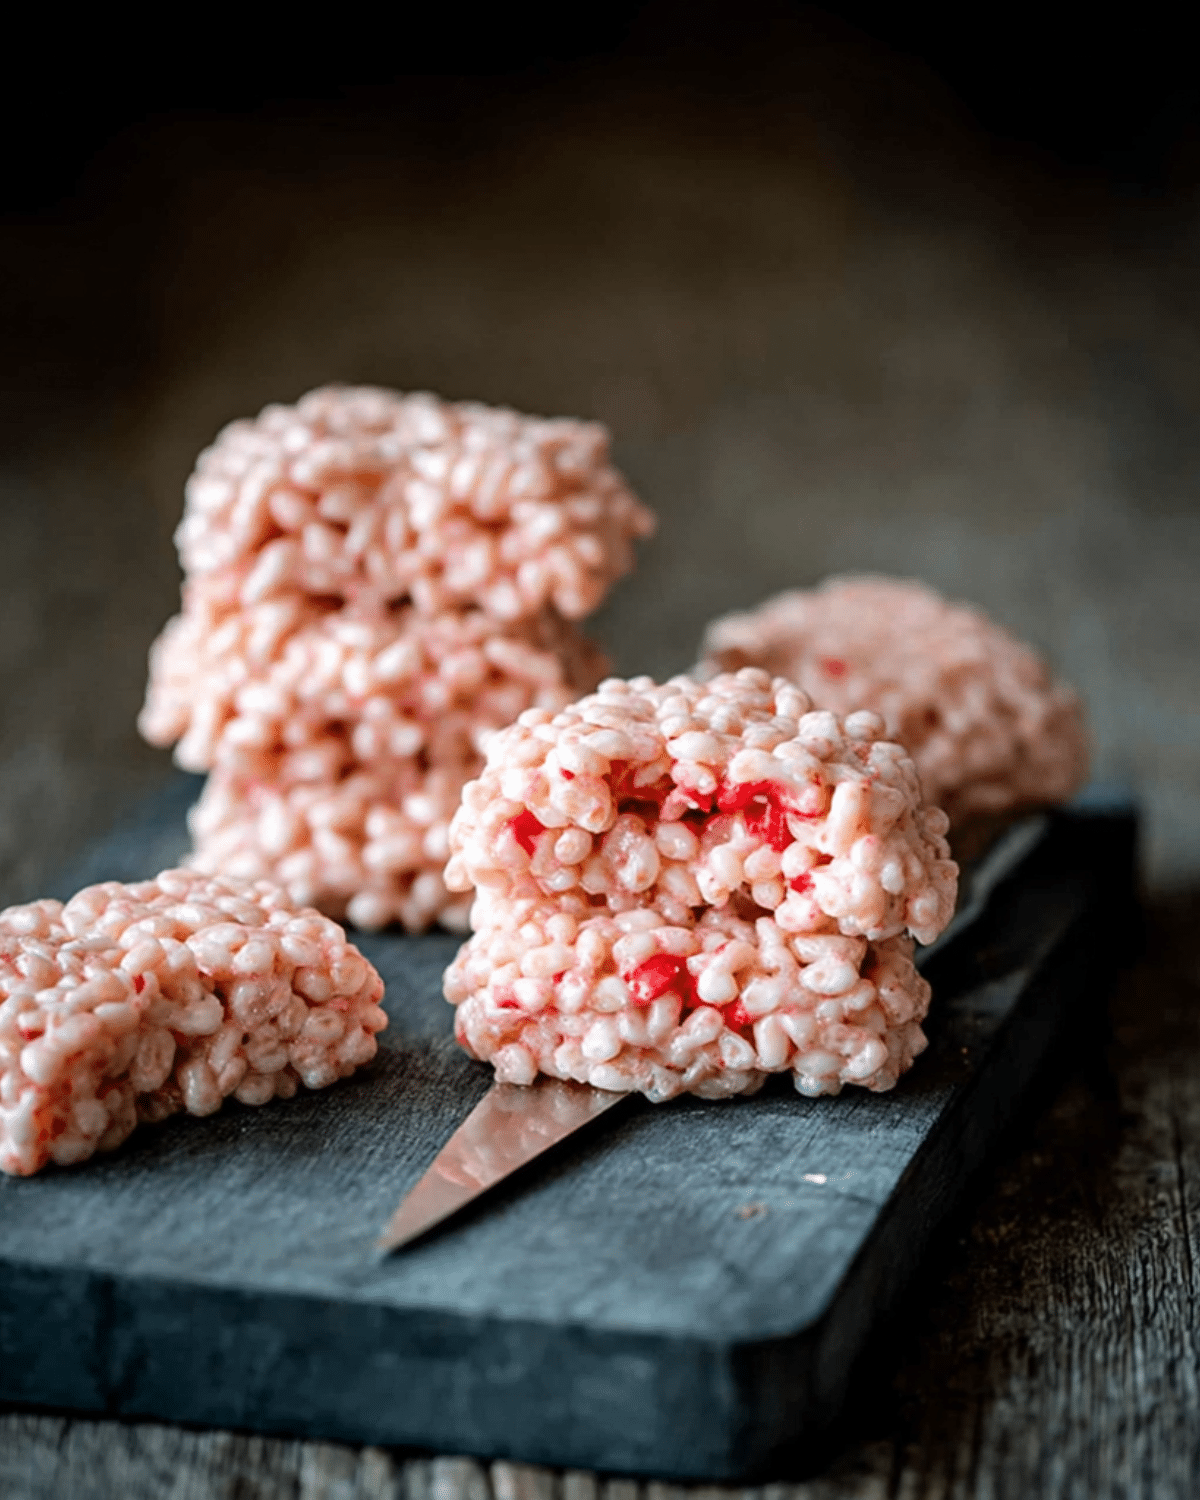
Halloween is the perfect time to blend creepy, creative fun with sweet, sticky treats—and these Marshmallow Rice Krispies (Bubbles) Halloween Brains are just the thing! They’re nostalgic, no-bake goodies with a delightfully ghoulish twist, making them ideal for Halloween parties, trick-or-treat bags, or a spooktacular family night in. Made with just a few pantry staples, these treats combine marshmallows, butter, and rice cereal to form brain-shaped bites that are scary good. In this article, you’ll learn how to craft these edible brains from scratch, get pro tips to perfect them, and even discover fun variations to inspire your Halloween dessert table.
Looking for inspiration? Try our Ruler Rice Krispies recipe for more themed treats that wow.
JUMP TO
Table of Contents
Why Marshmallow Rice Krispies Brains Are the Ultimate Halloween Treat
Nostalgic texture with spooky vibes
Rice Krispies (also called Rice Bubbles in places like Australia) have been a childhood favorite for decades. Their signature Snap! Crackle! Pop! sound brings instant nostalgia. But when transformed into a pinkish, squishy brain with marshmallow goo, they morph into a Halloween showstopper. The mix of chewy texture and playful shape creates a sensory experience that’s hard to forget—and just creepy enough to make kids giggle.
Why kids (and adults) love these “brains”
Let’s face it—Halloween is one of the few times of year when we want food to look gross. These pinkish blobs with red icing “blood” are both disgusting and delicious. Kids are captivated by the visual, and adults appreciate how simple yet effective the treats are. Plus, since they’re made without baking, it’s easy to involve little hands in the process.
Check out Apple Crumb Cake Recipe if you’re craving something less gory but equally delightful.
The origins of Rice Krispies as Halloween fun food
Although Rice Krispies Treats were invented in the 1930s by a Kellogg’s home economist, their versatility has made them a favorite for seasonal customization. From pumpkin shapes to spooky spiders, these cereal bars adapt beautifully for any occasion. Halloween “brains” just happen to be one of the most visually arresting variations. With just a few tweaks—like shaping and coloring—you transform a school lunch classic into a haunted party centerpiece.
Don’t miss our Pumpkin S’mores Cookies Recipe for another holiday-friendly twist on a childhood favorite.
Ingredients and Tools You’ll Need
Classic ingredients with a ghoulish twist
You don’t need any fancy ingredients to make this Halloween treat—just five basics:
| Ingredient | Quantity | Notes |
|---|---|---|
| Butter | 4 tablespoons | Unsalted works best |
| Marshmallows | 2 cups | Use pink and white for brain color |
| Salt | ¼ teaspoon | Enhances the sweetness |
| Rice Krispies (or Rice Bubbles) | 4 cups | Any puffed rice cereal works |
| Red Writing Icing | 1 tube (optional) | For realistic “blood” effect |
The red icing is optional, but it takes the brain effect over the top!
Discover great ideas like our Notebook Paper Rice Krispies Treats for other creative ways to customize this classic base.
Kitchen tools for shaping your marshmallow brains
To make things easier—and cleaner—you’ll want to have a few tools handy:
- Large heatproof bowl
- Saucepan (for double boiling)
- Mixing spoon or spatula
- Two tablespoons (for shaping)
- Non-stick baking paper
- Table knife (to create brain indent)
- Small dish of oil (to prevent sticking)
Having oiled utensils and hands will make shaping these brains much smoother.
Optional ingredients for added creep factor
Want to go the extra mile? Here are a few extras you can use:
- Black edible gel for “veins”
- Candy eyeballs to tuck in the center
- Green or purple food coloring for zombie variations
- Flavored marshmallows for a fruity kick
- Edible glitter for a sparkly ghoul effect
These customizations are perfect if you’re hosting a Halloween party and want a table full of creepy, colorful treats.
How to Make Halloween Marshmallow Rice Krispies Brains
Making these ghoulish treats is easier than you’d think. With a few smart techniques and some patience (yes, the setting time matters!), you’ll be serving up edible brains that look like they came straight from a haunted lab. Here’s exactly how to bring your spooky vision to life.
Best method to melt marshmallows safely
Although you can melt marshmallows in a microwave, a double boiler method gives you much more control. It also reduces the risk of scorching or uneven texture.
Here’s what to do:
- Fill a saucepan halfway with boiling water and place it on the stove.
- In a heatproof bowl, add the butter and marshmallows.
- Set the bowl over the saucepan without letting it touch the water.
- Bring the water back to a simmer and let the butter melt.
- Stir occasionally until the marshmallows become smooth and gooey.
Important tip: The mixture will look stringy and weird at first—don’t panic. Keep stirring, and it will eventually form a glossy, smooth paste.
If you’re using a mix of pink and white marshmallows, the color will melt into a creepy, brain-like pink hue—perfect for Halloween!
Learn more about Pumpkin Cheesecake Truffles if you’re a fan of no-bake desserts with seasonal flair.
Mixing, shaping, and indenting your “brains”
Once your marshmallow mixture is ready, the race begins—because this stuff gets sticky fast!
- Add the salt to your smooth mixture and stir it in.
- Turn off the heat, then pour in the Rice Krispies (or Rice Bubbles).
- Stir gently but thoroughly until all cereal is coated.
- Lightly oil two spoons and scoop out a generous blob of mixture.
- Use the second spoon to round the blob into a mound.
- Place it onto a tray lined with non-stick paper.
- Oil your fingers and flatten each mound slightly into an oval “brain” shape.
To create the center crease of the brain:
- Lightly oil a table knife and press it down the center of the mound.
- Use your fingers to hold the sides in place, so the shape doesn’t collapse.
- Repeat for each brain. Doing them in small batches (like five at a time) allows slight setting, which helps maintain shape.
How to decorate with red icing for realistic effect
Once your brains are shaped and firming up, it’s time for the fun part—making them look gross.
- Use red writing icing to drizzle “blood” across the top and into the brain grooves.
- Add splotches and drips to mimic fresh wounds.
- For an even gorier look, dab small amounts in random places to simulate trauma or damage.
Want to go further? Add black edible gel to simulate veins or tuck in candy eyeballs for a mad scientist vibe.
Check out Pumpkin Pie Overnight Oats for another make-ahead recipe that’s perfect for spooky mornings.
Once decorated, let your brains sit undisturbed for at least 4–5 hours. They’ll firm up enough to be handled or packaged, and still retain their ooey-gooey bite.
Pro Tips to Perfect Your Marshmallow Brains
How to keep mixture from sticking to your hands
This mixture is seriously sticky—like marshmallow-glue-on-your-skin sticky. But don’t worry! Here’s how to tame it:
- Lightly oil your hands and utensils. A small dish of neutral oil (like canola or vegetable) nearby makes it easy to dip your fingers or tools.
- Shape quickly while warm. The mixture gets harder to mold as it cools. Work in small batches while keeping the bowl warm over the hot water.
These small steps make a big difference and prevent your kitchen from turning into a monster mess.
Letting the brains set for maximum spookiness
These brains aren’t ready to party right away. Give them at least 4–5 hours to set completely on non-stick paper at room temperature. Don’t stack them until they’ve hardened on the outside—or you’ll end up with a sticky blob monster instead of distinct, brainy treats.
Store them in an airtight container lined with wax paper to keep them fresh for up to 3 days.
Storage, make-ahead, and serving ideas
Planning ahead for a Halloween bash or classroom party?
- Make them a day early. The texture improves as they sit.
- Individually wrap in cellophane bags and tie with Halloween ribbon for a festive favor.
- Add a spooky name card: “Zombie Brains” or “Monster Munchies” to complete your haunted table.
Don’t miss our Halloween Deviled Eggs — a savory, creepy twist for any party spread.
More Halloween Rice Krispies Ideas to Try
Zombie hands, witches’ hats, and other shapes
Once you’ve mastered the basic brain, the Rice Krispies monster lab is yours. Try these eerie shapes next:
- Witches’ hats: Use chocolate-dipped cones and top them with marshmallow treats.
- Ghosts or skulls: Press into silicone molds for easy shaping.
- Zombie hands: Flatten and carve finger shapes—complete with red icing claws!
Coloring your treats with natural dyes
If you’re not into food coloring, try natural tints:
- Beet powder or juice for a more realistic bloody pink
- Spirulina or matcha for ghastly green zombie skin
- Activated charcoal for a moody, gothic vibe
These options let you control how spooky—or subtle—your Halloween treats turn out.
Creative packaging for parties and trick-or-treat bags
Here’s how to make your brains even more impressive when gifting or sharing:
- Wrap each brain in clear cellophane and label them with a mini “lab tag” (think: Specimen No. 13).
- Use small black boxes with shredded red tissue for extra drama.
- Add googly eyes to bags for a playful, creepy touch!
Discover great ideas like our Fruit Leather Books Recipe for creative, packable snacks.

Frequently Asked Questions About Halloween Rice Krispies Treats
Can I make these treats ahead of time?
Yes! In fact, it’s better. Make them a day in advance and store in an airtight container at room temperature. They stay chewy and hold their shape for up to 3 days.
What cereal works best besides Rice Krispies?
Any puffed rice cereal will do—brands like Rice Bubbles, Crispy Rice, or even natural brown rice puffs. Just avoid flakes or granolas that won’t hold together when molded.
How do I store these to keep them fresh?
Once fully cooled and set, store in layers separated by wax paper in a container. Keep out of direct sunlight and humidity.
Are there allergy-friendly options for this recipe?
Absolutely. Use vegan marshmallows and dairy-free butter alternatives for plant-based versions. Double-check your cereal for gluten-free certification if needed.
Final Thoughts: Why These Halloween Brains Deserve a Spot at Your Spooky Table
If you want a treat that’s creepy, easy, and 100% crowd-pleasing, these Marshmallow Rice Krispies Halloween Brains check every box. They’re fast to make, wildly customizable, and offer a hilarious shock factor your guests won’t forget. Whether you’re hosting a monster mash or handing out spooky goodies, these gory brains are a no-fuss way to earn Halloween hero status.
Looking for more spooky treats? Don’t miss our Pumpkin Fluff Recipe — it’s sweet, creamy, and perfect for Halloween dessert tables.
PrintMarshmallow Rice Krispies (Bubbles) Halloween Brains
These Marshmallow Rice Krispies (Bubbles) Halloween Brains are a spooky, no-bake treat perfect for Halloween parties. Creepy on the outside and sweet on the inside, they’re fun to make and even more fun to eat.
- Prep Time: 30 minutes
- Cook Time: 0 minutes
- Total Time: 4 hours 30 minutes
- Yield: 15 servings 1x
- Category: Snack, Sweet Treat
- Method: No-Bake
- Cuisine: Modern Australian
- Diet: Vegetarian
Ingredients
- 4 tablespoons butter
- 2 cups pink and white marshmallows
- 1/4 teaspoon salt
- 4 cups Rice Krispies (or Rice Bubbles)
- 1 tube red writing icing (optional)
Instructions
- Line a large tray with non-stick paper.
- Fill a saucepan halfway with boiling water and place on the stove.
- Add the butter and marshmallows to a heatproof bowl and set it over the saucepan.
- Bring the water to a simmer and stir until the marshmallows are fully melted and smooth.
- Add the salt and stir to combine.
- Remove the bowl from heat and mix in the Rice Krispies.
- Lightly oil two spoons and scoop out a mound of mixture, then place it on the tray.
- Oil your fingers and flatten each mound into a brain shape.
- Oil a table knife and press down the center to create a brain crease.
- Repeat until all mixture is used.
- Use red writing icing to decorate the brains for a bloody effect.
- Let the brains set at room temperature for 4–5 hours.
Notes
- Use a mix of pink and white marshmallows for a realistic brain color.
- Work quickly while the mixture is warm for easier shaping.
- Oil your hands and utensils to prevent sticking.
- Store brains in an airtight container for up to 3 days.
Nutrition
- Serving Size: 1 brain
- Calories: 87
- Sugar: 6g
- Sodium: 113mg
- Fat: 3g
- Saturated Fat: 1g
- Unsaturated Fat: 2g
- Trans Fat: 0g
- Carbohydrates: 14g
- Fiber: 0g
- Protein: 0g
- Cholesterol: 8mg