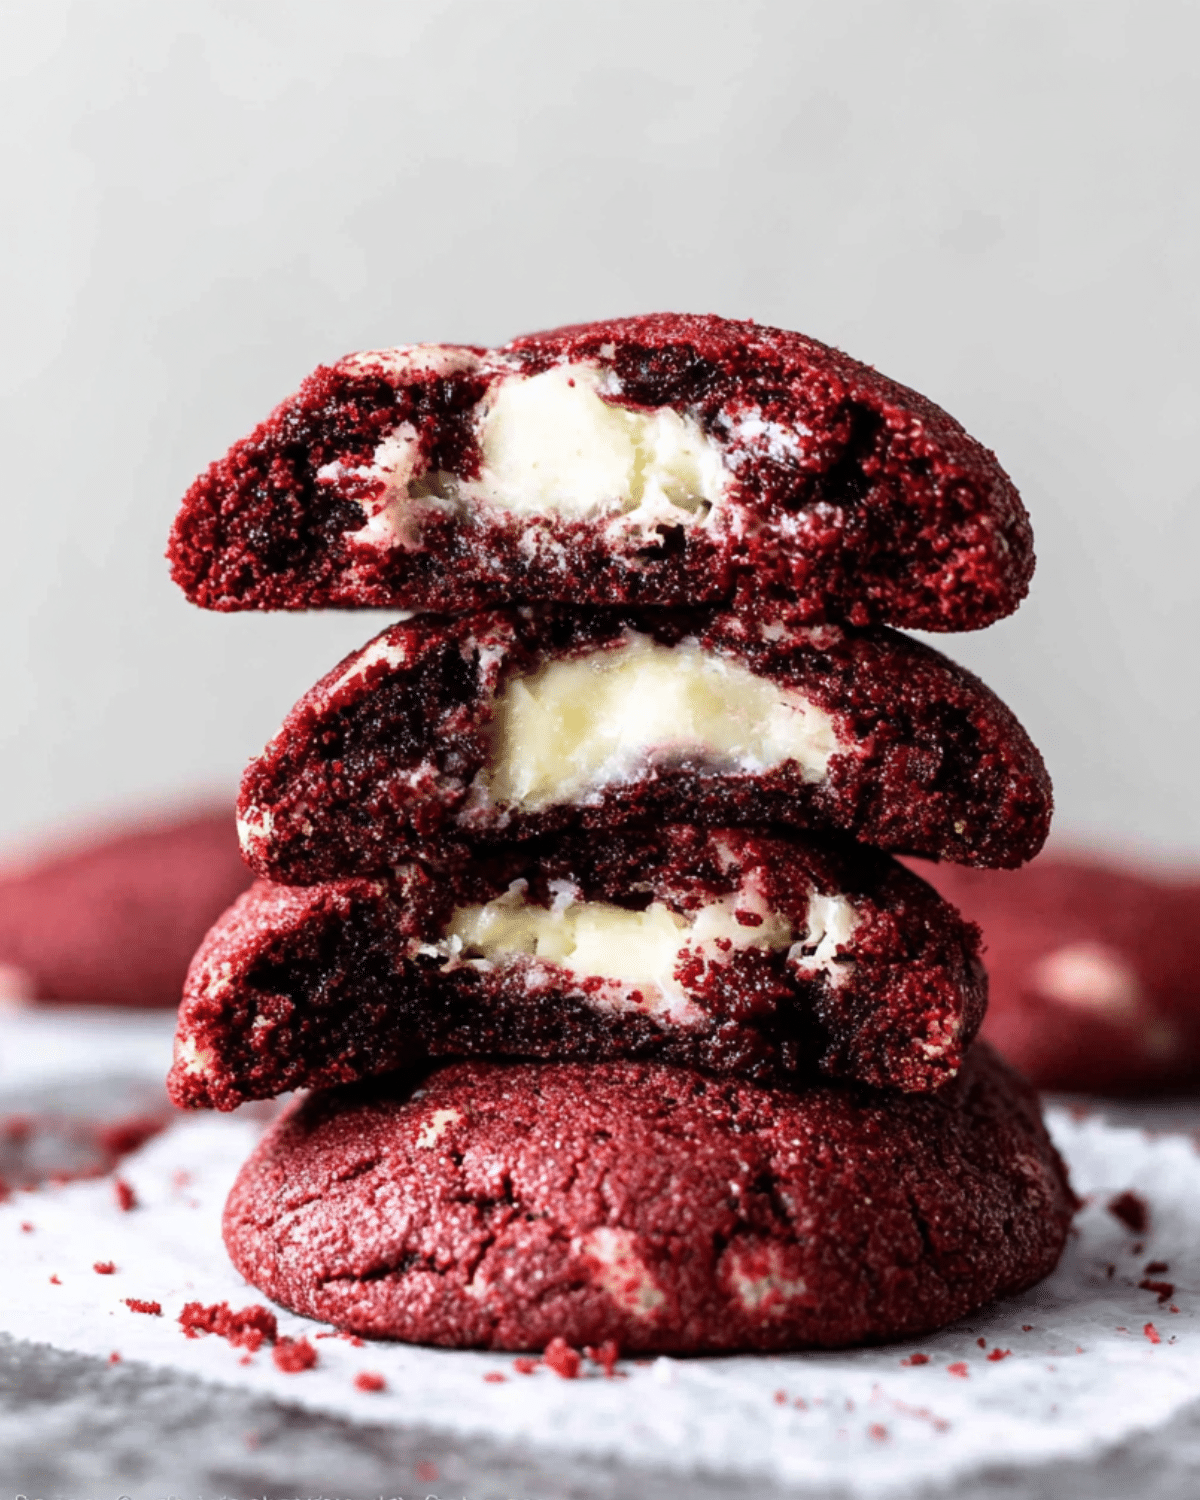
Red Velvet Cream Cheese Cookies bring together the rich cocoa flavor of red velvet cake with the creamy decadence of a cheesecake filling—all in a soft, chewy cookie form. Whether you’re preparing a holiday dessert tray or baking a batch for Valentine’s Day, these cookies always steal the spotlight. Their bright red hue, velvety texture, and surprise cream cheese center make them not just a treat, but a conversation piece. In this article, you’ll learn exactly what makes these cookies so irresistible, the best ingredients to use, and pro baking tips inspired by top pastry creators like Sally’s Baking Addiction.
JUMP TO
Table of Contents
What Makes Red Velvet Cream Cheese Cookies So Special
The Perfect Blend of Cocoa, Vanilla, and Tang
Red velvet is more than just red-colored chocolate. It’s a subtle combination of cocoa, vanilla, and a hint of tanginess from ingredients like buttermilk or vinegar. When these flavors come together in a cookie, the result is a soft, buttery bite with a mild cocoa taste that pairs beautifully with the creamy filling inside. Unlike typical chocolate cookies, red velvet cookies have a lighter flavor profile, making them perfect for those who enjoy balanced sweetness.
Why Cream Cheese Filling Changes Everything
The secret to these cookies’ indulgence lies in the center. The cream cheese filling acts like a built-in frosting—soft, sweet, and slightly tangy. When baked, it firms up just enough to hold its shape while remaining lusciously creamy inside. To achieve this texture, the filling must be chilled before baking. This ensures that it doesn’t melt into the dough. It’s this perfect contrast between the chewy red velvet exterior and creamy core that makes these cookies unforgettable.
The Origin of Red Velvet Flavor and Its Evolution into Cookies
Red velvet cake first gained popularity in the early 1900s, recognized for its striking color and soft crumb. Traditionally, the “velvet” referred to the fine, smooth texture achieved through the combination of cocoa and acidic ingredients. As baking evolved, red velvet became a symbol of celebration—especially around holidays. Transforming this cake flavor into cookies wasn’t just clever; it made red velvet accessible year-round. These cookies deliver that same nostalgic flavor in a convenient handheld treat, making them a favorite among modern bakers.
To explore more traditional red velvet inspirations, visit the Classic Red Velvet Cake guide from Food Network.
Ingredients for Red Velvet Cream Cheese Cookies
Getting the ingredients right is the secret to achieving bakery-quality Red Velvet Cream Cheese Cookies at home. Each component plays a crucial role in flavor, texture, and color. Below is a breakdown of what you’ll need to recreate these soft, chewy, cream-filled delights.

| Ingredient | Quantity | Purpose |
|---|---|---|
| All-purpose flour | 1 ⅔ cups (210g) | Provides structure |
| Unsweetened natural cocoa powder | ¼ cup (21g) | Adds mild chocolate flavor |
| Baking soda | 1 teaspoon | Helps the cookies rise |
| Salt | ¼ teaspoon | Balances sweetness |
| Unsalted butter | ½ cup (113g) | Gives richness and moisture |
| Granulated sugar | ½ cup (100g) | Sweetens and adds crisp edges |
| Brown sugar | ½ cup (100g) | Adds chewiness and depth |
| Large egg | 1 | Binds ingredients together |
| Milk | 1 tablespoon | Softens dough |
| Vanilla extract | 2 teaspoons | Adds aroma and warmth |
| Red food coloring | 1 tablespoon | Creates the classic red hue |
| Cream Cheese Filling: | ||
| Full-fat cream cheese | 4 oz (113g) | Soft, rich filling |
| Confectioners’ sugar | 1 ¾ cups (210g) | Sweetens and thickens |
| All-purpose flour | 1 tablespoon | Stabilizes filling |
| Vanilla extract | ½ teaspoon | Flavor balance |
If you prefer natural coloring, replace artificial dye with 2 teaspoons of beet powder. It provides a subtle, earthy tone without affecting flavor.
Step-by-Step Guide: How to Make Red Velvet Cream Cheese Cookies
Follow this detailed process for flawless cookies every time. Keeping ingredients cold and following the chilling steps are crucial to maintaining that perfect cream cheese center.
1. Prepare the Red Velvet Cookie Dough
In a large bowl, whisk together flour, cocoa powder, baking soda, and salt. In another bowl, beat softened butter, granulated sugar, and brown sugar until creamy. Add the egg, milk, and vanilla extract, and mix until smooth. Slowly combine the dry ingredients with the wet mixture on low speed. Finally, add red food coloring and mix until the dough turns evenly red.
Chill the dough in the refrigerator for at least 1½ hours. This step firms the butter and enhances the chewy texture once baked.
For more cookie texture tips, explore our Ultimate Guide to Perfect Cookie Dough.
2. Make the Cream Cheese Filling
In a separate bowl, beat cream cheese, confectioners’ sugar, flour, and vanilla extract until smooth and thick. Drop teaspoon-sized portions onto a parchment-lined baking sheet and freeze for 1–2 hours. The filling should be cold and firm before assembly—this prevents melting during baking.
If you’d like to experiment with fillings, you can try flavored versions like strawberry cream cheese or chocolate truffle filling. See more creative filling ideas on our Dessert Innovation Page.
3. Assemble the Cookies
Once both dough and filling are chilled, roll one tablespoon of red velvet dough into a ball. Flatten slightly and press a frozen cream cheese portion in the center. Cover it with another small piece of dough and seal all edges, ensuring the filling is fully enclosed.
Roll the stuffed dough balls in granulated sugar to give your cookies a sparkling finish before baking.
4. Bake the Cookies
Preheat your oven to 350°F (177°C). Place the cookies on a parchment-lined baking sheet, spaced 3 inches apart. Bake for 12–13 minutes, or until the edges look set but the centers remain soft. Allow them to cool for 5 minutes before transferring to a wire rack.
For consistent results, always use a kitchen thermometer to ensure even baking. Too hot, and the cookies will brown too quickly before the centers are set.
5. Pro Tips for Perfect Results Every Time
- Keep everything cold: The colder the filling, the better the result.
- Don’t overmix: Overmixing can toughen the dough and flatten your cookies.
- Freeze dough balls for 10 minutes before baking if your kitchen is warm.
- Measure accurately using the spoon-and-level method for flour.
- Use quality vanilla extract for a smoother, bakery-style flavor.
These steps guarantee your cookies have that iconic soft, chewy red velvet bite with a creamy, perfectly centered filling every time.
Baking Tips and Troubleshooting
Even seasoned bakers run into challenges when working with filled cookies. These expert tips ensure your Red Velvet Cream Cheese Cookies come out perfect every time.
Why Chill Time Is Crucial for Flavor and Texture
Chilling both the dough and the filling solidifies the fats and prevents spreading. This step also helps the cookies bake evenly, creating that chewy texture with soft centers. Skipping chill time can cause the filling to leak or the cookies to flatten too much.
Common Mistakes to Avoid (and How to Fix Them)
- Filling leaks out → The filling wasn’t cold enough. Next time, freeze it longer.
- Cookies too dry → Overbaking or too much flour. Always spoon and level your flour.
- Faded red color → Use gel food coloring for brighter results or beet powder as a natural substitute.
- Soft dough → Chill longer or add 1 extra tablespoon of flour.
Ingredient Substitutions and Allergy-Friendly Alternatives
For a dairy-free version, replace cream cheese with vegan cream cheese and butter with coconut oil. Gluten-free flour blends can replace all-purpose flour, but choose one with xanthan gum for stability.
How to Keep the Cream Cheese Filling from Leaking
Always shape the cookie dough completely around the filling, ensuring no cracks or openings. If the dough becomes too warm during shaping, refrigerate the assembled cookies for 10 minutes before baking.
Serving and Storing Red Velvet Cream Cheese Cookies
How to Store for Maximum Freshness
Store cooled cookies in an airtight container at room temperature for up to 3 days. For longer freshness, refrigerate for 1 week. The filling stays soft and creamy even when chilled.
Make-Ahead and Freezing Instructions
You can freeze both unbaked and baked cookies.
- Unbaked cookies: Assemble and freeze for up to 3 months. Bake directly from frozen—just add 2–3 extra minutes to the bake time.
- Baked cookies: Freeze for up to 3 months, then thaw overnight in the fridge.
For a complete step-by-step freezing method, visit How to Freeze Cookie Dough Correctly.
Creative Ways to Serve These Cookies
Serve these cookies on a dessert board, alongside hot cocoa, or as part of a holiday cookie exchange. They also make the perfect Valentine’s Day gift when wrapped individually in clear treat bags.
FAQs About Red Velvet Cream Cheese Cookies
Can I use natural food coloring instead of artificial dye?
Yes. Beet powder or natural red coloring will give a slightly muted shade but still look beautiful and festive.
How do I keep my cookies soft for days?
Store them in a sealed container with a slice of bread—the bread helps maintain moisture without altering the flavor.
Can I make these cookies gluten-free?
Absolutely. Substitute a 1:1 gluten-free flour blend, and make sure it includes a binder like xanthan gum.
Why did my filling disappear during baking?
It likely melted into the dough. This happens when the filling isn’t firm enough before baking. Always chill or freeze before assembling.
What makes red velvet different from chocolate cookies?
Red velvet has less cocoa and more vanilla flavor, giving it a smoother, creamier profile than typical chocolate cookies.
Conclusion: Why These Cookies Deserve a Spot on Your Holiday Table
Red Velvet Cream Cheese Cookies are a show-stopping addition to any dessert spread. With their deep red color, soft texture, and rich cream cheese center, they blend classic red velvet charm with the comfort of homemade cookies. Whether you’re baking for Christmas, Valentine’s Day, or a cozy weekend treat, this recipe is sure to impress family and friends.
PrintRed Velvet Cream Cheese Cookies

These Red Velvet Cream Cheese Cookies combine the classic cocoa and vanilla flavors of red velvet with a luscious cream cheese filling for the ultimate soft and chewy treat. Perfect for holidays, Valentine’s Day, or any dessert table.
- Prep Time: 1 hour 45 minutes
- Cook Time: 13 minutes
- Total Time: 2 hours
- Yield: 18 cookies 1x
- Category: Dessert
- Method: Baking
- Cuisine: American
- Diet: Vegetarian
Ingredients
- 1 ⅔ cups (210g) all-purpose flour
- ¼ cup (21g) unsweetened natural cocoa powder
- 1 teaspoon baking soda
- ¼ teaspoon salt
- ½ cup (113g) unsalted butter, softened
- ½ cup (100g) granulated sugar
- ½ cup (100g) packed light or dark brown sugar
- 1 large egg
- 1 tablespoon (15ml) milk
- 2 teaspoons pure vanilla extract
- 1 tablespoon red liquid food coloring (or ¾ tsp red gel or 2 tsp beet powder)
- Cream Cheese Filling:
- 4 ounces (113g) full-fat cream cheese, softened
- 1 ¾ cups (210g) confectioners’ sugar
- 1 tablespoon (8g) all-purpose flour
- ½ teaspoon pure vanilla extract
- For Rolling:
- ½ cup (100g) granulated sugar
Instructions
- Whisk flour, cocoa powder, baking soda, and salt together in a bowl. Set aside.
- In a large bowl, beat softened butter, granulated sugar, and brown sugar until creamy. Add egg, milk, and vanilla extract; mix well.
- Gradually combine dry ingredients with the wet mixture until a smooth dough forms. Add red food coloring and mix until evenly tinted.
- Cover dough and chill for at least 1½ hours.
- In another bowl, beat cream cheese, confectioners’ sugar, flour, and vanilla until smooth. Drop teaspoon-sized portions onto a parchment-lined sheet and freeze for 1–2 hours.
- Preheat oven to 350°F (177°C) and line baking sheets with parchment paper.
- Shape 1 tablespoon of red velvet dough into a ball, flatten slightly, and place a frozen cream cheese ball in the center. Cover with another dough piece and seal edges completely.
- Roll each stuffed dough ball in granulated sugar and place 3 inches apart on baking sheets.
- Bake for 12–13 minutes, or until edges are set but centers remain soft. Cool for 5 minutes before transferring to a rack to cool completely.
- Store cookies in an airtight container at room temperature for up to 3 days or refrigerate for 1 week.
Notes
- Chilling both dough and filling is essential to prevent spreading and leaking.
- For natural coloring, use 2 teaspoons of beet powder instead of red dye.
- Ensure the cream cheese filling is fully enclosed to avoid leakage.
- Freeze dough balls for 10 minutes before baking if your kitchen is warm.
- For a gluten-free option, use a 1:1 gluten-free flour blend with xanthan gum.
- Unbaked cookies can be frozen for up to 3 months; bake directly from frozen.
Nutrition
- Serving Size: 1 cookie
- Calories: 210
- Sugar: 18g
- Sodium: 120mg
- Fat: 9g
- Saturated Fat: 5g
- Unsaturated Fat: 3g
- Trans Fat: 0g
- Carbohydrates: 29g
- Fiber: 1g
- Protein: 2g
- Cholesterol: 30mg