Boston Cream Fudge is one of those desserts that instantly grabs attention. It blends the classic flavors of chocolate and vanilla into a rich, creamy bite that feels both nostalgic and indulgent. Inspired by the famous Boston cream pie, this fudge version is easier to make and just as satisfying. In this article, you’ll discover everything from ingredients to expert tips, so you can make the perfect batch right at home.
JUMP TO
Table of Contents
What Is Boston Cream Fudge and Why Everyone Loves It
The Inspiration Behind Boston Cream Fudge
Boston Cream Fudge takes its inspiration from the iconic Boston cream pie, a beloved American dessert known for its soft cake, creamy custard filling, and glossy chocolate topping. However, instead of cake layers, this recipe transforms those flavors into a smooth, dense fudge that melts in your mouth. Because of this twist, it’s become a favorite for anyone who loves rich desserts without complicated baking steps.
How It Differs from Traditional Fudge
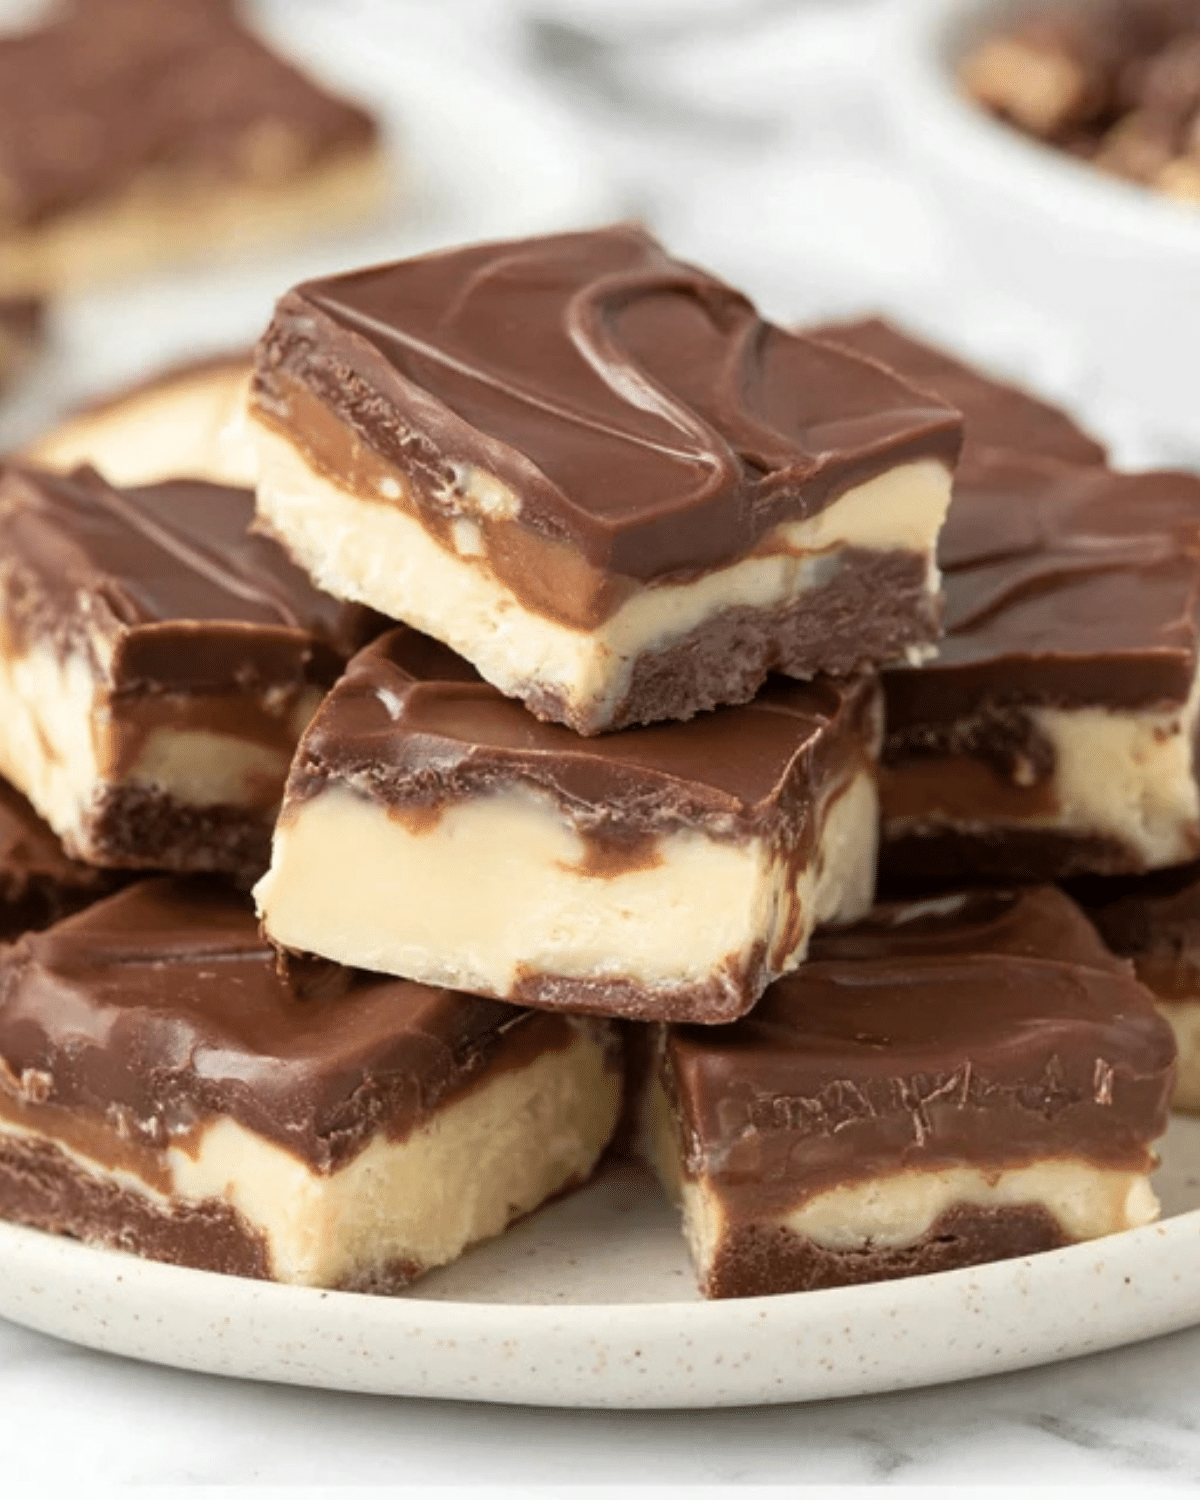
Unlike classic chocolate fudge, Boston Cream Fudge stands out due to its layered structure. While traditional fudge is often uniform in flavor, this version combines a creamy vanilla center with a chocolate top layer. As a result, each bite delivers a balanced mix of sweetness and richness. Additionally, the texture tends to be softer and more decadent, making it feel almost like a cross between fudge and a dessert bar.
Flavor Profile: Chocolate, Vanilla, and Creamy Layers
The flavor of Boston Cream Fudge is what truly sets it apart. First, you get a smooth vanilla base that adds sweetness and a custard-like taste. Then, the chocolate layer brings in depth and a slightly bittersweet contrast. Together, these layers create a dessert that is rich but not overwhelming. Because of this balance, it appeals to both chocolate lovers and those who prefer lighter, creamier treats.
Why This Dessert Is Trending in the USA
Recently, Boston Cream Fudge has gained popularity across the USA, especially among home bakers. One reason is its simplicity—there’s no need for advanced baking skills. Moreover, it’s a no-fuss dessert that can be prepared ahead of time, making it perfect for parties, holidays, or casual gatherings. On top of that, social media has played a big role in its rise, with many people sharing creative variations and presentation ideas.
Ingredients Needed for Boston Cream Fudge

Essential Ingredients Breakdown
To make Boston Cream Fudge, you’ll need a few basic ingredients that work together to create its signature texture and flavor. These include chocolate chips, sweetened condensed milk, butter, vanilla extract, and powdered sugar. Additionally, a pudding-style mix or custard-like component helps form the creamy middle layer. Because each ingredient plays a key role, it’s important to measure them carefully.
Choosing High-Quality Chocolate and Dairy
When it comes to flavor, quality matters a lot. Using high-quality chocolate chips or bars can make a noticeable difference in the final result. Similarly, fresh dairy products like butter and milk enhance the creaminess of the fudge. Therefore, it’s worth investing in good ingredients if you want a truly rich and satisfying dessert.
Substitutions and Variations for Dietary Needs
Although the classic recipe is quite indulgent, there are ways to adjust it. For instance, you can use dairy-free alternatives like plant-based butter and condensed milk substitutes. Additionally, sugar-free chocolate options can help reduce overall sweetness. While these changes may slightly alter the texture, they still produce a delicious version of Boston Cream Fudge.
Ingredient Table for Quick Reference
| Ingredient | Quantity | Purpose |
|---|---|---|
| Chocolate chips | 2 cups | Creates the rich top layer |
| Sweetened condensed milk | 1 can | Adds sweetness and smooth texture |
| Butter | 2 tbsp | Enhances creaminess |
| Vanilla extract | 1 tsp | Boosts flavor |
| Powdered sugar | 2 cups | Forms the base layer |
| Instant pudding mix | 1 package | Creates creamy filling |
Kitchen Tools You’ll Need for Perfect Results
Must-Have Equipment
Before starting, it’s helpful to gather all your tools. You’ll need a medium saucepan, a mixing bowl, a spatula, and a square baking dish. These basics are enough to prepare the fudge without any hassle. Additionally, parchment paper is essential for easy removal once the fudge has set.
Optional Tools for Easier Preparation
While not required, a few extra tools can make the process smoother. For example, using a double boiler helps melt chocolate evenly without burning it. Similarly, an offset spatula allows you to spread layers neatly, giving your fudge a more polished look.
Preparation Tips Before You Start
Before diving in, make sure all ingredients are measured and ready. This step, often overlooked, saves time and prevents mistakes. Also, line your baking dish with parchment paper in advance. That way, once the mixture is ready, you can quickly transfer it without delays.
Step-by-Step Boston Cream Fudge Recipe
Preparing the Vanilla Cream Layer
To begin making Boston Cream Fudge, start with the creamy base layer. First, in a large mixing bowl, combine the powdered sugar, softened butter, and vanilla extract. Then, gradually add the pudding mix to create that signature custard-like flavor. As you mix, the texture should become thick and smooth. If it feels too stiff, you can add a small splash of milk to loosen it slightly.
Once the mixture is ready, press it evenly into a parchment-lined baking dish. Make sure the surface is smooth, because this will form the foundation of your Boston Cream Fudge. After that, set the dish aside while you prepare the chocolate layer. This step is important, since it allows the base to firm up slightly before adding the next layer.
Making the Chocolate Fudge Base
Next, it’s time to create the rich chocolate topping. In a saucepan over low heat, combine the chocolate chips, sweetened condensed milk, and butter. Stir continuously so the mixture melts evenly. As the chocolate begins to melt, you’ll notice it turning glossy and smooth.
Keep stirring until everything is fully combined and silky. However, avoid overheating, because chocolate can burn quickly. Once melted, remove the pan from heat and let it cool for a minute. This brief cooling step helps prevent the chocolate from melting the base layer when poured.
Layering and Setting the Fudge
Now comes the fun part—assembling your Boston Cream Fudge. Carefully pour the melted chocolate mixture over the vanilla base. Then, using a spatula, spread it evenly to cover the entire surface. Try to work gently so the layers remain distinct and don’t mix together.
After layering, place the dish in the refrigerator for at least 3–4 hours. During this time, the fudge will firm up and develop its perfect texture. If you’re in a hurry, you can chill it longer to ensure clean cuts later. Patience really pays off here, since properly set fudge is much easier to handle.
Cutting and Serving Tips
Once the Boston Cream Fudge is fully set, lift it out of the dish using the parchment paper. Place it on a cutting board and use a sharp knife to slice it into squares. For cleaner cuts, wipe the knife between slices.
Serve the fudge slightly chilled for the best texture. Each piece should have a smooth vanilla base and a rich chocolate top. Because of its creamy consistency, it’s perfect for sharing at gatherings or enjoying as a sweet treat after dinner.
Pro Tips to Make the Best Boston Cream Fudge at Home
Common Mistakes to Avoid
Even though Boston Cream Fudge is simple, a few common mistakes can affect the outcome. First, overheating the chocolate can cause it to become grainy. Therefore, always melt it on low heat. Also, skipping parchment paper can make it difficult to remove the fudge later.
Another mistake is rushing the chilling process. If the fudge hasn’t fully set, it may fall apart when cut. So, always allow enough time for it to firm up properly.
Texture and Consistency Secrets
Getting the right texture is key to perfect Boston Cream Fudge. The base should be firm yet creamy, while the chocolate layer should be smooth and slightly soft. To achieve this balance, measure your ingredients carefully and mix thoroughly.
Additionally, using room-temperature ingredients helps everything blend more evenly. This small step can make a big difference in the final texture.
Storage and Shelf Life Tips
Boston Cream Fudge stores very well, which makes it a great make-ahead dessert. Keep it in an airtight container in the refrigerator for up to one week. If you prefer a firmer texture, store it longer in the fridge before serving.
You can also freeze the fudge for up to two months. Simply wrap it tightly and place it in a freezer-safe container. When ready to enjoy, let it thaw in the fridge overnight.
Creative Variations of Boston Cream Fudge
Mini Bite-Sized Fudge Pieces
For parties or gatherings, consider cutting your Boston Cream Fudge into smaller, bite-sized pieces. This not only makes it easier to serve but also adds a fun, snackable element. You can even place each piece in a mini paper cup for a polished presentation.
Boston Cream Fudge with Toppings
Although the classic version is delicious on its own, adding toppings can elevate it even further. For example, you can sprinkle chocolate shavings, crushed cookies, or a light drizzle of melted chocolate on top. These additions bring extra texture and visual appeal.
Healthier or Low-Sugar Alternatives
If you’re looking for a lighter version, there are a few simple swaps you can try. Use sugar-free chocolate chips and reduced-sugar condensed milk to cut down on sweetness. Additionally, plant-based alternatives can make the recipe dairy-free while still maintaining its creamy texture.
FAQs About Boston Cream Fudge
Can I freeze Boston Cream Fudge?
Yes, you can absolutely freeze Boston Cream Fudge. In fact, freezing helps preserve its texture and flavor for a longer time. To do this, wrap each piece tightly in plastic wrap and place them in an airtight container. When you’re ready to enjoy it, simply transfer the fudge to the refrigerator and let it thaw overnight. This way, it keeps its creamy consistency without becoming too soft.
Why is my Boston Cream Fudge too soft or too hard?
If your Boston Cream Fudge turns out too soft, it usually means it hasn’t chilled long enough or the ingredient ratios were slightly off. On the other hand, if it’s too hard, it may have been overmixed or stored improperly. Therefore, always follow the measurements carefully and allow enough time for setting. Also, keeping it refrigerated helps maintain the perfect texture.
How long does Boston Cream Fudge last?
Boston Cream Fudge can last up to one week when stored in the refrigerator. Make sure to keep it in an airtight container so it doesn’t dry out or absorb other flavors. If you need to store it longer, freezing is a great option, as it can extend the shelf life up to two months.
Can I make Boston Cream Fudge without condensed milk?
Yes, you can make Boston Cream Fudge without condensed milk by using alternatives like a homemade milk and sugar mixture or plant-based substitutes. However, keep in mind that condensed milk plays a key role in creating that smooth, creamy texture. So, while substitutes work, the final result may be slightly different in consistency.
Conclusion: Why Boston Cream Fudge Is Worth Trying
Boston Cream Fudge is more than just a dessert—it’s a rich, creamy experience that combines classic flavors in a simple, no-bake format. Because it’s easy to prepare and requires basic ingredients, it’s perfect for both beginners and experienced home cooks. Moreover, its layered texture and balanced taste make it a crowd-pleaser for any occasion.
Whether you’re making it for a family gathering, a holiday treat, or just to satisfy a sweet craving, Boston Cream Fudge delivers every time. With the tips, variations, and step-by-step guide shared above, you now have everything you need to create a perfect batch at home.
PrintBoston Cream Fudge – Easy and Irresistibly Creamy Dessert

Boston Cream Fudge is a rich and creamy no-bake dessert inspired by the classic Boston cream pie, featuring a smooth vanilla custard-like base topped with a decadent chocolate layer.
- Prep Time: 15 minutes
- Cook Time: 10 minutes
- Total Time: 4 hours 25 minutes
- Yield: 16 squares 1x
- Category: Dessert
Ingredients
- 2 cups chocolate chips
- 1 can (14 oz) sweetened condensed milk
- 2 tablespoons butter
- 1 teaspoon vanilla extract
- 2 cups powdered sugar
- 1 package instant vanilla pudding mix
- 2–3 tablespoons milk (as needed)
Instructions
- In a mixing bowl, combine powdered sugar, butter, vanilla extract, and pudding mix. Mix until smooth and thick, adding a little milk if needed.
- Press the mixture evenly into a parchment-lined square baking dish to form the base layer.
- In a saucepan over low heat, melt chocolate chips, sweetened condensed milk, and butter, stirring constantly until smooth.
- Remove from heat and let cool slightly for 1–2 minutes.
- Pour the chocolate mixture over the vanilla base and spread evenly.
- Refrigerate for 3–4 hours or until fully set.
- Lift from the pan, cut into squares, and serve chilled.
Notes
- Do not overheat the chocolate to avoid a grainy texture.
- Use parchment paper for easy removal and clean cuts.
- Allow enough chilling time for best consistency.
- Store in an airtight container in the refrigerator for up to 1 week.
- Freeze for up to 2 months for longer storage.
Nutrition
- Serving Size: 1 square
- Calories: 210
- Sugar: 22g
- Sodium: 60mg
- Fat: 11g
- Saturated Fat: 7g
- Unsaturated Fat: 3g
- Trans Fat: 0g
- Carbohydrates: 26g
- Fiber: 1g
- Protein: 2g
- Cholesterol: 15mg