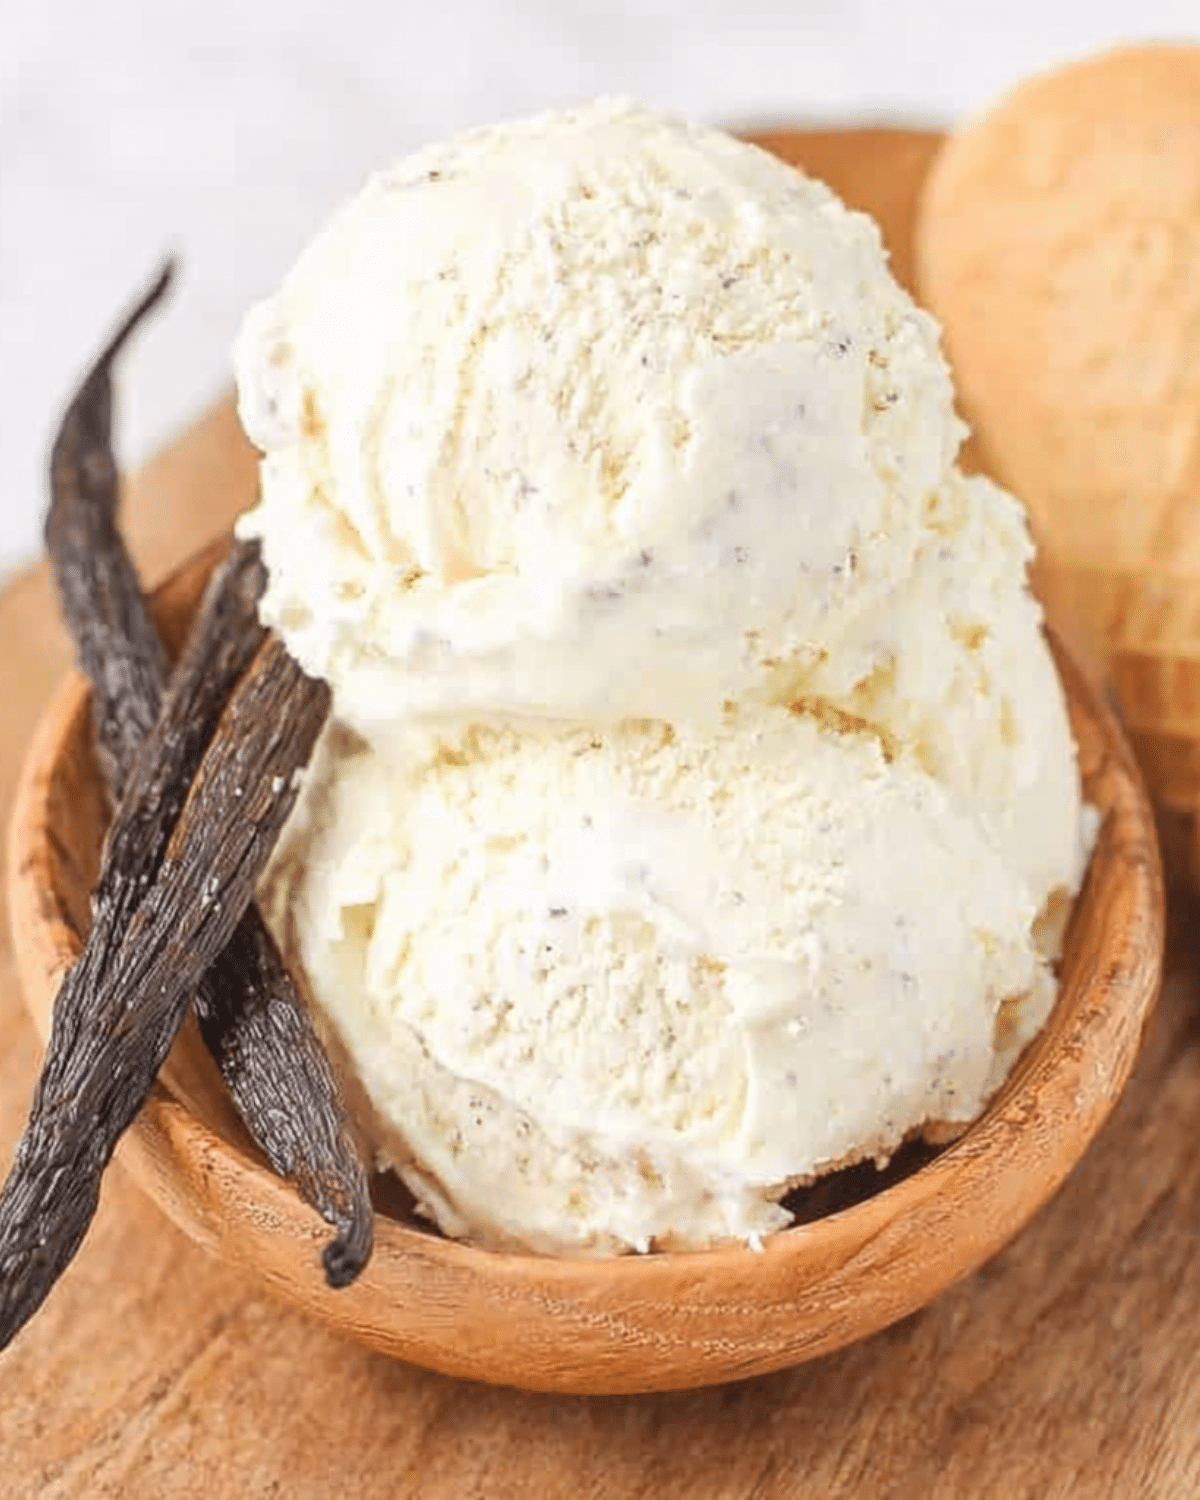
No-Churn Vanilla Ice Cream is the ultimate homemade frozen dessert for anyone who wants rich, creamy ice cream without needing an ice cream maker. Made with just a few simple ingredients, this classic recipe delivers a smooth texture, rich vanilla flavor, and scoopable consistency that’s perfect for serving on its own or alongside your favorite desserts.
Unlike traditional ice cream recipes that require cooking a custard base and churning for hours, this no-churn version comes together in minutes. Sweetened condensed milk provides sweetness and a silky texture, while whipped heavy cream creates a light, airy consistency that freezes beautifully.
Whether you’re preparing dessert for summer parties, birthdays, holidays, or simply satisfying an ice cream craving, this easy recipe is guaranteed to become a freezer favorite.
JUMP TO
Table of Contents
Why You’ll Love This No-Churn Vanilla Ice Cream
This homemade ice cream is simple, creamy, and incredibly versatile.
No Ice Cream Machine Needed
No special equipment is required.
Rich and Creamy
Whipped cream creates a luxurious texture.
Quick to Prepare
The mixture comes together in about 15 minutes.
Perfect for Any Occasion
Ideal for birthdays, holidays, summer gatherings, and everyday desserts.
Easy to Customize
Add chocolate chips, fruit, cookies, caramel, or nuts to create endless variations.
What Is No-Churn Vanilla Ice Cream?
No-Churn Vanilla Ice Cream is a homemade frozen dessert made without an ice cream machine. Instead of churning, whipped heavy cream is folded into sweetened condensed milk and vanilla extract before freezing.
The whipped cream introduces air into the mixture, creating a light texture that mimics traditional churned ice cream. The sweetened condensed milk prevents large ice crystals from forming, producing smooth and creamy results.
The finished ice cream is rich, velvety, and packed with classic vanilla flavor.
Ingredients

Ice Cream Base
| Ingredient | Amount | Purpose |
|---|---|---|
| Heavy whipping cream | 2 cups | Creates light texture |
| Sweetened condensed milk | 1 (14-ounce) can | Sweetness and creaminess |
| Pure vanilla extract | 2 teaspoons | Classic vanilla flavor |
| Pinch of salt | 1 | Enhances flavor |
Optional Mix-Ins
- Chocolate chips
- Crushed cookies
- Brownie pieces
- Caramel sauce
- Chopped pecans
- Fresh berries
- Rainbow sprinkles
- Mini marshmallows
Kitchen Equipment
Gather these kitchen essentials.
- Large mixing bowl
- Electric mixer
- Rubber spatula
- Measuring cups
- Measuring spoons
- Loaf pan or freezer-safe container
- Plastic wrap
Ingredient Tips
Use Cold Heavy Cream
Cold cream whips faster and holds its shape better.
Choose Pure Vanilla
High-quality vanilla extract produces the best flavor.
Fold Gently
Avoid overmixing to keep the whipped cream light and airy.
Freeze Overnight
Longer freezing creates the best texture.
Add Mix-Ins Carefully
Fold extras into the mixture without deflating the whipped cream.
How to Make No-Churn Vanilla Ice Cream
Step 1: Whip the Cream
Using an electric mixer, beat the heavy cream until stiff peaks form.
Step 2: Prepare the Base
In another bowl combine:
- Sweetened condensed milk
- Vanilla extract
- Salt
Mix until smooth.
Step 3: Fold Together
Gently fold the whipped cream into the condensed milk mixture.
Mix only until fully combined.
Step 4: Add Mix-Ins
If using:
- Chocolate chips
- Cookie pieces
- Fruit
- Nuts
- Caramel
Fold them in gently.
Step 5: Freeze
Transfer the mixture into a loaf pan or freezer-safe container.
Smooth the top.
Cover tightly with plastic wrap or a lid.
Freeze for 6 hours, preferably overnight.
Step 6: Scoop
Allow the ice cream to sit at room temperature for 5 minutes before scooping.
Step 7: Serve
Enjoy plain or with your favorite toppings.
Expert Tips for Perfect No-Churn Vanilla Ice Cream
Don’t Overwhip
Stop mixing once stiff peaks form.
Fold Slowly
Maintain as much air as possible in the mixture.
Use Full-Fat Ingredients
They create the creamiest texture.
Freeze Well Covered
This prevents freezer odors and ice crystals.
Let It Soften Before Serving
A few minutes at room temperature makes scooping much easier.
Delicious Variations
One of the best things about No-Churn Vanilla Ice Cream is how easy it is to customize. Once you’ve mastered the basic recipe, you can create countless homemade flavors using simple mix-ins and toppings.
Cookies and Cream Ice Cream
Fold crushed chocolate sandwich cookies into the ice cream base before freezing for a classic favorite.
Chocolate Chip Vanilla Ice Cream
Add mini chocolate chips or chopped dark chocolate for extra crunch and rich chocolate flavor.
Strawberry Vanilla Ice Cream
Swirl fresh strawberry puree or chopped strawberries into the mixture for a fruity summer dessert.
Salted Caramel Ice Cream
Drizzle caramel sauce between layers of the ice cream and sprinkle with flaky sea salt.
Birthday Cake Ice Cream
Mix colorful rainbow sprinkles and pieces of vanilla cake into the base for a festive dessert.
Peanut Butter Swirl
Swirl creamy peanut butter throughout the mixture before freezing for a rich, nutty flavor.
What to Serve with No-Churn Vanilla Ice Cream
This classic dessert pairs beautifully with many homemade treats.
Serve it with:
- Warm brownies
- Chocolate cake
- Apple pie
- Peach cobbler
- Fruit crumble
- Chocolate chip cookies
- Fresh berries
- Waffles
- Pancakes
- Banana bread
For toppings, try:
- Chocolate syrup
- Caramel sauce
- Whipped cream
- Chopped nuts
- Fresh fruit
- Cookie crumbles
- Sprinkles
It’s also perfect for making ice cream sandwiches, milkshakes, and sundaes.
Storage Instructions
Proper storage keeps homemade ice cream smooth and creamy.
| Storage Method | Time |
|---|---|
| Freezer | Up to 2 months |
Store the ice cream in an airtight freezer-safe container.
Press a piece of plastic wrap or parchment paper directly onto the surface before sealing to help reduce ice crystals.
Allow the ice cream to soften for about 5 minutes before scooping.
Can You Make It Ahead?
Absolutely.
No-Churn Vanilla Ice Cream is an excellent make-ahead dessert because it stores well in the freezer for weeks.
Prepare it several days before birthdays, holidays, barbecues, or family gatherings so it’s ready whenever you need a refreshing dessert.
Common Mistakes to Avoid
Underwhipping the Cream
The cream should hold stiff peaks to create the proper texture.
Overmixing the Base
Fold gently to keep the whipped cream light and airy.
Using Low-Fat Cream
Full-fat heavy whipping cream creates the richest consistency.
Freezing Without Covering
Exposure to air can lead to ice crystals and freezer odors.
Scooping Immediately
Let the ice cream soften slightly for easier serving.
Estimated Nutrition
| Nutrient | Amount Per Serving |
|---|---|
| Calories | 310 |
| Carbohydrates | 25g |
| Protein | 5g |
| Fat | 22g |
| Saturated Fat | 14g |
| Fiber | 0g |
| Sugar | 24g |
| Sodium | 70mg |
| Cholesterol | 75mg |
Frequently Asked Questions
Do I need an ice cream maker?
No. This recipe is specifically designed to be made without any special equipment.
Why is sweetened condensed milk used?
It adds sweetness while helping prevent large ice crystals, creating a smoother texture.
Can I add mix-ins?
Yes. Chocolate chips, cookies, fruit, caramel, nuts, and candies all work well.
Why is my ice cream hard?
Homemade ice cream naturally freezes firmly. Let it sit at room temperature for a few minutes before scooping.
Conclusion
No-Churn Vanilla Ice Cream proves that making rich, creamy homemade ice cream doesn’t require expensive equipment or complicated techniques. With just a handful of simple ingredients, you can create a smooth, velvety dessert that’s every bit as satisfying as traditional churned ice cream.
PrintNo-Churn Vanilla Ice Cream: Easy Homemade Creamy Ice Cream Recipe

No-Churn Vanilla Ice Cream is a rich, creamy homemade frozen dessert made with whipped cream, sweetened condensed milk, and vanilla. This easy no-machine recipe delivers smooth, scoopable ice cream that’s perfect for summer and special occasions.
- Prep Time: 15 minutes
- Cook Time: 0 minutes
- Total Time: 6 hours 15 minutes
- Yield: 8 servings 1x
- Category: Dessert
Ingredients
- 2 cups heavy whipping cream, cold
- 1 (14-ounce) can sweetened condensed milk
- 2 teaspoons pure vanilla extract
- 1 pinch salt
- Optional Mix-Ins:
- Chocolate chips
- Crushed cookies
- Brownie pieces
- Caramel sauce
- Chopped pecans
- Fresh berries
- Rainbow sprinkles
- Mini marshmallows
Instructions
- Beat the cold heavy whipping cream until stiff peaks form.
- In a separate bowl, whisk together the sweetened condensed milk, vanilla extract, and salt.
- Gently fold the whipped cream into the condensed milk mixture until fully combined.
- Fold in any optional mix-ins if using.
- Transfer the mixture to a loaf pan or freezer-safe container and smooth the top.
- Cover tightly with plastic wrap or a lid.
- Freeze for at least 6 hours or overnight.
- Let the ice cream sit at room temperature for 5 minutes before scooping and serving.
Notes
- Use cold heavy cream for the best volume.
- Fold gently to maintain a light texture.
- Use pure vanilla extract or vanilla bean paste for the best flavor.
- Cover tightly to prevent ice crystals.
- Store in the freezer for up to 2 months.
- Allow to soften slightly before scooping.
- Add mix-ins without overmixing.
- Perfect for sundaes, milkshakes, and ice cream sandwiches.
Nutrition
- Serving Size: 1/2 cup
- Calories: 310
- Sugar: 24g
- Sodium: 70mg
- Fat: 22g
- Saturated Fat: 14g
- Unsaturated Fat: 7g
- Trans Fat: 0g
- Carbohydrates: 25g
- Fiber: 0g
- Protein: 5g
- Cholesterol: 75mg