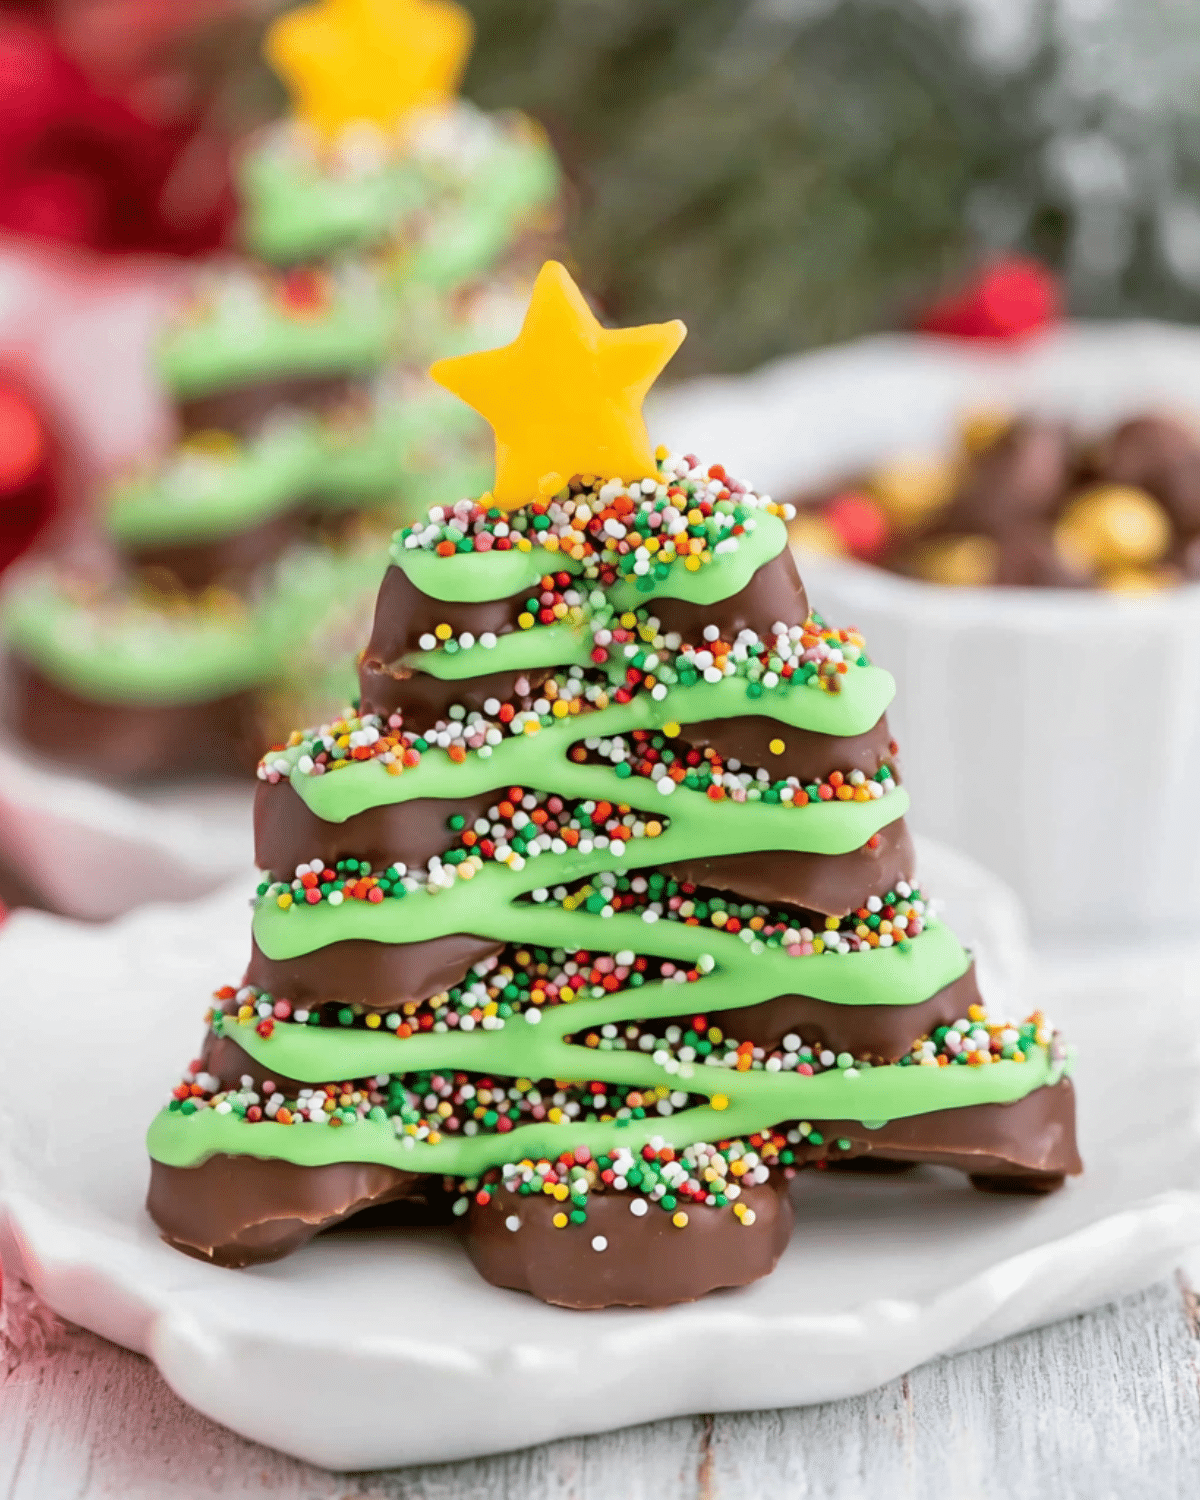
Looking to add a touch of nostalgia, flavor, and festivity to your holiday treats? This REESE’S Candy Christmas Tree recipe is the perfect blend of sweet, simple, and stunning. Whether you’re planning a cozy family night, holiday gifting, or a dessert table everyone will talk about, this no-bake treat checks all the boxes. With creamy peanut butter, smooth chocolate, and festive sprinkles, these tree-shaped candies are an easy upgrade to traditional Christmas goodies. Plus, they’re freezer-friendly and made with ingredients you likely already have. Don’t miss our Pumpkin Cheesecake Truffles if you’re stocking your dessert tray with crowd-pleasers!
JUMP TO
Table of Contents
Why REESE’S Candy Christmas Trees Are the Ultimate Holiday Treat
Nostalgic Flavors of Peanut Butter and Chocolate
Nothing hits the holiday sweet spot quite like peanut butter and chocolate. Inspired by classic REESE’S shapes, these Christmas tree candies bring together everything you love—soft, creamy centers with a rich chocolate coating. They’re essentially a holiday twist on buckeye balls or peanut butter cups, but even more festive.
A Festive Alternative to Store-Bought Candy
Store-bought REESE’S trees are convenient, but they don’t match the taste or charm of homemade. These DIY versions are customizable and perfect for anyone who enjoys putting a personal touch on their holiday creations. You can cut them into different sizes or even dip them in white chocolate with colorful sprinkles for a whimsical effect.
Kid-Friendly, Gifting-Ready, and Party-Perfect
One of the best things about this treat is its universal appeal. Kids can help decorate, and adults will love the rich flavor. They’re ideal for cookie swaps, gift bags, or holiday platters. Looking for inspiration? Try our Fruit Leather Books for another kid-friendly homemade treat!
What You’ll Need to Make REESE’S Candy Christmas Trees
Simple Pantry Ingredients
Here’s what you’ll need:
- Creamy peanut butter
- Unsalted butter (softened)
- Marshmallow fluff
- Vanilla extract
- Powdered sugar
- Chocolate melting wafers (milk, dark, or white)
- Green gel food coloring
- Assorted sprinkles
These ingredients come together to form a fluffy, flavorful dough that sets perfectly when chilled.
Essential Tools and Candy Decorations
You don’t need fancy tools, but having these on hand will make the process easier:
- Mixing bowl and spatula
- 8×8 baking pan
- Parchment or wax paper
- Sharp knife or cookie cutters
- Microwave-safe bowl for melting chocolate
- Ziplock bag for decorating drizzle
Peanut Butter Ball Dough vs. Traditional Buckeyes
This recipe starts with a variation of the classic peanut butter ball (similar to buckeyes), but instead of rolling into spheres, the dough is pressed flat and cut into triangles or tree shapes. That makes it quicker and more visually fun—perfect for a holiday twist. For a fun cookie-based twist, check out our Apple Oreo Balls!
Choosing the Right Chocolate for Dipping
Milk vs. Dark vs. White Chocolate Options
Milk chocolate gives you the iconic REESE’S flavor, but dark chocolate adds a rich, bittersweet depth. White chocolate offers a snowy canvas for colorful decorations. You can even mix and match to create a variety pack of tree candies that pop on a holiday platter.
Tips for Melting Chocolate Perfectly Every Time
Avoid scorched chocolate by microwaving in 30-45 second intervals at 50% power. Stir frequently and use quality chocolate wafers, which melt smoother than chips. Ghirardelli, Merckens, or similar brands are ideal.
Shapes, Sizes, and Styling Ideas for Candy Trees
Hand-Cut Triangles or Cookie Cutter Trees
Don’t have a tree-shaped cutter? No worries. Simply cut the chilled dough into strips and slice diagonally to form triangles. It’s easy and gives that tree-like appearance. If you want more defined edges, metal cookie cutters work best.
Drizzles, Dips, Sprinkles, and Stars
Get creative with your decorations! Use white chocolate dyed green for drizzles, add red and green sprinkles, or top each tree with a sugar star. Want more no-bake holiday cuteness? Don’t miss our Ruler Rice Krispies and Notebook Paper Rice Krispies Treats—great for classroom gifts too!
Prepare the Peanut Butter Dough
Mixing, Measuring, and Consistency Tips
Start by combining softened butter, creamy peanut butter, a pinch of salt, marshmallow fluff, and vanilla extract in a large mixing bowl. Beat the mixture until it’s smooth and creamy. Gradually add powdered sugar, mixing well after each addition. You’re aiming for a soft, pliable dough—not too sticky, not too dry. The dough should hold its shape when pressed but still be easy to work with.
Pressing the Dough for Freezing
Line an 8×8-inch pan with parchment or wax paper. Press the peanut butter mixture evenly into the pan. Use another sheet of parchment paper to smooth the top and make it even. Pop it into the freezer for about an hour. This step is essential—it firms up the dough, making it easier to cut clean shapes.
Cut and Shape the Trees with Precision
Knife-Cut Triangle Technique
Once chilled, lift the firm dough out of the pan using the edges of the parchment. Cut the block into four vertical strips. Then, cut each strip diagonally to form triangles—your “trees.” This free-hand method gives a rustic, homemade look that everyone loves.
Cookie Cutter Method for Uniform Trees
If you prefer more defined, symmetrical trees, use a tree-shaped cookie cutter. This method gives the candies a uniform appearance, perfect for gifting or showing off on a dessert board. You may need to re-roll the scraps a couple of times. For another easy-to-make treat using minimal ingredients, check out our 3-Ingredient Pencil Cookies.
Dipping Like a Pro: Chocolate-Coating Techniques
Fork Lift and Tap Method
Melt the chocolate wafers in a microwave-safe bowl at 50% power, stirring every 30–45 seconds until smooth. Drop one candy tree at a time into the chocolate. Use a spoon to cover it completely, then lift it out with a fork. Gently tap the fork on the edge of the bowl to remove excess chocolate and avoid thick pooling at the bottom.
Avoiding Chocolate Puddles Underneath
Place the dipped trees on a parchment-lined tray. Let them sit until the chocolate hardens. Once set, use a small sharp knife to trim away any chocolate that may have pooled around the base for a cleaner presentation.
Decorate and Personalize Your Candy Trees
White Chocolate Drizzles with Food Coloring
Melt white chocolate wafers and tint them with a few drops of green gel food coloring. Pour the melted green chocolate into a zip-top bag, snip off one corner, and drizzle over the chocolate-covered trees in a zigzag motion. It adds a “garland” effect that’s both fun and festive.
Adding Festive Holiday Sprinkles
While the drizzle is still soft, add sprinkles immediately. Use red and white nonpareils, mini candy canes, gold stars, or crushed peppermint for variation. You can also place a single candy star at the top of each tree to finish the look.
Storage Tips to Keep Them Fresh and Tasty
Room Temperature vs. Refrigerator vs. Freezer
Depending on when you plan to enjoy them, here’s how to store your REESE’S Candy Christmas Trees:
- On the counter: Store in an airtight container with parchment and a paper towel layer. Keeps for 2–3 days.
- In the fridge: Best for keeping them fresh up to a week (5–7 days).
- In the freezer: Wrap individually in plastic and place in a freezer bag. Freeze up to 2 months. Note: chocolate may slightly discolor after thawing.
Avoiding Moisture and Odor Transfer
Always keep candies away from moisture and strong-smelling foods (like onions or garlic) to prevent flavor transfer. Use odor-blocking containers if freezing.
Smart Candy-Making Tips You’ll Wish You Knew Sooner
Keep Trees Cold While Dipping
Only take a few tree cutouts out of the fridge at a time. They coat best when chilled, so this method helps maintain firmness and keeps the chocolate set quickly.
Use Good-Quality Chocolate for Best Results
Not all chocolate is equal. Use high-quality melting wafers such as Ghirardelli or Merckens for a silky-smooth finish. Avoid using chocolate chips, as they tend to be thicker and harder to work with.
Creative Ways to Gift or Serve Your REESE’S Candy Trees
Packaging in Cellophane with Ribbon
Once your trees are fully set, wrap them individually in cellophane bags. Tie each with holiday ribbon for stocking stuffers, classroom gifts, or Secret Santa exchanges. Add a custom gift tag for a personalized touch.
Holiday Platter or Dessert Bar Ideas
Arrange your candy trees with other holiday favorites like cookies, fudge, and truffles. A themed dessert board adds visual wow-factor. Discover great ideas like our Notebook Paper Rice Krispies Treats or the playful Ruler Rice Krispies to pair with your trees on a kid-friendly platter.

FAQ About REESE’S Candy Christmas Trees
Can I use natural peanut butter?
It’s not recommended. Natural peanut butter tends to separate, making the dough greasy and harder to work with. Stick with commercial creamy peanut butter for best results.
Can I freeze them ahead of time?
Yes! Freeze the shaped peanut butter trees (before or after dipping) in an airtight container for up to 2 months. For best results, thaw in the fridge overnight.
What to do with leftover chocolate?
Don’t toss it! Use leftover melted chocolate to coat pretzels, dip strawberries, or pour into molds. You can even drizzle it over ice cream or popcorn for a quick dessert.
Can I use molds instead of shaping by hand?
Absolutely. Candy molds work great if you want perfectly uniform shapes. Simply coat the mold with melted chocolate, add peanut butter filling, and seal with more chocolate before setting.
Conclusion: Make This Holiday Sweet with REESE’S Candy Christmas Tree
From the first creamy bite to the last sprinkle of joy, these REESE’S Candy Christmas Trees are everything a holiday treat should be—easy, delicious, and full of festive spirit. Whether you’re making them for your family, gifting to friends, or stacking them on a dessert tray, this no-bake recipe brings cheer to every bite. Looking for more homemade joy? Don’t miss our 3-Ingredient Pencil Cookies—they’re as simple as they are sweet.
PrintREESE’S Candy Christmas Tree
REESE’S Candy Christmas Trees are a no-bake holiday dessert made with a soft peanut butter filling, dipped in rich chocolate, and decorated with festive sprinkles. Perfect for gifting, holiday platters, or family fun.
- Prep Time: 25 minutes
- Cook Time: 0 minutes
- Total Time: 1 hour 30 minutes (includes chilling)
- Yield: 28 trees 1x
- Category: Dessert
- Method: No-Bake
- Cuisine: American
- Diet: Vegetarian
Ingredients
- 6 tablespoons unsalted butter, softened
- 1/2 cup creamy peanut butter
- 1/4 cup marshmallow cream
- 1/2 teaspoon vanilla extract
- Pinch of salt
- 2 cups powdered sugar
- 1 (10-ounce) bag chocolate melting wafers
- 1/2 cup white chocolate wafers
- Green gel food coloring
- Assorted sprinkles
Instructions
- In a large bowl, mix softened butter, creamy peanut butter, marshmallow cream, vanilla extract, and salt until smooth.
- Gradually add powdered sugar and mix until a soft, pliable dough forms.
- Line an 8×8-inch pan with parchment paper and press the dough evenly into the pan. Freeze for 1 hour.
- Remove dough from the pan and cut into 4 vertical strips. Cut each strip diagonally to create triangle shapes.
- Refrigerate triangles while preparing chocolate.
- Melt chocolate wafers in a microwave-safe bowl at 50% power, stirring every 30-45 seconds until smooth.
- Dip each peanut butter tree in melted chocolate using a fork, tap off excess, and place on parchment to set.
- Melt white chocolate, tint with green food coloring, and drizzle over trees using a zip-top bag.
- Add sprinkles immediately before chocolate sets. Let candies harden completely before serving or packaging.
Notes
- Use high-quality chocolate wafers for best coating results.
- Only remove a few trees from the fridge at a time to prevent softening during dipping.
- Freeze shaped dough up to 2 months before dipping.
- Use cookie cutters for more defined tree shapes.
- Store in an airtight container to maintain freshness.
Nutrition
- Serving Size: 1 tree
- Calories: 151
- Sugar: 15g
- Sodium: 52mg
- Fat: 8g
- Saturated Fat: 4g
- Unsaturated Fat: 3g
- Trans Fat: 0g
- Carbohydrates: 18g
- Fiber: 1g
- Protein: 2g
- Cholesterol: 9mg